Think, Draw, Art!

for art lovers

  • Home
  • Gallery
  • Contact
  • Recent Articles
  • Article Categories
    • Daz Studio
    • 3D Art
    • 2D Art
    • Contest
You are here: Home / Daz Studio / How to Combine Multiple Poses in Daz Studio

How to Combine Multiple Poses in Daz Studio

We are a Daz3d affiliate and we use affiliate links in our pages.

by shibashake 13 Comments


DAZ Studio 4 - Create 3D Art for Free

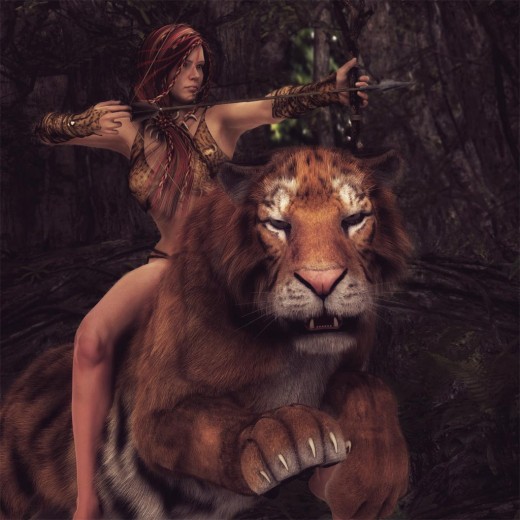
In the image below I combined together a riding pose at the bottom and an archery pose at the top. By combining these two poses together, I was able to create a more unique render, without too much effort.

Doing so will also allow us to significantly expand our pose repertoire, simply by just using our existing poses in new ways.

In this tutorial, I talk about how I combine poses in Daz Studio. It is quite simple to do, and I was able to start generating interesting fantasy art with it, even as a Daz Studio beginner.

Warrior woman riding on a tiger while shooting a bow and arrow.
Composed pose for Olympia figure – riding pose and archery pose. Rendered in Daz Studio 4.6 Pro with simple distant and UE2 lights. Post-work in Photoshop.

How to Combine Poses in Daz Studio

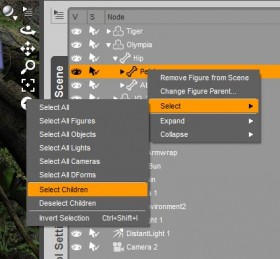
Screen-shot of how we select the pelvis of our figure, and its children, all the way down to the feet.
Selecting the pelvis and all of its children.

To pose the Jungle Warrior figure in the image above,

  1. I first applied a horse riding pose.
  2. Next, I placed her properly on top of the tiger.
  3. Then, I open up my figure (Olympia 6) node in the Scene panel.
  4. I select the Pelvis section, right click, and choose the Select All Children option (see right). This selects the pelvis, right and left thighs, all the way down to the feet.
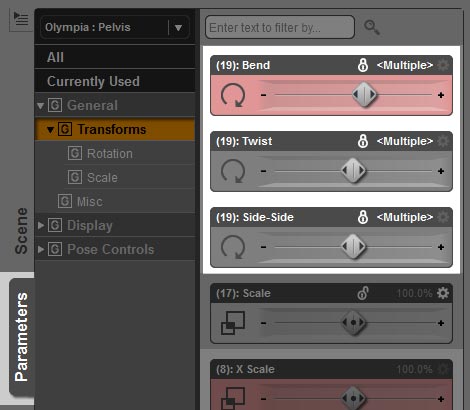
  5. After making the selection, I open the Parameters tab and lock the values for Bend, Twist, and Side to Side. This locks my figure pose from pelvis downwards (see below).
  6. Screen shot of how I lock the pose of the figure's pelvis and its children (i.e. down to her feet).
    After making the selection, I open the Parameters tab and lock the values for Bend, Twist, and Side to Side.
  7. Now, when I apply poses to my figure, only her upper body will be affected. I am now free to try out various archery poses until I find one that fits. Some tweaks may be necessary to make the resulting pose look natural.

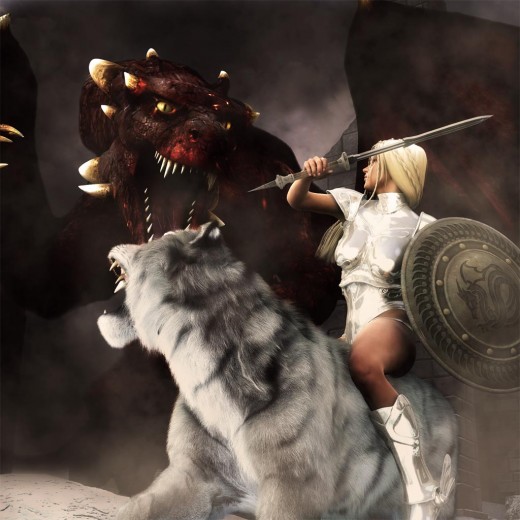
Finally, I get a cool and unique pose of an archer girl riding a tiger. Below, I use the same process to create a sword wielding warrior girl, riding on a Siberian Tiger, while battling a fierce dragon.

White knight in shining armor sitting on a white Siberian Tiger, battling with a large dragon.
Rendered in Daz Studio 4.6 Pro with Distant Lights and the UE2 light. Post-work in Photoshop.

How to Pose Only One Part of a Figure

Another nifty trick is to lock an entire figure, then only release a small part, for example a hand or leg for posing. To do this-

  1. Right-click on the root of a figure, and choose Select Children.
  2. Go to the Parameters tab and select the Transform option.
  3. Lock the values for Bend, Twist, and Side to Side, similar to what we did before. This will lock the pose of the entire figure.
  4. Finally, we select the section of the figure we want to alter (e.g. right arm).
  5. Right-click and choose Select Children.
  6. Unlock the values for Bend, Twist, and Side to Side.
  7. When we apply a new pose, it should only affect the right arm of our figure.

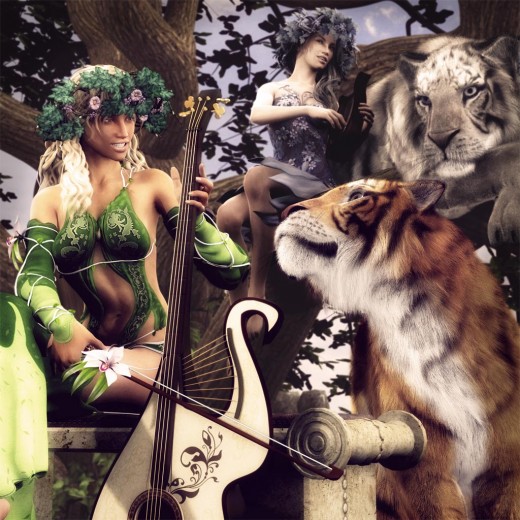
For example, in the One Sweet Song image below, I used this process to pose my summer girl’s arms so that she is properly holding the cello.

Summer fairy playing a cello together with her tiger familiar. Winter fairy playing a lyre up on a tree with her white Siberian Tiger.
Rendered in Daz Studio 4.6 Pro, with post-work in Photoshop. This image also uses the Look at My Hair free player.

How to Zero-Out Only One Part of a Figure

Suppose I just want to zero out an arm all the way down to the fingers.

  1. Right-click on the target arm, and choose Select Children.
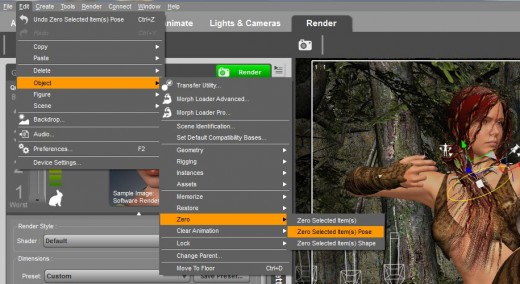
  2. Go to the Edit menu at the top of the Daz Studio interface. Then select Object >> Zero >> Zero Selected Item(s) Pose.
Screen-shot for how to zero out the pose of only certain selected items.
How to Zero-Out Only One Part of a Figure

Saving Partial Poses

We can save partial poses by drilling down on our selected figure, and just picking the parts that we want to save. For example, suppose I just want to save the bow-grip pose of my figure.

  1. I would select the target parent figure in my scene.
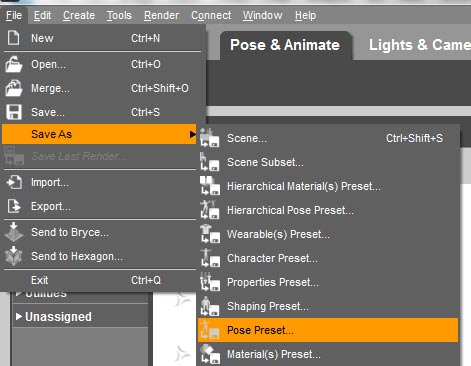
  2. I go to File >> Save As >> Pose Preset.
  3. Screen-shot of how to save my own pose presets in Daz Studio 4.6.
    How to save a partial pose.
  4. I type in my pose present filename.
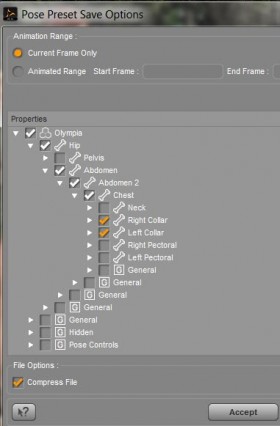
  5. Screen-shot of the Pose Preset Save Options screen and how I choose to only save a partial pose of both arms in my figure.
    How to only save the arm bow-grip pose of my Olympia figure.
  6. After this, I get a pop-up menu titled Pose Preset Save Options. I deselect Olympia, and then drill down on the figure until I get to the parts I want to save. In this case, I only want to save the pose of both arms so I select Right Collar and Left Collar.
  7. Once I am done selecting the parts of my figure I want to save in my pose present, I click on the Accept button. This saves out a partial pose.

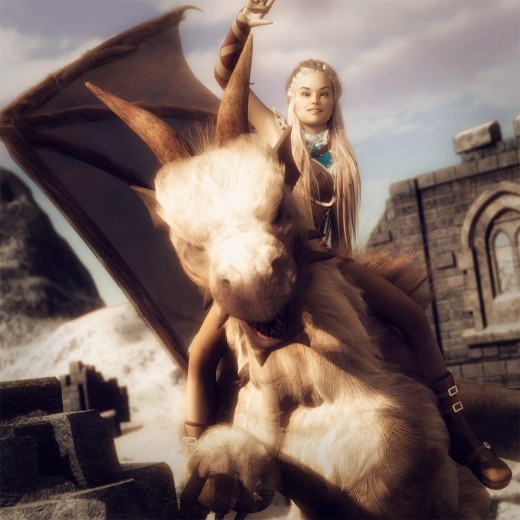
Finally, below is another combined pose with a girl riding on a dragon, and waving goodbye before she takes off.
Combined pose of a girl riding on her dragon, and waving goodbye before take-off.
Girl Riding on a Dragon. Rendered in Daz Studio 4.6 Pro, Post-work in Photoshop.

Check Out the Latest Sales at Daz3D

daz sale banner
DAZ Studio FREE 3D MODELS AND SOFTWARE

Leave a Reply Cancel reply

Your email address will not be published. Required fields are marked *

Comments

  1. Jan Freeman says

    September 3, 2020 at 11:49 am

    Totally awesome tutorial!! I was able to lock Mavka in DS in her violin playing pose, then pose her lower parts in a sitting position!! Thank you so much!!!

    Reply
    • shibashake says

      September 3, 2020 at 6:03 pm

      Yeah, I do that all the time. It is very useful! 🙂

  2. luigi iannelli says

    September 6, 2016 at 7:52 am

    it doesn’t work for me on genesis 2 :(….also if i lock some parts parameters,when i apply the poses they changes anyway

    Reply
  3. Lisa says

    August 2, 2016 at 12:28 pm

    Another great tutorial. I’m still learning! I have a pose I love, but the arms are not what I need, this is great.

    Reply
    • shibashake says

      August 5, 2016 at 5:35 pm

      Thank you Lisa! 😀

  4. Jayne Wilson says

    April 14, 2016 at 6:42 am

    Wow – whenever I read your articles it’s like light bulbs go on over my head. I always learn something new! I can’t believe I have been using DAZ since 2007 and never knew how to lock parts of a pose! I have always used stock poses and then spent hours manually tweaking the bit I want to be different. This is great news! Thank you, thank you, thank you!

    Reply
    • shibashake says

      April 16, 2016 at 3:40 pm

      Haha, you are very welcome. Daz Studio has a lot of cool functionality, but I think because it is not well documented, they are not easy to find. I am always very excited when I find new stuff that can be done with it. 😀

  5. claude says

    September 1, 2015 at 9:03 am

    Hi, I’ve read your different papers above and will keep them somewhere for future use. May be you can help me in solving the following problem. When I want to animate M4 or M5 with DAZ3d 4.8 while the character walks his feet keep staying at a 45° angle which makes him appear to walk on his heels which is ridiculous! I tried to correct the feet’s position but as soon as the animation begins the feet resume their awkward position. Any idea how I could fix that. I’m a beginner as far as DAz is concerned. Thanks in advance. Claude from Paris-France.

    Reply
    • shibashake says

      September 7, 2015 at 2:39 pm

      Hello Claude, so sorry for the late reply. I am afraid I do not do animation on Daz Studio so I do not have experience in this area. Have you tried posting in the Daz3D forum? There are usually many helpful people over there.

  6. Anonymous says

    August 1, 2015 at 2:14 pm

    I love your tips and tricks, they are great for us new DAZers lol keep them coming!

    Reply
    • shibashake says

      August 1, 2015 at 10:13 pm

      Thank you. 🙂

  7. Markus Barnick says

    June 17, 2014 at 2:29 pm

    Great idea to lock the bones partially before posing!

    Reply
  8. Brandon says

    March 13, 2014 at 8:27 pm

    Nice article (and great looking site, btw). An interesting way to get fairly dynamic poses from just about any model is use puppeteer. The idea is, you set up a wide range of poses and capture them individually on puppeteer. After that, you use the preview to shift your model through the various poses, saving ones that you like as you described above.

    I find this useful for a couple of reasons. First, Most poses are designed for a generic model (Genesis 2 Female, Victoria 5, Aiko 4, etc, etc). Having the computer shift to a new pose allows you to see more natural poses for that character. Besides, most preset poses are far to stiff to feel natural. Seeing your model move “loosens” them up a bit and gives you a better idea of yours models qualities.

    Second, you do this for individual body parts, or the entire model. I love using this technique for expressions and hand gestures. You can also use this to pose hair and clothing, getting props to bend in ways that are hard to do with dials or pose tools.

    Thanks for the good read,
    Happy Rendering!

    Reply

Recent Posts

  • Duality of life and death represented by a day of the dead girl with black flowers and butterflies on her headdress surrounded by skeletons. Gothic fantasy woman art. Daz Studio Iray image.What Does Our Art Say About Us?
  • Side by side face comparisons of out-of-the-box Millawa 8 face and skin and multiple tweaked Millawa 8 face and skin.Making Skin Pop with the Daz Studio Iray Uber Shader - Part 2
  • Side by side Victoria 8.1 face comparison of Daz Studio's PBR Iray Skin Shader and the Iray Uber Shader..Making Skin Pop with the Daz Studio Iray Uber Shader - Part 1
  • Item used: VR X01 BYOS Modular by Studio360.3D-Art Contest Winners ~ April 2020
  • Qualifying item used Inside Linday's Daz Studio Iray Scenes by Linday3D-Art Contest Winners ~ March 2020

Recent Comments

  • Side by side face comparisons of out-of-the-box Millawa 8 face and skin and multiple tweaked Millawa 8 face and skin.Making Skin Pop with the Daz Studio Iray Uber Shader – Part 2
    • Adil
      - Hi,I hope everything is good at your end. Please if you can help me with light scene duf file for ...
    • jane
      - I can not write 0.24 or 0.24 after 0. doesnt work. would you share your settings?
  • Duality of life and death represented by a day of the dead girl with black flowers and butterflies on her headdress surrounded by skeletons. Gothic fantasy woman art. Daz Studio Iray image.What Does Our Art Say About Us?
    • Plaiades
      - Dear Shiba,i am a long time admirer of your art and have missed you in the DAZiverse. Over a year ...
    • K Smith
      - Thank you for sharing this, a lot of it resonated with me and I know some of the pain you have been through. ...
  • Side by side Victoria 8.1 face comparison of Daz Studio's PBR Iray Skin Shader and the Iray Uber Shader..Making Skin Pop with the Daz Studio Iray Uber Shader – Part 1
    • Foxy
      - Hi, can you save your settins and share with us?

Copyright © 2023 · Genesis Skins by ShibaShake · Terms of Service · Privacy Policy ·