I am starting to play around more seriously with the Iray renderer in Daz Studio. The great thing about Iray, is that we can create realistic looking renders without having to muck around too much with lighting. Another really big advantage of Iray, is that we can get pretty good render results in a fairly short amount of time, if we have a good nVidia graphics card.
In this tutorial, I will describe how I started out with Daz Studio Iray, and how I created a simple realistic render from start to finish. This tutorial is intended for Iray beginners who are already familiar with the standard Daz Studio Interface.
If you are only starting to use Daz Studio, then check out this Daz Studio for Beginners tutorial.
1. Creating the Scene and Materials
I create the scene in the same way as I would in regular Daz Studio. However, one very important aspect of getting a scene to look right in Iray is in using the right materials.
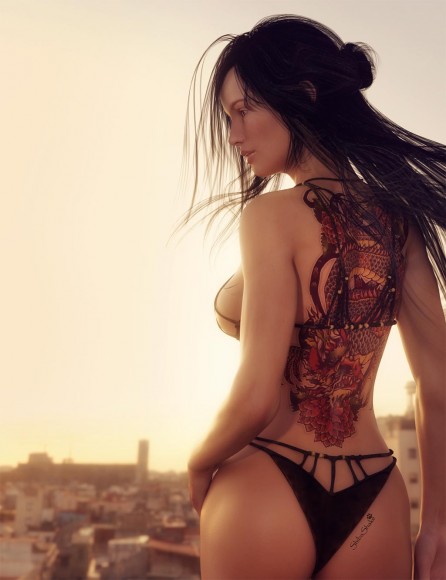
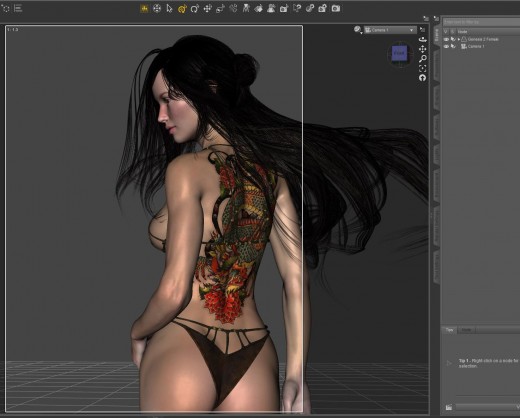
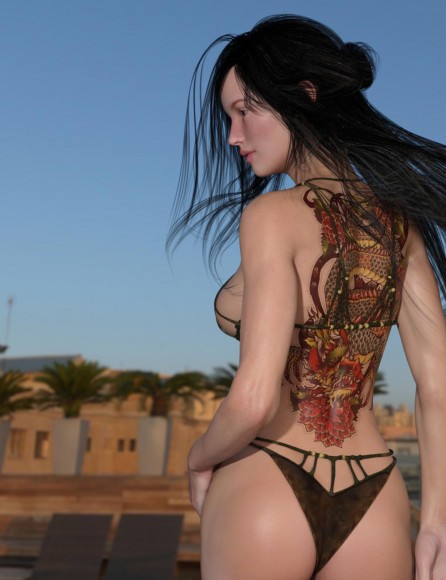
In this tutorial, I make a very simple scene with a female figure and a dragon tattoo on her back. She has interesting, long, wind-blown hair and is wearing a bikini. I make sure to use a highly detailed and realistic looking skin on my human figure. In this example, I am using the Bambolina skin by Tempesta3d. I also get pretty good results from the Daz3d Elite skins that I got from Michael 6 HD Add-On and Victoria 6 HD Add-On.
This simple scene allows me to focus on learning the basic material and lighting aspects of Iray.
After I finish creating my scene, I need to apply Iray shaders to all of my scene objects (figures, clothing, props, environment). One simple way to do this, is to –
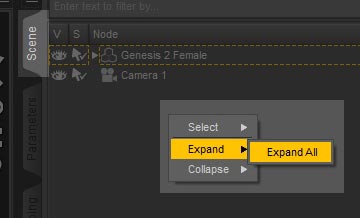
- Click on the Scene Tab. Then, right-click on the Scene pane, and select Expand > Expand All.
- I do Ctrl-A to select all items in my scene pane. Then I Ctrl-click to un-select lights and cameras.
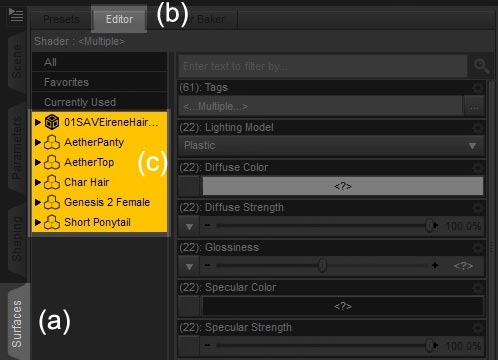
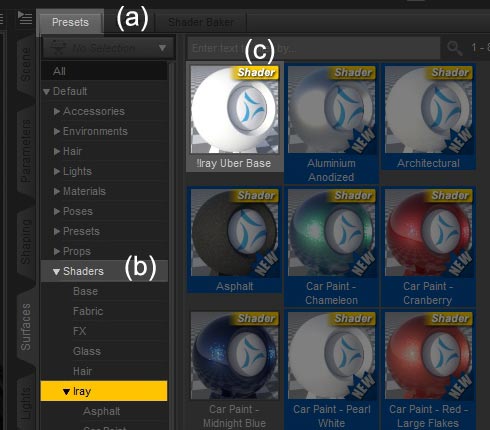
- Next, (a) I click on the Surfaces Tab, (b) click on Editor, and (c) select all the objects within it
- Now, (a) I click on Presets. Within the Presets pane, (b) I select Shaders > Iray. If you are not using the Smart Content functionality within Daz Studio, you can get at the Iray shaders through your Content Library by going to Shader Presets > Iray > DAZ Uber in your Daz Studio directory. Finally, (c) I double click on the !Iray Uber Base shader to convert all the objects in my scene to using Iray shaders.
- Note that Iray also has specialized shaders for glass, metal, water, fabric, leather, and more. At this point, I identify any special surfaces in my scene that fall into these categories, and assign them accordingly.
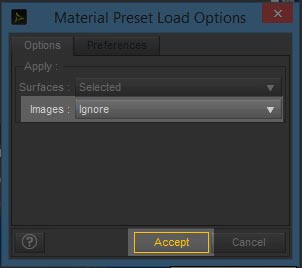
- I do Ctrl-double click if I want to keep the original textures of my selected objects. This will open up a pop-up window. I select Ignore, and then click on Accept.
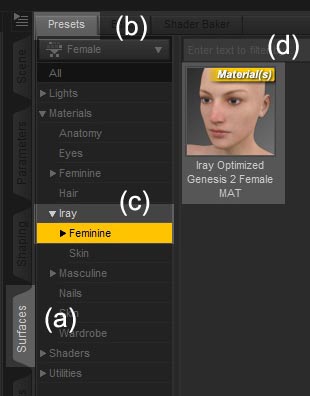
- There are also specialized shaders for Genesis 2 males and females. These shaders will use the existing skin textures that we have on our figure. Therefore, I select my female figure in the Scene pane, (a) go to the Surfaces Tab, (b) click on the Presets button, and (c) select Materials > Iray > Feminine. (d) I double click on the Iray Optimized Genesis 2 Female MAT to apply this shader on my figure.
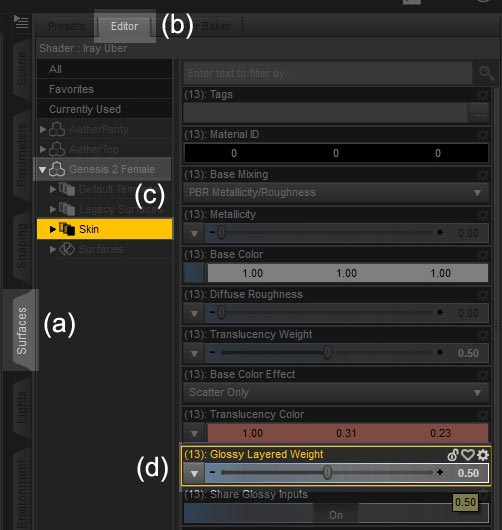
- Finally, I tweak my surfaces as needed. I find that the Iray skin shaders are a bit too glossy/shiny for my taste. Therefore, I select my G2F figure, go to Surfaces > Editor. Open up Genesis 2 Female and select Skin. Then I change the Glossy Layered Weight to 0.5.
This finishes the material setup of my simple scene. As I learn more of Iray and create more complex scenes, I will probably want to do more here to get the best render results. However, that is for a later time and tutorial. 🙂
2. Iray Image Based Light
A very simple way to light my Iray scene in a realistic way, is to use an image based light (IBL). To do this –
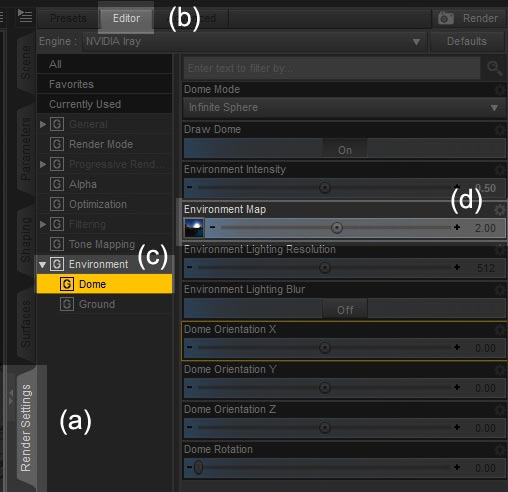
- I go to (a) Render Settings > (b) Editor.
- I select (c) Environment > Dome.
- I assign an appropriate image to light my scene in the (d) Environment Map control. In this example I am using Barcelona Rooftops that I got from sIBL Archives. That is a great site to get free IBL images. Dimension Theory also has some great HDRI packs in his DAZ store.
As far as I can tell, the Environment Map slider also controls IBL intensity. For example, rendering at Environment Intensity 1 and Environment Map 1 gets me the same result as rendering at Environment Intensity 0.5 and Environment Map 2.
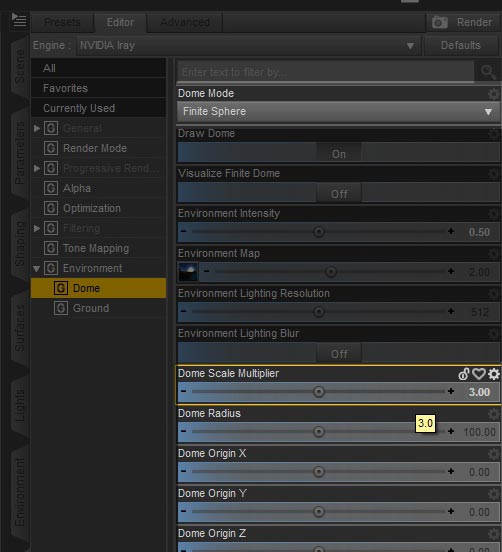
- Next, I set Dome Mode to Finite Sphere so that I have more control over how the image map is used in my scene. When I do this, additional controls appear including Dome Scale Multiplier, Dome Radius, and Dome Origin XYZ.
Dome Scale Multipler and Dome Radius allows us to scale our environment map, and Dome Origin allows us to reposition our environment map. I set Dome Scale Multiplier to 3 so that I can see more of the image in my scene.
- Next, I want to position the sun in the image map at the right place so that it casts a nice rim or silhouette on my figure. To do this I need to better understand how my image maps onto the 3d-dome in my scene.
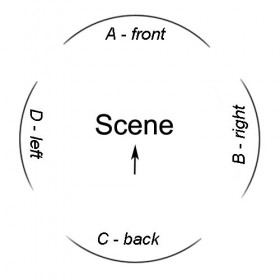
A simple way to think about it is to divide our image into four segments.
- Section A maps to the front of the dome (what we see in the scene).
- Section B maps to the right of the dome.
- Section C maps to the back of the dome.
- Section D maps to the left of the dome.
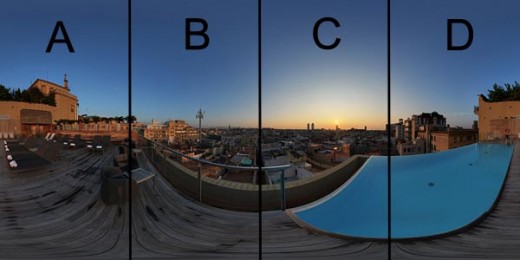
Essentially, the left of the image maps onto what we see, and then it goes clock-wise from there.
The sun in our image is in section C (back of the dome). Therefore, to move it to the front of my image, I rotate the dome by 180 degrees. This gives me a nice rim or silhouette effect on the left of my figure. Rotating 270 degrees shifts the light-rim to the right of my figure.
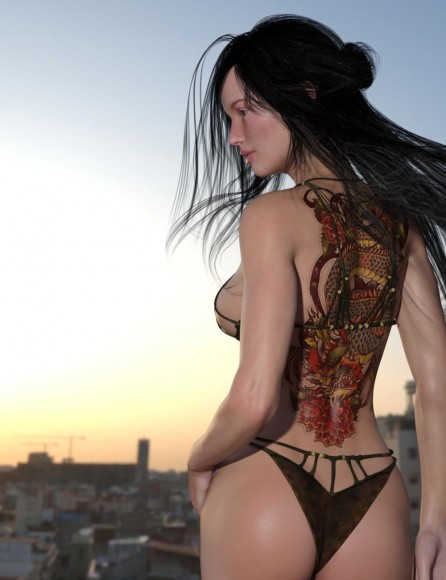
However, it looks like there is also too much light in my scene, and there does not seem to be enough contrast between the rim set by the setting sun and the rest of the image. This is because of the camera headlamp.
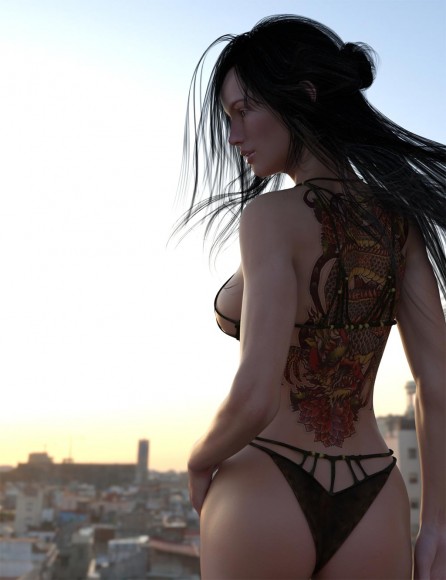
In particular, if there are no lights in the scene (other than the IBL), Daz Studio automatically adds a headlamp to the top of the camera to light our scene. This headlamp is adding too much light and reducing the contrast of the IBL that I want. To turn off this headlamp, I simply add a Daz Studio light to the scene, and then turn that light off. In this way, the only light source is my image based light (IBL).
3. Postwork and Done!
Finally, I add some glow to my image, tone it to a more orange sunset color, lighten the figure a little bit, and I am done!
With an nVidia GeForce GTX TITAN X card, I was able to render a 1000×1300 version of the image in under 5 minutes.
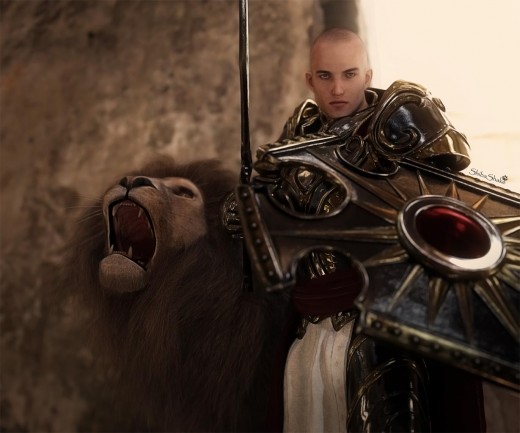
Below is a more complex second scene that I made. I set the armor to the Iray iron shader (keeping my original textures), and I exported the lion hair as OBJ from the Look at My Hair plugin.


This guide is extremely useful, thank you!!
I am so glad to hear this and you are very welcome. If there are additional topics you would like to see, please let me know. 🙂
Thank you so much for this tutorial, I’ve only been using Daz for a short time and mainly just creating props and things of that nature. I avoided scenes because I just couldn’t get the lighting right. But with this tutorial I’m starting to get it now…I was wondering could you do a tutorial explaining how to zero props please. I have purchased several sets that were to have individual props but they don’t it says they have to be zero’d to turn them into individual props to use in other scenes and I have no clue where to even begin…Thank you again..
Thank you Jackie. With props –
1. I first right click and then unparent the prop.
2. Do Edit > Object > Zero > Zero Pose
3. Repeat for each prop you want to extract
Hope this helps. 🙂
Thanks so much for this great info! I am newbie with Daz, using it to create art for the 1st in a series of children’s books I wrote and have had my biggest challenges with lighting. The IBL explanation just answered several of my struggles with exterior lighting so thanks again. Do you have any suggestions on simple lighting tricks for interior scenes? If i understand correctly IBL or iradiance like products wont work with an interior scene, correct? I am actually going for sort of an illustrated look and taking my renders into PS then using a digital painting looking action so I’m not going for complex lighting at all. I have been experimenting with various combinations of interior lights (going to try making them mesh lights now!) but just havent found a good workflow on interior lighting yet. Any suggestions would be much appreciated, but already the content here is awesome, thx!
Thank you very much John. Some ways I light interior scenes-
http://thinkdrawart.com/daz-studio-iray-tutorial-for-beginners#comment-188061
super
Hey there, how are you doing? Very nice images. Does this technique still work in Daz 4.9? Using the _8k .jpg and _3k .hdr versions of the Barcelona IBL dome rotated to the same angle with your settings didn’t get anything like the dramatic rim lighting you have in your pictures (or is there something magical in the skin shader?). Also, what focal length are you using?
All the best,
-Dave
Daz3D 4.9, Two GTX 970 SSCs
It still works for me in 4.9 as described. Use the hdr version, not the jpg. You could try turning up the intensity or Screen (Blending Mode) the rendered image in PS to increase the light strength. If you link to your renders, I can have a look.
For focal length I just use the default. This discussion has some good detailed info. on focal length.
Thanks for your quick reply (and your great artwork and tutorials)! Here is an image with just the IBL lighting, straight from iray: https://image.ibb.co/e5CBAa/Think_Tutorial8_No_Lights.png . And this is adding three lights to somewhat match your render: https://image.ibb.co/koojVa/Think_Tutorial8_R3.png . Focal length: 140mm. Perhaps I should have asked, how much Photoshop was involved, and if you brightened up the dome then did a composite with just the lit figure on top. Also, I’m still learning Daz, so please excuse any noob mistakes, etc.
Looks like you may have the camera light still turned on? It is on by default when there are no other lights in the scene. If you select camera and then go into the parameters tab, there should be an option in there to turn it off. The darker image with the strong rim doesn’t have any post (caption = Iray render with headlamp turned off).
If you look at the image before the one with the strong rim, it looks a lot like yours. That one has the headlamp still on.
Hello, thanks for the suggestions. Looks like the camera light is already off, so it might just be your skin texture / shader. I don’t have the one you used, though as a test I tried the steps in your “How To Get Wet Skin” tutorial (nice btw) for some extra highlights: https://image.ibb.co/cRMMwF/Wet_Test3_R2.png . Just the IBL was a touch flat and without much rim lighting, so this image uses two emissive spheres and a spotlight. C’est la vie. Looking over your images, you seem to start with some great composition and poses out of the gate — What are your thoughts on doing a tutorial on great composition (and poses)?
Yeah, rim lighting is great and your image really shows that. One of the things that I am going to try next is to really commit to rim lighting. Do darker renders with less environment light, and much stronger single light sources. Will need to experiment, as that will be a shift.
In terms of composition, thank you for the wonderful compliment. Writing a tutorial on that will be a challenge for me, because I don’t consciously follow any rules per-se. In terms of poses, I am a very big fan of DMs poses. Most of their stuff is in Renderosity. I also like Ilona.
Looking forward to seeing your rim lighting experiments! And I’m sure you’d do great on a Composition tutorial—even just a “from empty scene to pose, background and camera” walk-through for an image would be helpful.
Hey, congratulations on the “Flowers” Daz3D banner ad by the way. Recently, I’ve been trying to learn composition and posing by “studying the masters”—can you guess what amazing image was the reference for this quick composition study?: https://image.ibb.co/gEDdWQ/Good_Evil29_R1.png
Wow! That is so very cool. I did that one for a Daz PC contest a while ago. Those can be a lot of fun. I learned a lot from participating in various contests. Thank you so very much for this. 😀
Thank you so much for these wonderful tutorials. Such a wonderful resource and love your artwork too!
Thank you for visiting and for your wonderful words. Hugs!
Hi! Great tutorial!. My question for you is, when I load a .obj file XNALARA posing program DAZ is not loading the textures. Any reason why it’s doing this?.
I have DAZ 4.9 And a Nvidia GTX750 graphics card.
When I load up OBJ files in DS, it only loads the geometry without any textures. I am not an expert at this, but I think it has to do with the OBJ file format.
Wow – I’m so glad I found this tutorial. I’ve been messing with DAZ for a long time, but never got really technical with it and, until yesterday, had avoided IRay rendering because I just didn’t understand it. Thanks to your tutorial I understand some of what is happening now, but I’m still having difficulties. I have an iMac with OS 10.10.5 and a NVIDIA GeForce GTX 660M 512 MB video card and it’s taking 2 hours or more to render a simple 1000 x 1300 image. I also noticed that, even when it stops rendering, the image is very “dotty” and not sharp and clear. Not sure if it’s just that my computer is not up to the task, or if I’m doing something wrong, but I’ll keep on trying. I’m bookmarking your page too, so I can come back again 🙂
It depends a lot on the scene, scene materials, and lighting complexity. If there is a lot of bounce light and scattering, it will take longer to converge/be more noisy. When I started, I did a very simple scene, e.g. like the one described above. With just a single figure, very simple materials (no shiny metal stuff), and just an environment map for lighting. In this way, I have a simple base line, and can build up from there.
Thanks. I’ll try that. If it doesn’t take hours to do a render every time I’ll feel more inclined to play with the settings and see what does what so I can learn more about it.
Thank you for the great tutorial!
However, I found that I couldn’t even find Iray Shaders in the preset tab. I have clicked and searched everywhere I could think of, but still couldn’t find it.
It was really frustrating because I really want to try out this tutorial.
Do you mind to let me know if some setting needs to be checked in order to have Iray Shaders as option? Like how Mental Ray in Maya?
I am using the latest Daz version (4.8) I believe, since I just downloaded a couple months ago, and my graphic card is NVIDIA Geforce 970.
I will really appreciate your help!
Thank you for the great tutorial again!
You will first need to go to Editor and select the surfaces you want operate on. What appears in Presets depends on what is selected in Editor. If there is absolutely nothing in Presets, then it could be a database issue.
https://helpdaz.zendesk.com/hc/en-us/articles/207530323-Trouble-shooting-the-Smart-Content-Pane
In the presets tab under surfaces, I don’t have a “materials” option. Only glass lights metal other plastic skin stone utilities and wood. None of them has Iray genesis 2 feminine option.
Try going to the Editor tab first and selecting your G2F figure. Then go to the Presets tab. The Presets tab works off of whatever surfaces are currently selected in the Editor tab.