I am starting to play around more seriously with the Iray renderer in Daz Studio. The great thing about Iray, is that we can create realistic looking renders without having to muck around too much with lighting. Another really big advantage of Iray, is that we can get pretty good render results in a fairly short amount of time, if we have a good nVidia graphics card.
In this tutorial, I will describe how I started out with Daz Studio Iray, and how I created a simple realistic render from start to finish. This tutorial is intended for Iray beginners who are already familiar with the standard Daz Studio Interface.
If you are only starting to use Daz Studio, then check out this Daz Studio for Beginners tutorial.
1. Creating the Scene and Materials
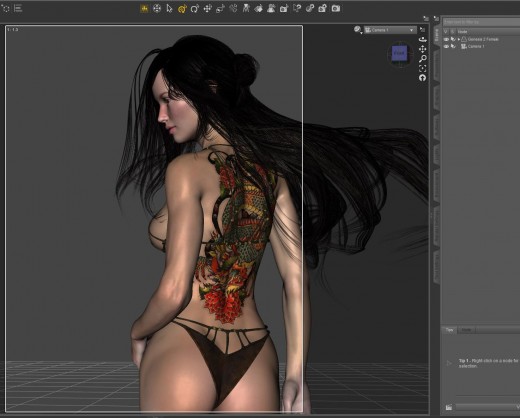
I create the scene in the same way as I would in regular Daz Studio. However, one very important aspect of getting a scene to look right in Iray is in using the right materials.
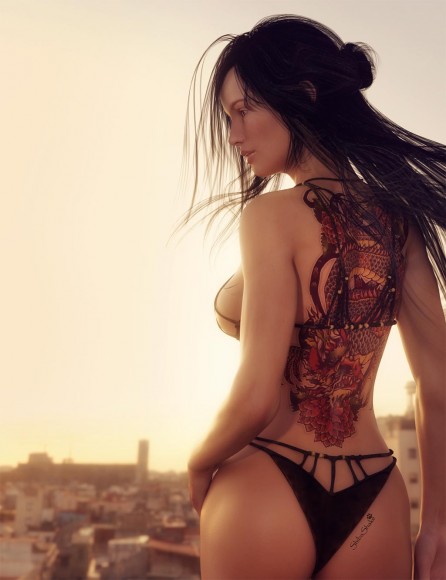
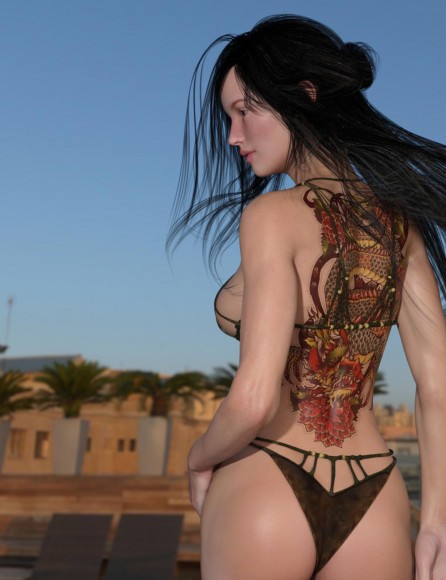
In this tutorial, I make a very simple scene with a female figure and a dragon tattoo on her back. She has interesting, long, wind-blown hair and is wearing a bikini. I make sure to use a highly detailed and realistic looking skin on my human figure. In this example, I am using the Bambolina skin by Tempesta3d. I also get pretty good results from the Daz3d Elite skins that I got from Michael 6 HD Add-On and Victoria 6 HD Add-On.
This simple scene allows me to focus on learning the basic material and lighting aspects of Iray.
After I finish creating my scene, I need to apply Iray shaders to all of my scene objects (figures, clothing, props, environment). One simple way to do this, is to –
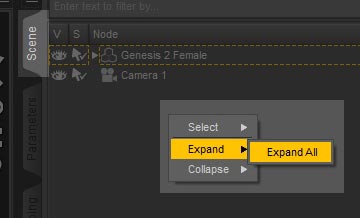
- Click on the Scene Tab. Then, right-click on the Scene pane, and select Expand > Expand All.
- I do Ctrl-A to select all items in my scene pane. Then I Ctrl-click to un-select lights and cameras.
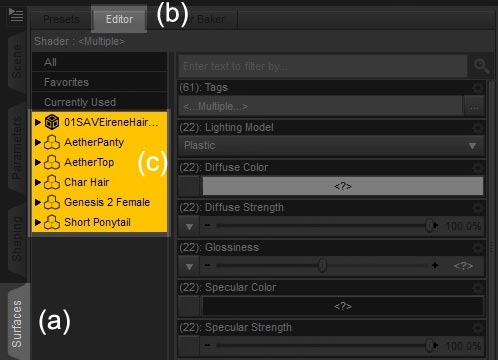
- Next, (a) I click on the Surfaces Tab, (b) click on Editor, and (c) select all the objects within it
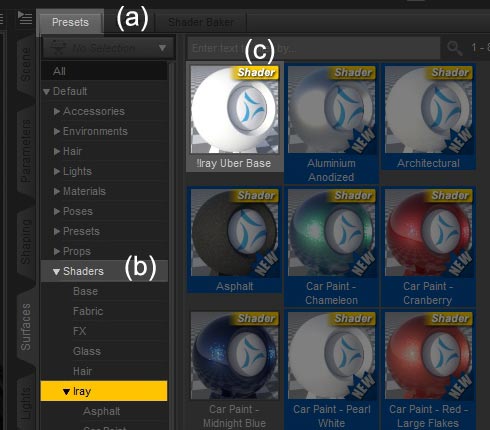
- Now, (a) I click on Presets. Within the Presets pane, (b) I select Shaders > Iray. If you are not using the Smart Content functionality within Daz Studio, you can get at the Iray shaders through your Content Library by going to Shader Presets > Iray > DAZ Uber in your Daz Studio directory. Finally, (c) I double click on the !Iray Uber Base shader to convert all the objects in my scene to using Iray shaders.
- Note that Iray also has specialized shaders for glass, metal, water, fabric, leather, and more. At this point, I identify any special surfaces in my scene that fall into these categories, and assign them accordingly.
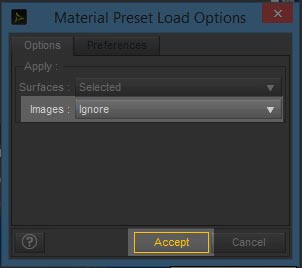
- I do Ctrl-double click if I want to keep the original textures of my selected objects. This will open up a pop-up window. I select Ignore, and then click on Accept.
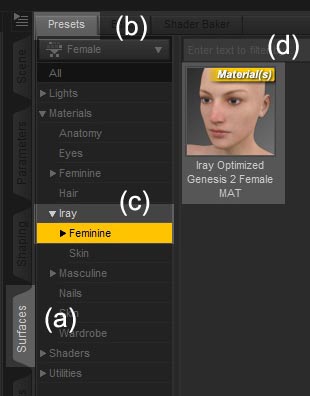
- There are also specialized shaders for Genesis 2 males and females. These shaders will use the existing skin textures that we have on our figure. Therefore, I select my female figure in the Scene pane, (a) go to the Surfaces Tab, (b) click on the Presets button, and (c) select Materials > Iray > Feminine. (d) I double click on the Iray Optimized Genesis 2 Female MAT to apply this shader on my figure.
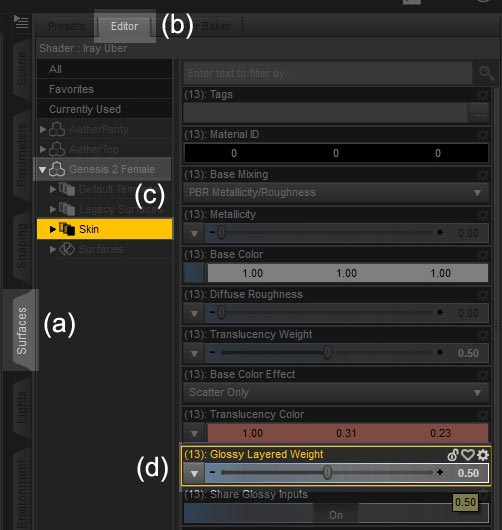
- Finally, I tweak my surfaces as needed. I find that the Iray skin shaders are a bit too glossy/shiny for my taste. Therefore, I select my G2F figure, go to Surfaces > Editor. Open up Genesis 2 Female and select Skin. Then I change the Glossy Layered Weight to 0.5.
This finishes the material setup of my simple scene. As I learn more of Iray and create more complex scenes, I will probably want to do more here to get the best render results. However, that is for a later time and tutorial. 🙂
2. Iray Image Based Light
A very simple way to light my Iray scene in a realistic way, is to use an image based light (IBL). To do this –
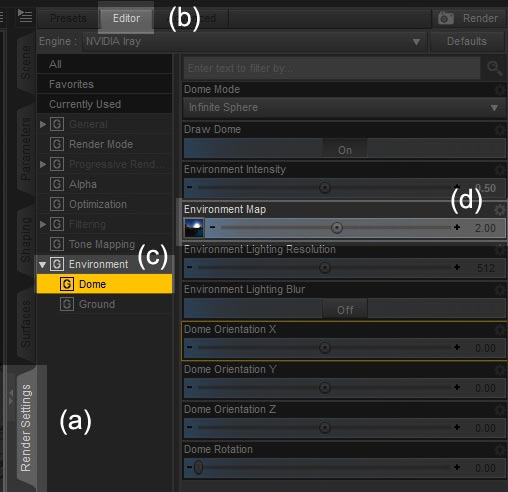
- I go to (a) Render Settings > (b) Editor.
- I select (c) Environment > Dome.
- I assign an appropriate image to light my scene in the (d) Environment Map control. In this example I am using Barcelona Rooftops that I got from sIBL Archives. That is a great site to get free IBL images. Dimension Theory also has some great HDRI packs in his DAZ store.
As far as I can tell, the Environment Map slider also controls IBL intensity. For example, rendering at Environment Intensity 1 and Environment Map 1 gets me the same result as rendering at Environment Intensity 0.5 and Environment Map 2.
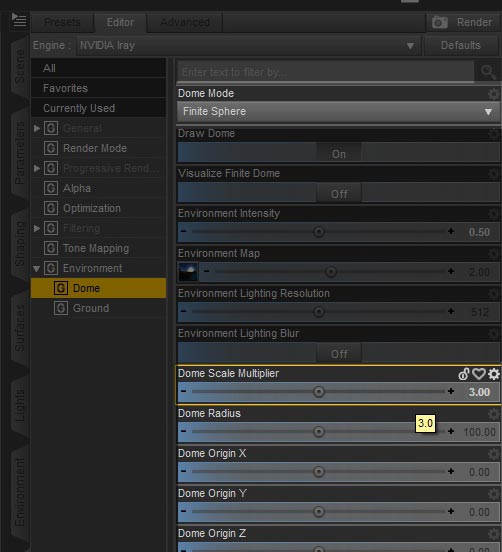
- Next, I set Dome Mode to Finite Sphere so that I have more control over how the image map is used in my scene. When I do this, additional controls appear including Dome Scale Multiplier, Dome Radius, and Dome Origin XYZ.
Dome Scale Multipler and Dome Radius allows us to scale our environment map, and Dome Origin allows us to reposition our environment map. I set Dome Scale Multiplier to 3 so that I can see more of the image in my scene.
- Next, I want to position the sun in the image map at the right place so that it casts a nice rim or silhouette on my figure. To do this I need to better understand how my image maps onto the 3d-dome in my scene.
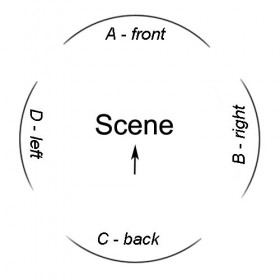
A simple way to think about it is to divide our image into four segments.
- Section A maps to the front of the dome (what we see in the scene).
- Section B maps to the right of the dome.
- Section C maps to the back of the dome.
- Section D maps to the left of the dome.
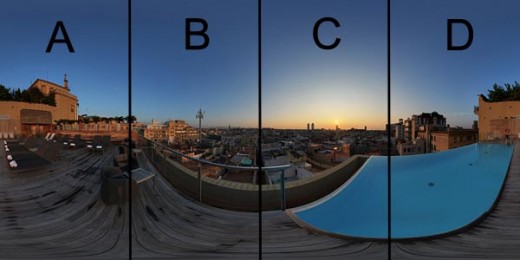
Essentially, the left of the image maps onto what we see, and then it goes clock-wise from there.
The sun in our image is in section C (back of the dome). Therefore, to move it to the front of my image, I rotate the dome by 180 degrees. This gives me a nice rim or silhouette effect on the left of my figure. Rotating 270 degrees shifts the light-rim to the right of my figure.
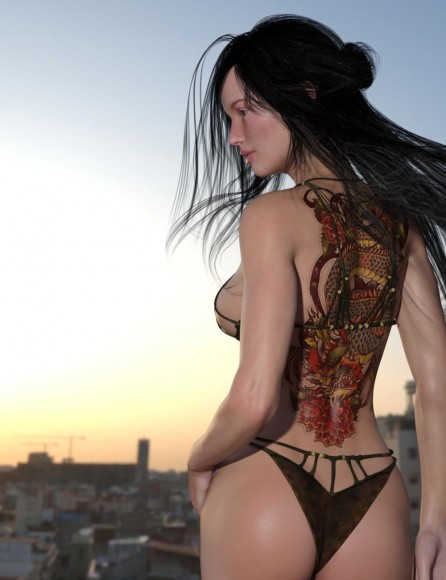
However, it looks like there is also too much light in my scene, and there does not seem to be enough contrast between the rim set by the setting sun and the rest of the image. This is because of the camera headlamp.
In particular, if there are no lights in the scene (other than the IBL), Daz Studio automatically adds a headlamp to the top of the camera to light our scene. This headlamp is adding too much light and reducing the contrast of the IBL that I want. To turn off this headlamp, I simply add a Daz Studio light to the scene, and then turn that light off. In this way, the only light source is my image based light (IBL).
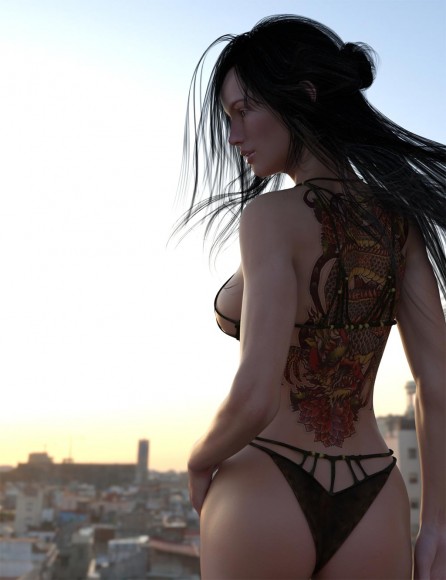
3. Postwork and Done!
Finally, I add some glow to my image, tone it to a more orange sunset color, lighten the figure a little bit, and I am done!
With an nVidia GeForce GTX TITAN X card, I was able to render a 1000×1300 version of the image in under 5 minutes.
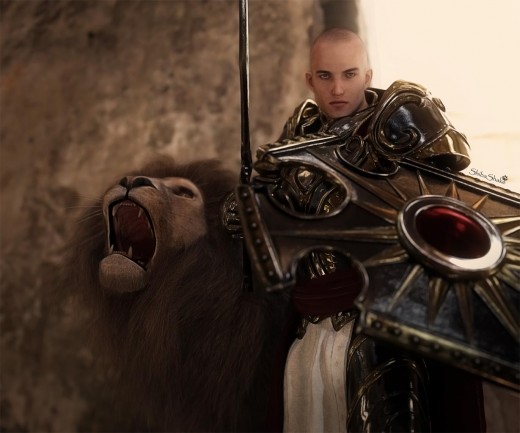
Below is a more complex second scene that I made. I set the armor to the Iray iron shader (keeping my original textures), and I exported the lion hair as OBJ from the Look at My Hair plugin.


Hello, great tutorial! How would I apply this all (lighting etc) to an indoor space or a scene with no actual environment background?
There are several ways-
1. Remove walls or ceilings that are not needed to allow light through.
2. Make the outside light very strong, increase scene exposure, and light the inside through windows and open doors.
3. Use mesh lights – http://thinkdrawart.com/how-i-light-my-daz-studio-iray-scenes
4. Use an interior environment map.
Very helpful! Stumbled across your site recently and it is a treasure chest of information for Daz Studio. Thank you, you have made the subjects of both posing and Iray so much clearer. I look forward to seeing more of your posts! 🙂
Thank you Simon! I will definitely be posting more. 🙂
Thank you very much Shiba, you helped me a lot with this!
well done 🙂
You are very welcome. I am glad it was helpful. 🙂
Thank you for such a clear and we’ll illustrated tutorial. I’ve been on a long hiatius after being involved in Poser, Daz Studio and Carrara since 1999 and was very confused with this new version of Daz Studio and Iray, and had been getting terrible results with it as I didn’t realise that you need new shaders for it! Now I think I can get to grips with it cheers. x Angela (Ladyfyre-Graphics)
Great tutorial, thanks!
Can you tell me what hair you used, and what tattoo? Where can I get them?
~ Russ
The hair is SAV Eirene hair from Renderosity. SAV has some great hairs that I use in lots of my images.
Tattoo is from Inked Vol. 1 for Genesis 2 by ShanasSoulmate at Daz3D.
Hi,
I’m planning on getting a new GFX card. You can confirm that a G-force card will do fine? You don’t need a Quadro?
That will depend a lot on the scenes you create, and your definition of what “fine” is.
For the type of scenes that I create, I can get a pretty good IBL-only render in 30 minutes-2 hours (about 2000×2000 size). Most scenes I leave it on for about 1 hour thereabouts. Depending on materials, there may sometimes still be speckling, but I can remove those in Photoshop. It is the last bits that take the longest time.
I have never tried any of the Quadro cards so I cannot do a comparison.
Hey, thanks for this tutorial, it was a helpful start for me.
You are very welcome. I am planning to do a few more Iray tutorials. 🙂
Well after more experimentation I’ve found it works better to put no shader at all on the hair.
I picked up the AOA lights and that seems to work well on leaves, I haven’t tried the hair yet. I will soon.
So on to the next question, have you had any problems rendering trees with individual transparency based leaves with IRAY? On this I can’t offer examples because I’ve never been able to get iray to render any non simple trees (basically flat planes) without it crashing.
Thanks!
I haven’t had any problems with that as of yet. What tree product are you having problems with? I could try it out if I have it. I have also been experiencing some crashes lately, so there definitely are still some kinks in the system.
Don’t suppose you’d mind a question?
I’ve been searching the daz forums for quite a few hours now and haven’t quite found the solutions to my questions. I searched deviantart and a general google search too.
I’ve got several items saved to my wish list, but until then I’d like to see if any one has any suggestions. Iray seems to be doing great with the hair I’ve been attempting to render with just the prepackaged ‘Iray shaders’.
I may still get the UHT Hair Shaders for Iray anyway. However when it comes to rendering with 3Delight I’m having less than stellar results (apparently a very common issue) I’ve tried using several different lights, or just UberEnviroment2, I’ve used the Omnifreaker SimpleSurface shader (which seems to be working the best and isn’t super slow), Omnifreaker Human Surface shader, the Ubersurface shader, the Uberhair shader (which doesn’t seem to work at all), the AOA subsurface shader, the Daz basic ones (alll of them!)
I’ve turned shadows on and off, I’ve increased the render dimensions. I’ve tried different light styles. I’ve tried several of UE2’s light settings (occulsion w/ soft, etc ) I haven’t fiddled too much with the hair settings themselves yet as I was hoping to find a tutorial. Can anyone suggest which shader I should stick with and maybe which toggles I should change to keep the hair from being super dull or a big chunk of clay like strips, or completely transparent?
Not sure if it matters but if case it does here are the computer stats: Processor : Intel (R) CoreTM i7-3770 CPU @ 3.40GHz Ram is 12.0 GB Running Windows7 64 Bit. Graphics card is GeForce GTX 680.
Thanks so much!
Do you have some example images that I can look at? What hair in particular are you having problems with?
I haven’t used 3Delight in a while to render entire scenes, so I am pretty rusty in this area. 🙂 In terms of lighting, this article has all the different light setups I used from when I started with Daz Studio to now.
Thanks so much for publishing these tutorials. They are very easy to understand and follow. I can’t wait to try them out!
I am very glad you like them. Hope you will join in on our contest too! 🙂