Think, Draw, Art!

for art lovers

  • Home
  • Gallery
  • Contact
  • Recent Articles
  • Article Categories
    • Daz Studio
    • 3D Art
    • 2D Art
    • Contest
You are here: Home / 2D Art / Step-by-Step Daz Studio Post-Work Tutorial

Step-by-Step Daz Studio Post-Work Tutorial

We are a Daz3d affiliate and we use affiliate links in our pages.

by shibashake 19 Comments

Post-work in the Daz Studio context simply means the work done after rendering. This could be anything from repainting the entire picture, to simply adding a signature. Because the term is so nebulous, it sometimes gets attributed magical or nefarious properties. The truth is, there is nothing mystical about the post-work process. While it can contribute to the quality of an image, everything that comes before it, including composition, camera-work, and lighting will be just as or more significant.

Depending on the artist, some things can be more effectively done in post, and some in Daz Studio. We get to decide, which techniques best help us transform what we see in our heads onto paper.

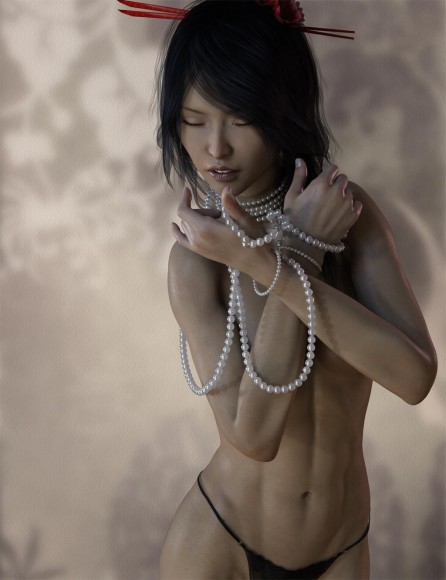
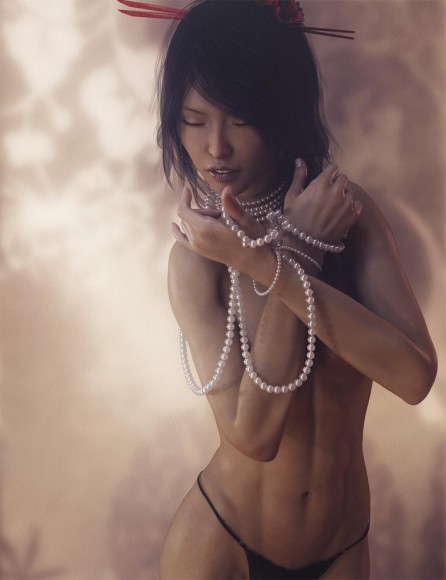
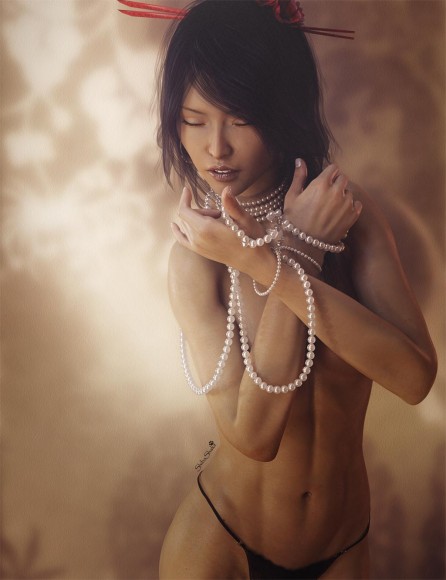
Daz Studio Iray Asian woman pin-up with her eyes closed and holding strands of pearls.
Step-by-Step Daz Studio Iray Post-Work Tutorial

My current Daz Studio Iray post-work process consists of 3 stages:

  • Stage 1 – Combine Iray light layers and fix rendering artifacts.
  • Stage 2 – Soften, sharpen, glow, color, and contrast.
  • Stage 3 – HDR filter. We are currently using Color Efex Pro 4 from the Nik Collection. Available for free here.

All three stages are performed in Photoshop, but depending on the look that I am going for, I sometimes skip Stage 3. We will be using the Pearls image above in our step by step post-work tutorial. My recent images can be found here.

Stage 1 – Combine Lights and Fix Rendering Artifacts

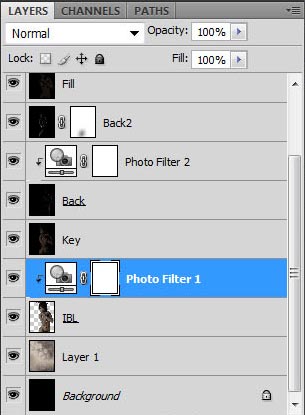
Photoshop screenshot of our background and 5 light layers.
Add in a soft background layer and our 5 Iray rendered light layers.
  1. Add a soft image to provide an appropriate background. Here, we used one of the photographs from Lady Kassie’s Oriental background set.
  2. We rendered 5 different light layers in Daz Studio Iray – Key, Fill, two Back Lights, and an Environment Map. For the Environment Map, we used the Tropical Ruins HDRi from sIBL Archives. We have Dome turned off, and saved the light layer as a PNG file.
  3. We add in our light layers using the process described in How I Combine Iray Lights in Photoshop.
  4. The added gray Photo Filter layer on top of our IBL layer is used to darken our IBL image, so that it fits our background and composition. By changing the gray color, we can lighten or darken our IBL layer.
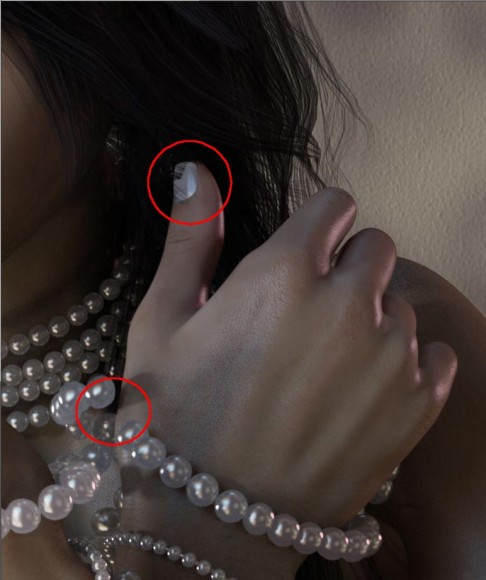
  5. If we zoom in on our current image, we will notice that there are certain rendering artifacts. In particular, the Asian woman’s hair collides with her thumb-nail. In addition, there is a missing pearl on the strand around her hand.
  6. Photoshop screenshot showing render problems such as collisions, which can be retouched in post-work.
    The Asian woman’s hair collides with her thumb-nail. In addition, there is a missing pearl on the strand around her hand.
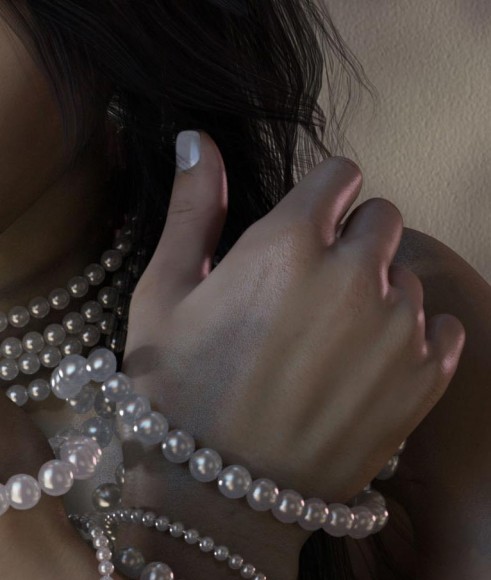
  7. We can fix this in post by using the Clone Stamp tool. In general, however, we want to minimize the number and extent of fixes we need to make, as we will get better results by dealing with it in Daz Studio.
  8. Fixed image after using the Photoshop Clone Stamp tool to retouch rendering artifacts.
    Removed collisions and added in a pearl using the Clone Stamp tool.
  9. Copy our completed Stage 1 image (shown below) by doing Shift + Ctrl + C (Edit > Copy Merged).
  10. Create a new file by doing Ctrl + N, and then Ctrl + V to paste our Stage 1 image into the new file.
Asian girl with pearls pin-up image after Stage 1 post-work.
Completed Stage 1 image.

Stage 2 – Soften, Sharpen, Glow, Color, and Contrast

  1. Right-click on our Stage 1 layer and select Merge Down.
  2. Add glow to our image by using the process described here.
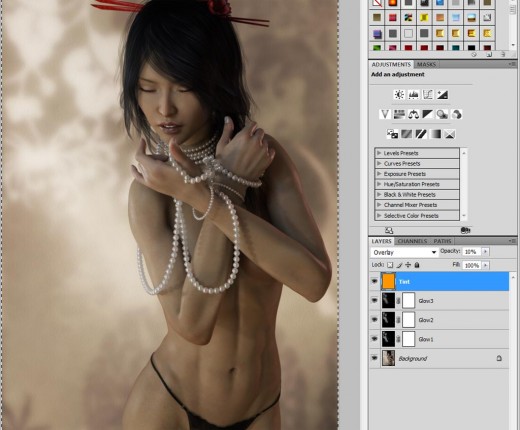
  3. Screenshot of our Photoshop interface after running the Shiba Glow action.
    After running the Shiba Glow action on our Stage 1 image.
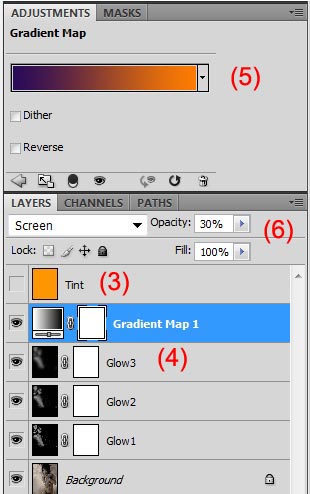
    Photoshop screenshot of the Gradient Map adjustment layer, and how we set the color range to Violet,Orange in the Adjustments menu above.
    Re-tone or recolor our image by using a Gradient Map adjustment layer, set to Violet, Orange color range.
  4. Turn off the Tint layer by clicking on the eye icon to the left of the layer.
  5. Select the Glow3 layer. Do Layer > New Adjustment Layer > Gradient Map.
  6. Select the Gradient Map layer and pick the Violet,Orange color range in the Adjustments menu (see right).
  7. Set the blending mode of our Gradient Map layer to Screen and set opacity to 30%.
     
    We use the gradient map to retone/recolor our image. The Violet,Orange color range works well in in many cases, especially for realistic images. For fantasy pieces, I may use different colors in my gradient map.
  8. Create a copy of all our layers by doing Shift + Ctrl + Alt + E (Stamp Visible).
  9. Select our new layer, name it Soften, and set blending mode to Soft Light. Go to Filter > Blur > Gaussian Blur. Set the radius according to the amount of softening that you want.
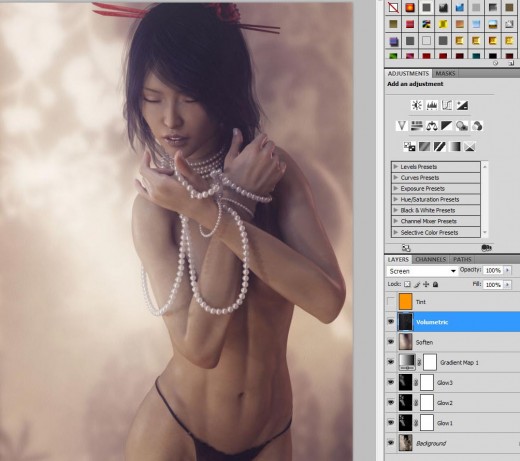
  10. Open our volumetric light file and paste it after our Soften layer.
  11. Asian girl with pearls pin-up image after applying Gaussian Blur and Volumetric lights softening effects.
    Adding two softening operations – Gaussian Blur layer and our Volumetric light.
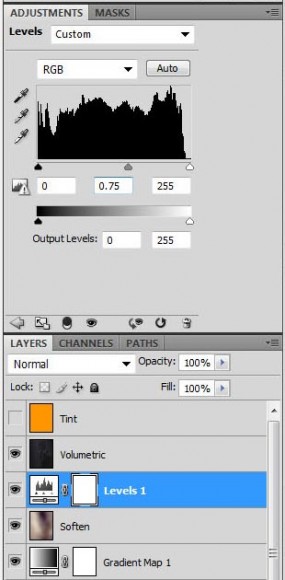
    Photoshop screenshot of our layer stack after adding the Levels adjustment layer for increasing contrast.
    Select the Levels layer and set the middle value to 0.75 in the Adjustments menu.
  12. Select the Soften layer and do Layer > New Adjustment Layer > Levels. This Levels layer will help to increase contrast in our image, so that it doesn’t look so flat. We set the middle value in the Levels adjustments settings to 0.75 (see right).
  13. At this point, our image looks rather dark and a bit blurry. Therefore, we want to lighten our image and bring back some detail.
  14. Asian girl holding pearls pin-up after our Photoshop image softening effect.
    After our softening effects, the image looks rather dark and a bit blurry.
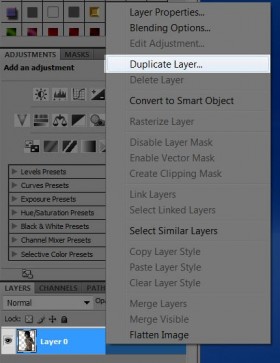
    Photoshop screenshot of how to duplicate a layer from one image file into another.
    Right-click on the Environment Map layer and pick Duplicate Layer.
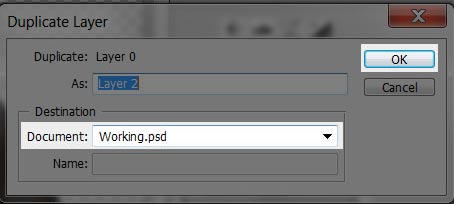
  15. Open our Environment Map (Tropical Ruins) image. Right-click on the Environment Map layer and pick Duplicate Layer (see right). In the pop-up menu, under Destination > Document, select our current working image (see below).
     
    This will duplicate our Environment Map layer into our working document. We name the layer Lighten.
  16. Photoshop screenshot of the Duplicate Layer pop-up, of how to copy a layer to a different file.
    In Destination > Document, select our current working image file.
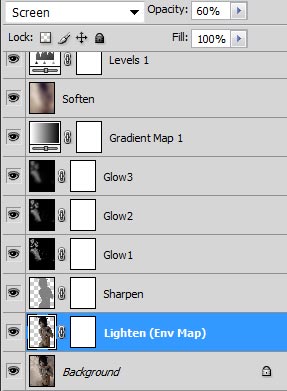
    Screenshot of our image layer stack after adding the lighten and sharpen layers.
    This is what our Photoshop layer stack looks like after adding the lighten and sharpen layers.
  17. Set the blending mode of the Lighten layer to Screen. This will add the Environment Map light into our image. Adjust opacity to the level that we want. In this case I set it to 60%.
  18. Duplicate our new Environment Map layer (this time into the same document, which is the default). Name this new layer Sharpen.
  19. Set the blending mode of this new layer to Soft Light and opacity to 100%. Go to Filter > Other > High Pass. Set the radius to 5.0 pixels.
     
    This creates a sharpening layer from our Environment Map to bring back some of our image details. We can further increase sharpening by setting the layer blend mode to Overlay. As usual, we can use the opacity dial to make more minor adjustments.
  20.  
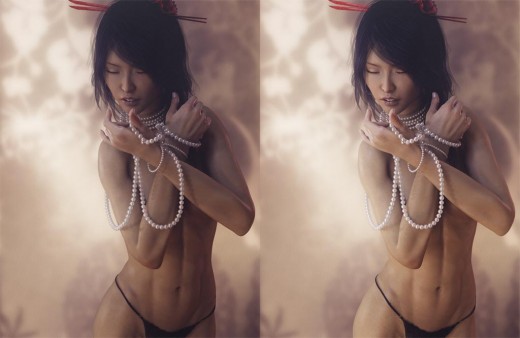
    After adding our lighten and and sharpen layers, our image is now brighter and has more detail.

    Two side-by-side images of Asian girl holding pearls. The right image has been lightened and sharpened.
    Left – Before; Right – After adding the lighten and sharpen layers.
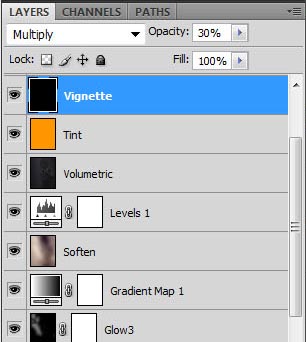
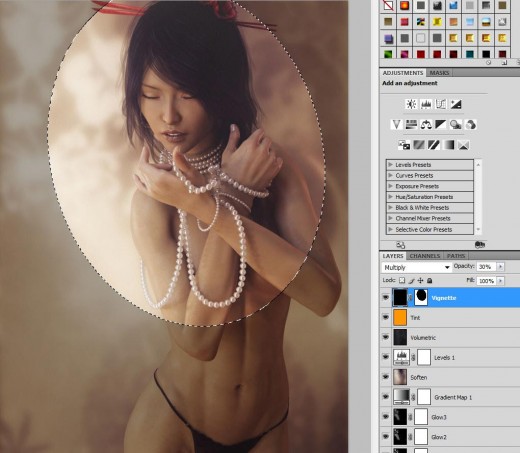
    Photoshop screenshot of our layer stack after adding tint and a vignette layer.
    Add warm tint and a Vignette layer.
  21. Turn the visibility of the Tint layer back on by clicking on the check-box to the left. This will give a warm tint to our image. We can control how warm our image is by changing the opacity of this layer.
  22. Select the Tint layer and do Layer > New > Layer. This creates a new layer on top of our tint layer.
  23. Select our new layer and name it Vignette. Ctrl-A to select the entire layer and do Edit > Fill. In the pop-up menu select Black as our fill color and make sure that opacity is set to 100%.
  24. Set the blend mode of our Vignette layer to Multiply and opacity to 30%.
  25. Do Layer > Layer Mask > Reveal All. Click on our mask layer to select it.
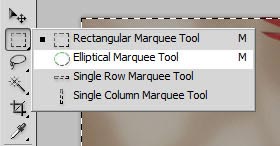
  26. Photoshop screenshot of selecting the Elliptical Marquee Tool.
    How to select the Elliptical Marquee Tool.
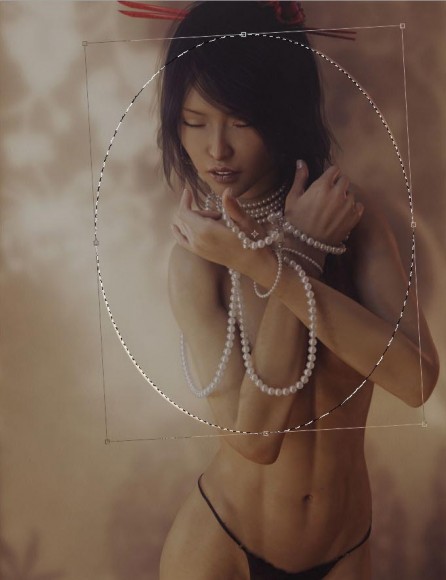
  27. Select the Marquee tool on the left Photoshop toolbar. Right-click on it, and select Elliptical Marquee Tool (see right). Draw an elliptical marquee around the area of our image that we want to emphasize (e.g. her face and pearls). We can also do Edit > Free Transform to rotate and scale our elliptical marquee to get it to the right position, size, and orientation.
  28. Photoshop screenshot of how to select, orient, and scale the area of our image we want to emphasize.
    Draw an elliptical marquee in the area we want to emphasize. Edit > Free Transform to rotate, scale, and move, our selection.
  29. Once we have it in the position that we want, do Edit > Fill > Black. This will create a light area around the part of the image we want to highlight.
  30. Photoshop screenshot of how to create a vignette layer to highlight certain parts of our image.
    Create a light area around the part of the image we want to highlight by using our Vignette layer.
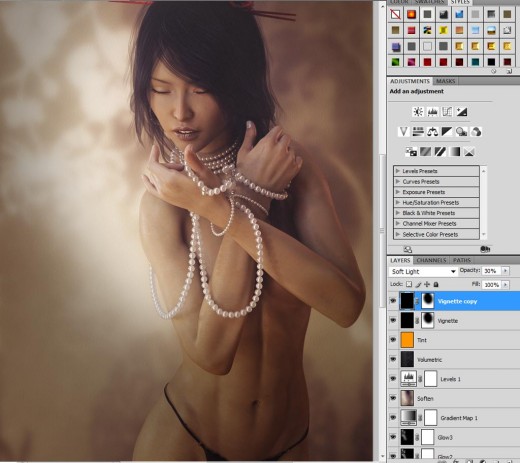
  31. Click somewhere else on the screen to deselect our marquee. Do Filter > Blur > Gaussian Blur to soften out the edges of our circle.
  32. Duplicate our Vignette layer and set blend mode to Soft Light. This finishes our Stage 2 process.
  33. As before, Copy our completed Stage 2 image (shown below) by doing Shift + Ctrl + C (Edit > Copy Merged).
  34. Create a new file by doing Ctrl + N, and then Ctrl + V to paste our Stage 2 image into the new file.
Photoshop screenshot of our working image and layers after our stage 2 post-work process.
Our image and layer stack after finishing the Stage 2 process.

Stage 3 – HDR Filter

  1. Right-click on our Stage 2 layer and select Merge Down.
  2. Click on Color Efex Pro 4 from the Nik Collection (Download for free here).
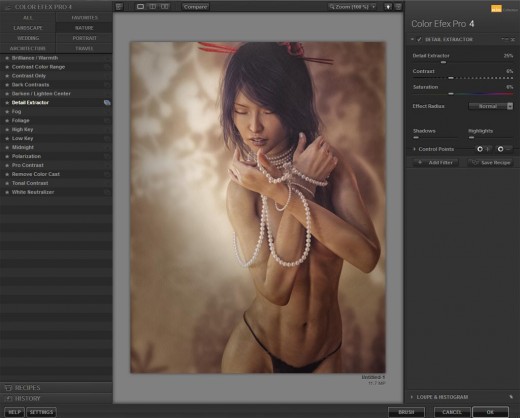
  3. Select Detail Extractor in the Color Efex Pro 4 interface. In this case, I use the default settings (see below) and hit ok.
  4. Nik Collection screenshot of the Detail Extractor.
    Use the Detail Extractor in Color Efex 4 from the Nik Collection to bring out more image details.
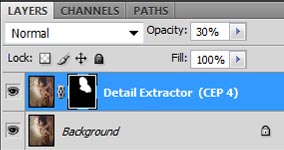
    Photoshop screenshot of our Detail Extractor layer and its accompanying visibility mask.
    Our Detail Extractor layer with a mask for the areas we want to emphasize (e.g. face).
  5. This adds a new Detail Extractor layer to our image file. We can then set the opacity of that layer to control the level of detail added. In this case, I set the opacity to 30%.
  6. In addition, we may only want to add detail on certain parts of the image. To do this, select our Detail Extractor layer and do Layer > Layer Mask > Hide All. Then, paint in the areas where we want more detail.
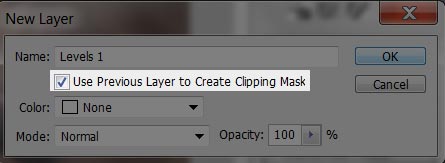
  7. Also note that the Detail Extractor operation will lighten our image. To re-balance the layer so that it better matches the original Stage 2 image, we add a Levels adjustment layer (Layer > New Adjustment Layer > Levels). Make sure to check Use Previous Layer to Create Clipping Mask, so that the Levels adjustment only applies to our Detail Extractor layer.
  8. Photoshop screenshot of how to limit the Levels adjustment operation to just the Detail Extractor layer.
    Make sure to check Use Previous Layer to Create Clipping Mask.
  9. Set the middle number in the Levels adjustments menu to 0.9. This finishes our Stage 3 process.

I do not always use the HDR filter. For this composition, I actually prefer the softer image, so I posted the finished Stage 2 image in my Daz Gallery. In fact, this applies to all of the methods outlined above; we only apply them if they help to enhance our image. Experiment with opacity and adjustment settings to get the results that you want.

Hope you enjoyed this step-by-step post-work tutorial.

Daz Studio Iray pin-up image of an Asian lady holding strings of pearls with her eyes closed.
Asian woman holding pearls final image (with HDR filter).

Check Out the Latest Sales at Daz3D

Check Out the Latest Sales at Daz3D

daz sale banner
DAZ Studio FREE 3D MODELS AND SOFTWARE

Leave a Reply Cancel reply

Your email address will not be published. Required fields are marked *

Comments

  1. Mark T says

    March 11, 2019 at 10:46 am

    Awesome tutorials and really helped me grow as an artist, the only thing I haven’t gotten a grasp on yet is the glow method. I noticed you had it on Patreon but it’s no longer available, would you be able to upload that again at some point since I’m really struggling to get it to work even following that tutorial along? When I do it in Photoshop CC 2018 it just washes out the image.

    Again, wonderful tutorials. I hope someday I’ll have artwork good enough to enter the competitions. 🙂

    Reply
    • shibashake says

      March 14, 2019 at 4:27 pm

      Yeah, the “washing out” effect can happen with glow when there is too much light in the scene. This can also happen with Iray glow settings. Some things that can be done –
      1. Turn down the glow effect. In this tutorial, this translates to turning down the opacity of the glow layers.
      2. Limit the glow effect to certain lights only. For example applying it only to the light coming in from the window or only to the candles, etc.

  2. Elaneith says

    January 16, 2019 at 8:26 am

    Hello there!

    As promised, here I am with my questions! I hope they won’t make you do a face palm or exasperate you, but… They need to be adressed, at least for my little head :

    1 – What is your render technique? It’s not about the lights, of your render settings (even though I’d be curious to know what they are in optimization&progressive render) but about your way to make your layers. I use canvases, set for each light in the scene (even the emissive like on luminowings or the SV muse textures for lilflame’s for the witchy sleeves, for exemple) set in – light group. Seeing your own layers, I was wondering how do you do it? Do you turn on and off the lights you want on a layers to render them progressivly?
    So to sum up, this first veeeery long question is : What is your technique to render in layers?

    2 – How do I render the environmental map? Is it simple the HDR? Or something else entirly? I admit I’m a little lost in your tutos when you speak about environmental maps or IBL in your tutos, which is normal since the two are connected. Well it’s two in one, sorry! >_<

    3 – About the volumetric lights, Must I be in "sun-sky only" to have it, or can I see it even with other render settings? I'm asking because I've check the tutorial about atmospheric and dust, but I felt lost quite quickly, so I turn myself to more "already done solution", Atmcam, the one you've spoken about in your tutorial about "how I Combine Daz Studio Lights in Photoshop", but it doesn't appears ont the render I've tried it, so I'm wondering.

    Sorry for these three big sett! And thank you for this tutorials and your help! You can't imagine how much it helps when you want to try more in DAZ studio! 🙂

    Cheers,

    Elaneith~

    Reply
    • shibashake says

      January 18, 2019 at 3:53 pm

      1. Yes, I render the layers manually by turning lights on and off. I tried canvasses a while ago, but didn’t really like the format limits, lack of tone mapping options, etc. I am not sure what improvements have been made lately.
      2. Yes, environment map is the image used in Render Settings. 🙂
      3. For volumetric lights I usually use a spotlight only together with the Atmocam rig. Here is more on how I use atmocam – https://thinkdrawart.com/top-5-daz-studio-iray-essentials#comment-190998

      Hope this helps. 🙂

    • Elaneith says

      January 21, 2019 at 5:08 pm

      Ok! Thank you!! 😀 Funny thing is your first answer kinda answers to the question I was asking my self “how to have my environmental map in layers?” xD
      I like Canvas, but I guess you could do canvas + rendering tone maping + environment like you usually do with the rest of the lights? Anyway, to have all the photoshop options, you’ll have to export the layers as .png in the end, so it doesn’t change much, except a gain of time, since rendering process can be soooooooooo long. I’ll try your method though!

      Thank you again for those answer, and I’ll definetely try what you explain in this answer you’ve linked. So much to learn, so little time! (yes, I’m not patient and I’m a perfectionnist, the perfect mix to make my art practice complicated!)

  3. irfan says

    September 19, 2018 at 9:08 pm

    please make video tutorial for all your tutorial.. you are awesome

    Reply
    • shibashake says

      September 24, 2018 at 3:51 pm

      Thank you very much. Videos are tough for me because my head is all over the place. 😀

  4. Mark says

    December 15, 2017 at 4:57 am

    This tutorial has been as massive help, although I’m unclear on the volumetric light Shibashake? What setting should I set it to. Blend mode in particular?

    Reply
    • shibashake says

      December 15, 2017 at 2:41 pm

      Thank you Mark. I just screen it to combine its lighting effects.

  5. Christy says

    August 24, 2017 at 9:11 am

    Would love to see these tuts in video 🙂

    Reply
    • shibashake says

      August 31, 2017 at 1:30 pm

      Haha, I have never done those before. Will definitely think about it. 😀

  6. Angela says

    July 21, 2017 at 1:06 pm

    I am still a newbie at DS.
    “We have Dome turned off, and saved the light layer as a PNG file.” How can I do this? Or do I have to render each light seperate??

    Reply
    • shibashake says

      July 21, 2017 at 4:15 pm

      Hello Angela, Yeah, I render my lights into separate layers.

  7. Areyna says

    January 9, 2017 at 4:08 pm

    You did another tutorial and I didn’t know! Oh my gosh! Thank you!

    Reply
    • shibashake says

      January 12, 2017 at 3:14 pm

      Hope you like it! Hugs!

  8. Ferretmania says

    December 23, 2016 at 9:15 am

    Merry Christmas or Happy Holidays if you don’t do Christmas.

    Lots of big hugs to you too 🙂

    Reply
  9. Johnny Rico says

    December 22, 2016 at 6:21 pm

    Absolutely FANTASTIC!
    This tutorial is the best Christmas gift I’m getting this year. 🙂
    Thank you SO much Shibashake for taking the time to put this together.

    Reply
  10. Ferretmania says

    December 19, 2016 at 7:13 pm

    I love this tutorial and it has taught me a lot about how to use photoshop for postwork..
    It has been my “go to” tutorial on postwork ever since I first got access to it and has really kickstarted me in to trying out different things in photoshop.

    Thank you(again) for sharing!

    Reply
    • shibashake says

      December 22, 2016 at 2:58 pm

      Thank you so very much! Big big hugs to you and a very Happy Holidays!

Recent Posts

  • Duality of life and death represented by a day of the dead girl with black flowers and butterflies on her headdress surrounded by skeletons. Gothic fantasy woman art. Daz Studio Iray image.What Does Our Art Say About Us?
  • Side by side face comparisons of out-of-the-box Millawa 8 face and skin and multiple tweaked Millawa 8 face and skin.Making Skin Pop with the Daz Studio Iray Uber Shader - Part 2
  • Side by side Victoria 8.1 face comparison of Daz Studio's PBR Iray Skin Shader and the Iray Uber Shader..Making Skin Pop with the Daz Studio Iray Uber Shader - Part 1
  • Item used: VR X01 BYOS Modular by Studio360.3D-Art Contest Winners ~ April 2020
  • Qualifying item used Inside Linday's Daz Studio Iray Scenes by Linday3D-Art Contest Winners ~ March 2020

Recent Comments

  • Side by side face comparisons of out-of-the-box Millawa 8 face and skin and multiple tweaked Millawa 8 face and skin.Making Skin Pop with the Daz Studio Iray Uber Shader – Part 2
    • jane
      - I can not write 0.24 or 0.24 after 0. doesnt work. would you share your settings?
  • Side by side Victoria 8.1 face comparison of Daz Studio's PBR Iray Skin Shader and the Iray Uber Shader..Making Skin Pop with the Daz Studio Iray Uber Shader – Part 1
    • Foxy
      - Hi, can you save your settins and share with us?
  • Duality of life and death represented by a day of the dead girl with black flowers and butterflies on her headdress surrounded by skeletons. Gothic fantasy woman art. Daz Studio Iray image.What Does Our Art Say About Us?
    • K Smith
      - Thank you for sharing this, a lot of it resonated with me and I know some of the pain you have been through. ...
  • Knight in armor shooting a steampunk gun at a dragon. Night scene.Shiba 3D-Art Contest
    • Carola O
      - Things are well here, having a bit of a art complication, none of the many ideas I have want to be made ...
    • Carola O
      - Hope you and yours are doing well in these trying times *hugs* (in case this end up double, I tried to ...

Copyright © 2022 · Genesis Skins by ShibaShake · Terms of Service · Privacy Policy ·