Think, Draw, Art!

for art lovers

  • Home
  • Gallery
  • Contact
  • Recent Articles
  • Article Categories
    • Daz Studio
    • 3D Art
    • 2D Art
    • Contest
You are here: Home / Daz Studio / Pre and Post-Work Images – Redhead Warrior Woman Fantasy Art

Pre and Post-Work Images – Redhead Warrior Woman Fantasy Art

We are a Daz3d affiliate and we use affiliate links in our pages.

by shibashake 4 Comments

There have been a fair amount of discussion on post-work of Daz Studio or Poser renders. Indeed, one big complication of post-work is that it can encompass a wide range of techniques. Some people go all the way, and paint over the entire render; only using the rendered image as reference. Others, may use filters and actions; while some only resize and add a signature.

As a result, it is not always clear which part of the finished image comes from the Daz Studio/Poser render and which part comes from the post image manipulation. I have gotten some questions about this as well, so I thought it would be fun to show how my images develop from pre to post to done.

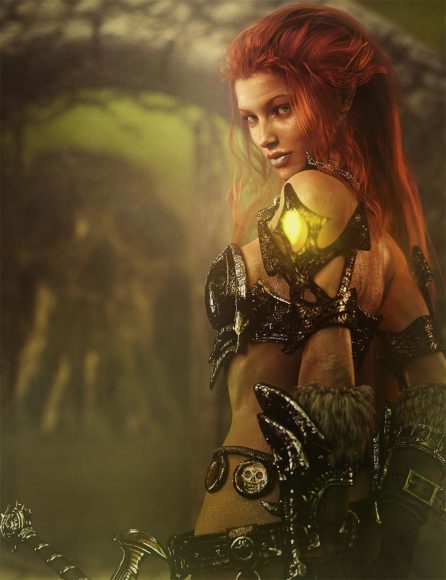
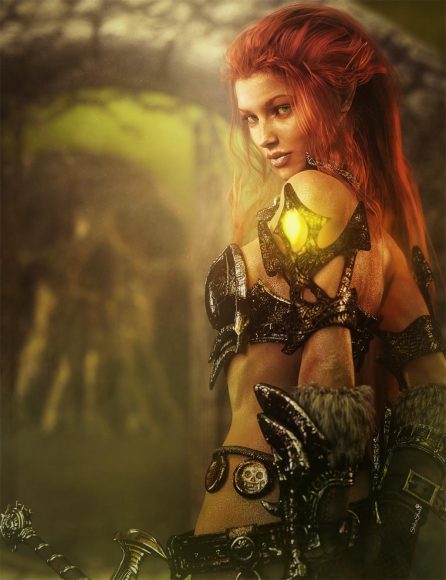
Red head warrior woman with armor and sword looking over her shoulder. Gate and skull mountain in the backdrop.
Pre and Post-Work Images – Redhead Warrior Woman Fantasy Art

My Post-Work Process

My post-work process consists of three key steps-

  1. Combining all light layers (except for volumatric light).
  2. Add filters, actions, effects, and volumetric light.
  3. Add detail using Color Efex Pro 4 from the Nik Collection.

I do very limited paint-overs, mainly to fix collisions and poke-through. Most of my post-work involves using layer blends, filters, adjustments, and actions. For a detailed description of my post-work process, please refer to my Step-by-Step Daz Studio Post-Work Tutorial.

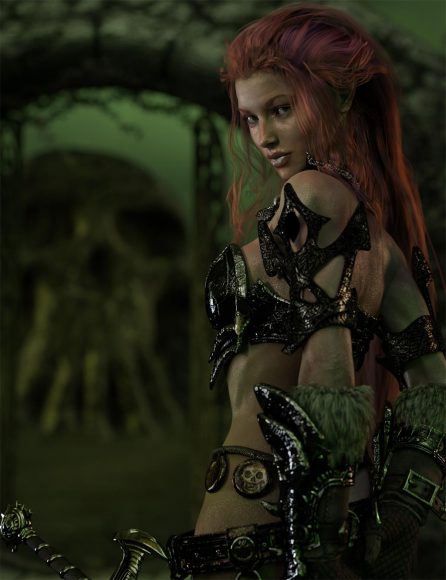
I will be using the Fantasy Red Head Warrior Woman image above, to show my pre and post-work progression. I used Legacie Hair, Kadis armor combined with Daemon outfit, and Terradome 3 to create the scene. Larger version in my Daz Gallery.

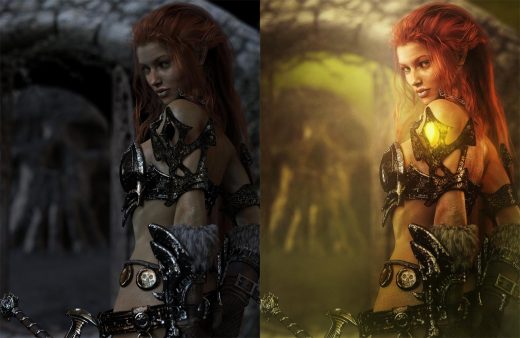
Pre and post-work images to a red head warrior woman with armor and sword. Fantasy Art.
Left – Pre image with only an Environment light. Right – Completed image with all lights and post-work process.

Based on what we see above, it seems that there is a very great difference between the pre and post-work pictures. However, the left image is only lighted by an Environment Map, whereas the right image has Environment Map, key, fill, two rim lights, a top light, a volumetric light, and outfit lights. Therefore, it is not a very fair comparison.

Step 1 – Combining Light Layers

I combine light layers in Photoshop because it is much faster to experiment with different light intensities and colors. In general, if I can do something better in the scene render, then I do it in the scene render. If I can do it better in post, then I do it in post. Ultimately, it doesn’t matter which is done where, as long as I can get an end result that I am happy with. This article has more on how I combine lights in Photoshop.

Below is the image with all light layers combined except for volumetric and outfit lights, which we add in Step 2. This is perhaps a better comparison because it contains close to comparable lights as the finished image.

Picture of redhead warrior girl with armor and sword with all light layers combined. Fantasy Art.
All light layers combined except for volumetric light and outfit lights.

Step 2 – Filters, Action, Effects

This is the largest step as we add all our filters, adjustments, and actions, as well as the volumetric and outfit lights. Some operations include adding glow, sharpening, softening, tone readjustments, adding effects, and more.

After doing all this, the image is very close to the completed picture.

Fantasy red head woman warrior after we add sharpening, softening, mist, glow, and other Photoshop adjustments and effects.
Red head warrior woman image after adding Photoshop adjustments, filters, actions, and effects.

Step 3 – Bringing Out Detail

In the final phase, I bring out more details using Color Efex Pro 4 from the Nik Collection. You can get the Nik Collection for free from Google. It has many useful actions for manipulating photos and images, so definitely worth a look.

I also do more light and contrast adjustments as necessary.

Red head warrior woman with armor and sword looking over her shoulder. Gate and skull mountain in the backdrop.
Completed Image – Redhead Warrior Woman Fantasy Art

To Post-Work or Not to Post-Work?

There have been some interesting discussions about this in the Daz forums and elsewhere. I am a fan of using whatever tool that will help me create the best end-result.

Before I started with Poser and Daz Studio, I did digital painting. It was a lot of fun, even though I was not very good at it. Later, I started playing with Photoshop in a limited way, to add fantasy backgrounds to photographs. Next, I tried out Poser, Carrara, then Daz Studio, which allowed me to create much better images. Now I mostly use Daz Studio, various DS plugins, Photoshop, and various PS plugins.

I am not a trained artist, so I am very excited when there are tools like Daz Studio and Photoshop that help me create images that I previously could not make.

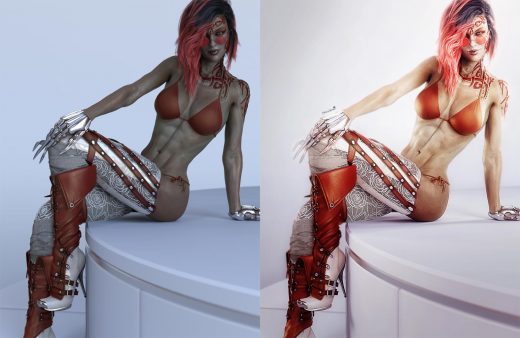
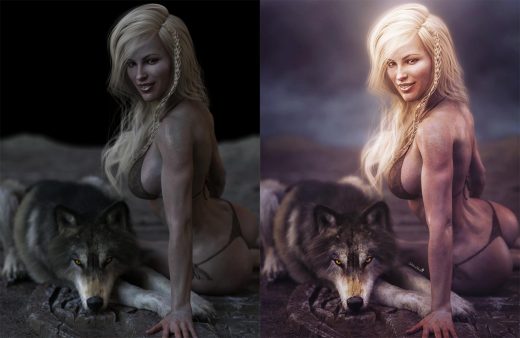
Below are two more pre and post-work images. The left images only use an Environment Map, because I combine light layers in post.

Pre and post-work images of a red head woman in high boots, sitting on a white platform with a white background.
Pre and Post-Work Images for Red Head Woman in High Boots Pin-Up Art.
Pre and post-work images of a white haired girl sitting next to her yellow eyed wolf, who is lying down. Fantasy Art.
Pre and Post-Work images of a White Haired Girl and Her Wolf (Fantasy Art).

Let me know if there are particular images you would like to see pre-post images for, and I will try to post more of these progression image articles.
Related Articles

Step-by-Step Daz Studio Post-Work Tutorial

A step-by-step postwork tutorial on my Asian Girl with Pearls image. Scene was created in Daz Studio and initial light layers were rendered in Daz Studio Iray.

How to Add Glow to Daz Studio Images Using Photoshop

Some simple steps on how I add glow to my Daz Studio images using Photoshop.

How I Combine Daz Studio Lights in Photoshop

Come see how I combine my various Daz Studio light layers in Photoshop, how I add color to lights, and how I modify light layers using Photoshop masks.

Check Out the Latest Sales at Daz3D

DAZ Studio FREE 3D MODELS AND SOFTWARE

Comments

  1. Areyna says

    September 11, 2017 at 6:14 pm

    Just glanced at your recent post. Sure brought back memories. I was about to voice the same thing Ferret and Erwin did. I, too, miss your presence on Patreon. But I totally agree with you in that our loved ones must come first.

    Reply
  2. Ferretmania says

    September 5, 2017 at 9:28 pm

    I’ve learned a lot from you and miss you on Patreon too, but totally understand your choice and how sometimes you need to choose what you want to spend your time on. You know there’s only so many hours a day to do stuff in.

    I’m sorry about your pup having arthritis. I had a German Shepard who grew so fast he got problems with his joints/bones . I gave him Hokamix 30 Gelenk which helped him a great deal. Maybe try that and see if it can at least ease the arthritis, if it’s available in the US that is πŸ™‚

    Reply
  3. Erwin van der Minne says

    July 31, 2017 at 4:46 am

    Awwwwwwe….. I just love your work. Looks like you’ve been slowly tweaking your postwork as time has gone by.
    Come back to Patreon; I miss the inspiration (the learning kinda helped too πŸ™‚ )…

    Reply
    • shibashake says

      July 31, 2017 at 12:20 pm

      Hey Erwin! Great to hear from you and thank you very much. Yeah, I am always tweaking – which is a lot of fun! πŸ˜€

      Probably not going to be able to do Patreon anytime soon. One of my pups has pretty bad arthritis, so I am increasing pup-time, and there is less time for everything else. Hope everything is going well with you. πŸ™‚

Leave a Reply Cancel reply

Your email address will not be published.

Recent Posts

  • Item used: VR X01 BYOS Modular by Studio360.3D-Art Contest Winners ~ April 2020
  • Qualifying item used Inside Linday's Daz Studio Iray Scenes by Linday3D-Art Contest Winners ~ March 2020
  • Qualifying item used –Z Beauty Poses for Kalea 73D-Art Contest Winners ~ February 2020
  • Qualifying item: - Li'l Scrap Boy HD for Genesis 8 Male by Pixeluna3D-Art Contest Winners ~ January 2020
  • Qualifying items used –Ancient Tomes by Merlin Studios3D-Art Contest Winners ~ December 2019
  • Shiba contest qualifying Item used: Mech Dancer Outfit3D-Art Contest Winners ~ November 2019
  • Shiba contest qualifying items used – Greeble City Blocks, Greeble City Blocks 2, Greeble City Blocks 3; and Greeble City Blocks 04 by Stonemason.3D-Art Contest Winners ~ October 2019
  • Shiba Contest Featured Vendor Petipet. Used: Car Edi, Unicycle Bob, Bus Maxis, Bus Pegasus & Motorbike ZAZ3D-Art Contest Winners ~ September 2019
  • Qualifying item for shiba contest - Z Almost Human Poses by Zedicuss3D-Art Contest Winners ~ August 2019
  • Qualifying items used – Rei HD for Genesis 8 Female by Mousso.3D-Art Contest Winners ~ July 2019

Recent Comments

  • Cute cat girl fantasy pin-up art with folded arms and standing in a forest or woods. Fantasy art rendered in Daz Studio Iray.Best Fantasy Women Skins, 3D-Art
    • - Can I ask how you got the Tigerlily skin on a G8F figure?
  • Girl reaching upward for a flying bird (signifying knowledge, dreams, or more) while another holds her down to earth.Daz Studio Iray Tips and Tricks
    • G.Carlo
      - Very Helpful, thanks!!!!
  • Blonde haired sci-fi elf girl with sword, standing next to an owl robot. Fantasy sci-fi woman art. Daz Studio Iray image.What Is Daz Studio?
    • Shanique
      - Hey please check your inbox on deviantart ASAP, I’ve been trying to reach out to you. Thanks
  • Screenshot of the Environment Map interface in Daz Studio Octane.How to Set-Up Camera, Lights, & Displacement in Daz Studio Octane
    • dmc
      - In my case I turned up the intensity of the spherical light. In Octane:(1) Select the Sphere-Default ...
  • Girl with pink hair, pink dress, and pink petals blowing in the wind. Daz Studio dForce Iray picture. Fantasy Art.How to Save a Daz Studio dForce Frame as a Morph
    • emu
      - I have been trying to apply this to dForce hair, but the result does not really match the original simulated ...
    • Esse
      - Just great! Thank you so much.
  • Warrior woman riding on a tiger while shooting a bow and arrow.How to Combine Multiple Poses in Daz Studio
    • Jan Freeman
      - Totally awesome tutorial!! I was able to lock Mavka in DS in her violin playing pose, then pose her ...
  • Catwoman sitting on a papasan chair with several cats around her. Moon in the background.How to Save a Single Frame in Daz Studio
    • Perficimus
      - Well thanks for this!Problem + good solution poster = happy user!!! ;-)
  • Queen Elsa with ice wings and forming the heart or love sign with her hands. Magic or spell lights in the background and around her hands.How to Create Frozen’s Queen Elsa in Daz Studio
    • lord lethris
      - I been looking at doing this myself, and trying to find the right dress was impossible - until I stumbled ...
  • Woman exercising with two weights and covered in sweat. Daz Studio Iray render.How to Get Wet Skin in Iray
    • sreenivassan T
      - select skin under "character name" in the surface box.

Copyright © 2021 · Genesis Skins by ShibaShake · Terms of Service · Privacy Policy ·