Think, Draw, Art!

for art lovers

  • Home
  • Gallery
  • Contact
  • Recent Articles
  • Article Categories
    • Daz Studio
    • 3D Art
    • 2D Art
    • Contest
You are here: Home / Daz Studio / How to Save a Daz Studio dForce Frame as a Morph

How to Save a Daz Studio dForce Frame as a Morph

We are a Daz3d affiliate and we use affiliate links in our pages.

by shibashake 15 Comments

I am really enjoying Daz Studio dForce and have been experimenting with wind nodes. In the Pink Lady image below, I used the adorable dForce Sweet Anime Outfit with a wind node below the dress, pointing from the girl’s left to right. After running several different simulations, I got one frame or pose that I really like and would want to save for future use.

Can I save a dForce pose? How do I do this?

The short answer is yes, we can save a Daz Studio dForce frame as a morph. In this tutorial, I will describe the steps I use to save a frame from the dForce Sweet Anime Outfit.

Girl with pink hair, pink dress, and pink petals blowing in the wind. Daz Studio dForce Iray picture. Fantasy Art.
How to Save a Daz Studio dForce Frame as a Morph

1. Save the dForce Frame as an OBJ File

  1. Go to the dForce frame we want to save.
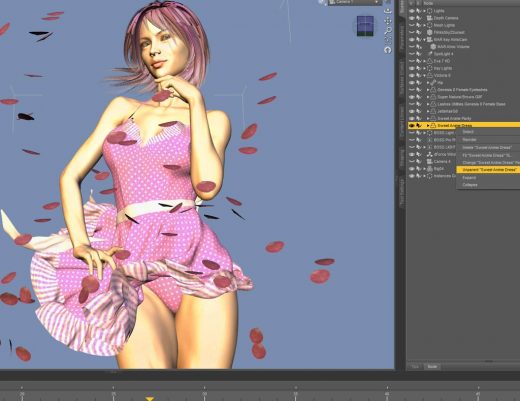
  2. Right-click on the dForce Sweet Anime Outfit and unparent it from our Genesis 8 figure.
  3. Daz Studio screenshot of how to unparent a dForce dress from a Genesis 8 figure.
    1. Right-click on the dForce Sweet Anime Outfit and unparent it from my Genesis 8 figure.
  4. Delete everything else from the scene except for the dForce Sweet Anime Outfit.
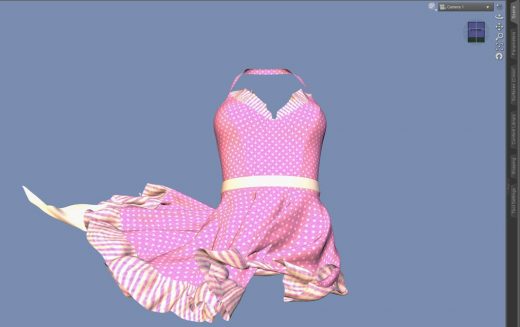
  5. Screenshot of Daz Studio scene with just the dForce Sweet Anime Outfit left at the frame we want to save.
    Delete everything else from the scene except for the dForce Sweet Anime Outfit.
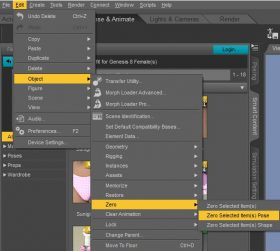
    Daz Studio screenshot of how to select all parts of an object and zero out all other pose and shape settings.
    Zero out all other pose and shape settings on the dForce object.
  6. Zero out all other pose and shape settings on the dForce object. This will ensure that the object mesh that we are saving only has the dForce simulation changes applied to it. I zero out my dForce dress by right-clicking on it and then choose Select > Select Children. Then, I do Edit > Object > Zero > Zero Selected Item(s).
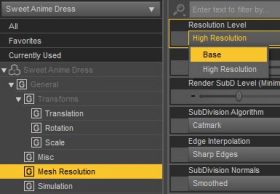
  7. Daz Studio screenshot of how to set the mesh resolution level of our dForce pink dress to Base.
    Set the Mesh Resolution of our dForce object to Base.
  8. Go to the Parameters tab and set General > Mesh Resolution > Resolution Level to Base. This ensures that our saved mesh will properly match with the original object mesh. This is important in the next section when we use our OBJ file as a morph.
  9. Daz Studio screenshot of exporting my dForce mesh as an OBJ file.
    Set Save as type to Wavefront Object (*.obj).
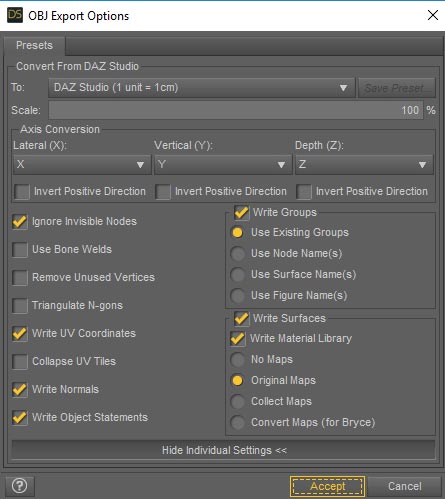
  10. Do File > Export and set Save as type to Wavefront Object (*.obj). I name my OBJ file based on what I want to call my morph parameter. For example, in the case of the pink dress morph, I name my file WindLtoR. For the OBJ Export Options, I use the Daz Studio defaults (see below).
  11. Daz Studio screenshot of OBJ Export options with Daz Studio defaults.
    For the OBJ Export Options, I use the Daz Studio defaults.

At this point, we have an OBJ file of our simulated dForce dress.

2. Save the OBJ File as a Morph

  1. Start a new scene.
  2. Load the base Genesis 8 figure (make sure pose and shape are zeroed out).
  3. Fit the dForce Sweet Anime Outfit to our Genesis 8 figure.
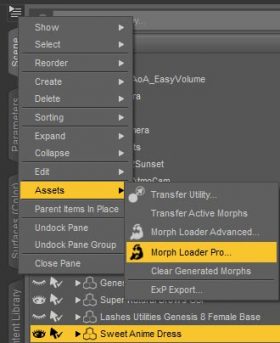
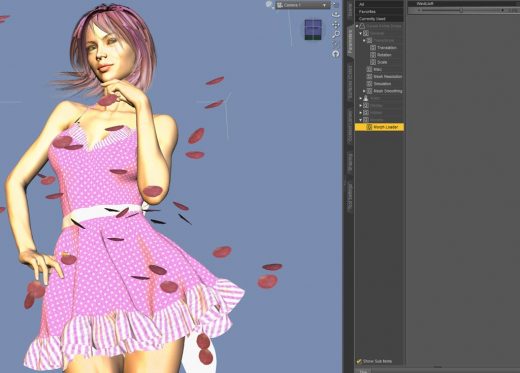
  4. Daz Studio screenshot of how to open up Morph Loader Pro for our dForce pink dress.
    Select our dForce dress and go to Assets > Morph Loader Pro.
  5. Go to the Scene tab and select the dForce Sweet Anime Outfit. Click on the triangle and lines menu button and select Assets > Morph Loader Pro (see right).
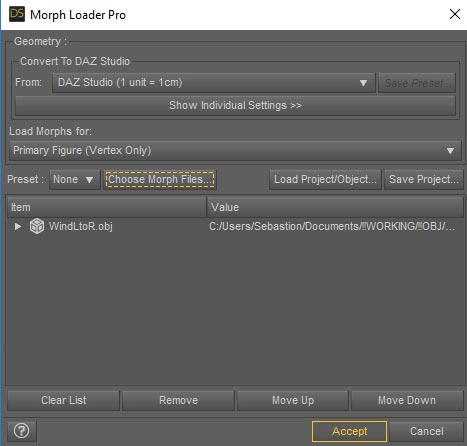
  6. Click on Choose Morph Files and select the OBJ file we saved in the previous section (see below). Hit the Accept button and hopefully the morph will load successfully. A common reason for failure is when the OBJ file mesh does not match with the original object mesh. This is why we want to make sure that the OBJ file only contains the pink dress object and nothing else. In addition, we need to set the Mesh Resolution Level to Base (as outlined in the previous section).
  7. Daz Studio screenshot of the Morph Loader Pro interface.
    Click on Choose Morph Files and select the OBJ file we saved in the previous section.
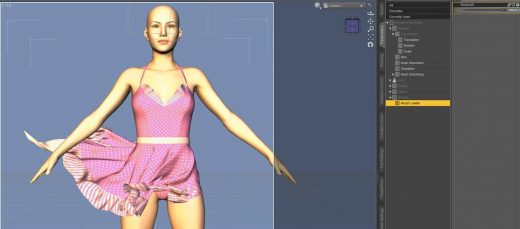
  8. If our morph loaded successfully then it should appear in the Parameters tab under Morphs > Morph Loader. Dial in the morph to see how it looks on our figure.
  9. Daz Studio screenshot of our new scene and with the dialed in saved dForce morph.
    If our morph loaded successfully then it should appear in the Parameters tab under Morphs > Morph Loader.
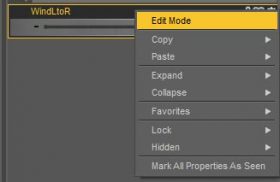
    Daz Studio screenshot of how to enable Edit Mode in the Parameters tab.
    Right-click on our new morph parameter and select Edit Mode.
  10. Right-click on our new morph parameter and select Edit Mode.
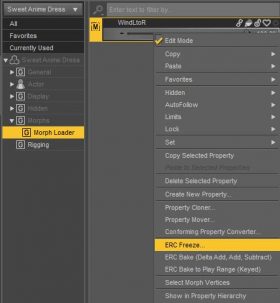
  11. Daz Studio screenshot on applying ERC Freeze to our new dForce wind morph parameter.
    With Edit Mode on, right-click again and choose ERC Freeze…
  12. With Edit Mode on, right-click again and choose ERC Freeze…
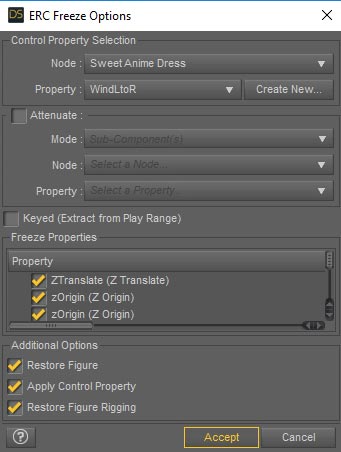
  13. I just use the default ERC Freeze Options and click Accept.
  14. Daz Studio screenshot of the ERC Freeze Options interface.
    I just use the default ERC Freeze Options and click Accept.
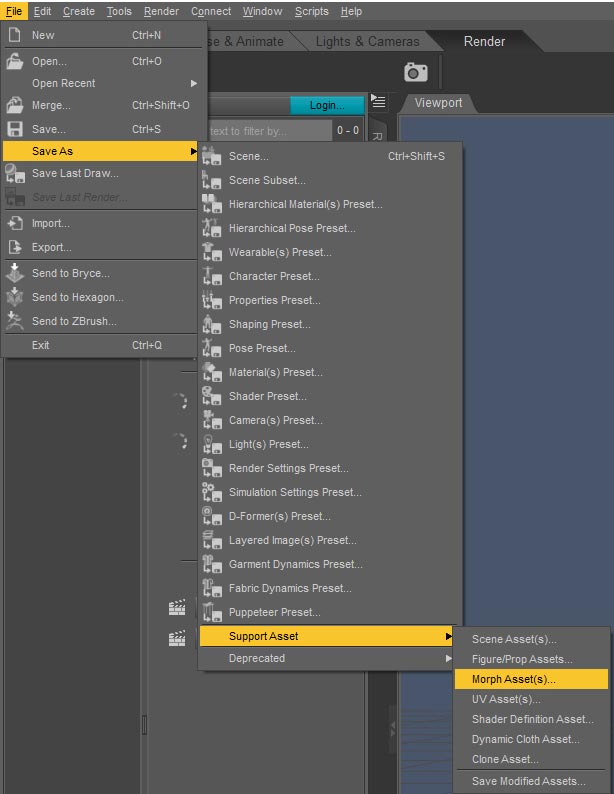
  15. Save our morph by going to File > SaveAs > Support Asset > Morph Asset(s)…
  16. Daz Studio screenshot of how to save our new dForce wind morph as a permanent Morph Asset.
    Save our morph by going to File > SaveAs > Support Asset > Morph Asset(s)…
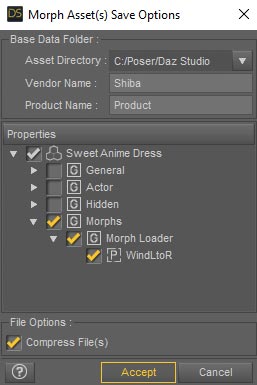
    Daz Studio screenshot of the Morph Asset(s) Save Options interface.
    In the Morph Asset(s) Save Options interface, deselect everything and only click on our new dForce wind parameter (e.g. WindLtoR).
  17. In the Morph Asset(s) Save Options interface, deselect everything and only click on our new dForce wind parameter (e.g. WindLtoR). I also set Vendor Name to Shiba. Click on Accept.

We are all done! Now when I restart Daz Studio and load in the dForce Sweet Anime Outfit, I have my WindLtoR parameter under Morphs > Morph Loader (see below).

Daz Studio screenshot of a newly loaded pink dress with our dForce wind morph attached to it in the Parameters tab.
Now when I restart Daz Studio and load in the dForce Sweet Anime Outfit, I have my WindLtoR parameter under Morphs > Morph Loader.

How to Delete a Saved Morph

  1. Go to Daz Studio Content Directory > data.
  2. Do a search for my OBJ file name, for example WindLtoR.
  3. In this case, the file was in Daz Studio Content Directory > data > nikisatez > G8FSweetAnime > Sweet Anime Dress > Morphs > Shiba > Product > WindLtoR.dsf.
  4. Delete WindLtoR.dsf to delete our newly saved morph.
Brown haired fantasy woman holding glass spheres with three small dragons around her. Fantasy Art. Daz Studio Iray Image.
Daz Studio dForce simulation applied to the dress of the fantasy girl.

Pose vs. Morph

Why can’t I just save my dForce simulation result as a pose?

As I understand it, a pose captures changes made to the bones or rigging of a figure. For example, a pose would be bending the forearm of a figure and turning her head. In contrast, a morph captures changes made to the mesh of the figure. For example, different face shapes or body musculature.

A dForce simulation operates on the mesh of the figure, which is why we are able to get much nicer cloth drapes than what is possible with just rigging. As a result, to save a dForce frame, we will need to save it as a morph.

Daenerys Targaryen, Mother of Dragons, sitting on the Iron Throne, surrounded by three dragons. Fantasy Fan-Art. Daz Studio Iray Image.
Daenerys Targaryen, Game of Thrones Fan-Art. Daz Studio dForce simulation applied to her white dress.

Check Out the Latest Sales at Daz3D

daz sale banner
DAZ Studio FREE 3D MODELS AND SOFTWARE

Leave a Reply Cancel reply

Your email address will not be published. Required fields are marked *

Comments

  1. Frank Rizzo says

    February 10, 2021 at 2:02 pm

    First, thank you for this and your other articles. I hope I’m not too late in contributing this:

    In case this wasn’t brought up, two things:
    1. You can save the object export without deleting anything else. Just make sure ALL other items in the scene are hidden and that “Ignore Invisible Nodes” is checked in the export settings menu during export.
    2. Because of this, you do not have to unparent the item that you are trying to save first. In fact, as someone pointed out, unparenting changes the mesh of that item, which you definitely want to avoid. Conversely, this should answer their question regarding how to save dforce morphs without losing the simulated shape.

    Note, I just performed all this as I was typing it, using a heavily morphed and posed G8F figure. If you are doing the same (not starting with a zero’d figure), you also want to make sure you have “Reverse Deformations” set to Yes in Morph Loader Pro. Otherwise, the morph will cause the simulated deformation to include any movements due figure morph/posing — which you don’t want.

    Reply
    • shibashake says

      February 11, 2021 at 10:09 pm

      Very useful information! Thanks for the add. Are you interested in writing a tutorial on Daz Studio? 🙂

    • Deidre Smith says

      April 30, 2021 at 5:03 am

      Thank you both for writing this article there should be a product offered that does this automagically or it should be built into DAZ perhaps in future generations! Its such a tedious task but well worth the time spent as it saves so much drive space to condense those scenes into one frame!

  2. emu says

    October 8, 2020 at 12:59 pm

    I have been trying to apply this to dForce hair, but the result does not really match the original simulated hair. From what I’ve seen, the shape changes drastically when I remove the original figure (before I save the hair in OBJ format) – same as if I just fit the hair to “none”. And it looks like I end up with the same changed hair shape eventually when I try to reapply it as a morph.

    Not sure how to fix this.

    Reply
  3. Esse says

    August 8, 2020 at 8:26 am

    Just great!
    Thank you so much.

    Reply
  4. Alesia says

    February 16, 2020 at 3:58 am

    Hi!

    Thank you for this tutorial. I have a custom dForce skirt for which I plan on using a certain pose frequently, and having a pre-made morph will save loads of simulation time.

    Will check out the rest of your site

    Reply
  5. Diego Guerra says

    January 26, 2020 at 6:26 am

    Very useful info, thanks a lot

    Reply
  6. HK-47 says

    September 3, 2019 at 5:58 am

    There is one small problem with this tutorial. For sitting poses the clothing items such as skirts are already being deformed by shape matching / auto-follow. If you don’t set Reverse Deformations to Yes when loading the morph your item will have shape-matching applied together with dForce morph which is not what you want.

    Reply
  7. Markus says

    June 5, 2018 at 11:09 am

    Wow, you are amazing. It worked

    Reply
    • shibashake says

      June 5, 2018 at 4:13 pm

      😀

  8. 3doutlaw says

    May 8, 2018 at 12:27 pm

    You do very good tutorials! 🙂 Thanks!

    Reply
    • shibashake says

      May 12, 2018 at 9:09 pm

      Thank you very much!

  9. Kurt says

    May 5, 2018 at 1:10 pm

    I could see where this would come in especially handy if exporting to another program such as Vue.

    Reply
  10. jardine says

    April 28, 2018 at 2:21 pm

    this is a wonderful technique. thanks for sharing!

    Reply
    • shibashake says

      April 28, 2018 at 3:57 pm

      Thank you! 🙂

Recent Posts

  • Duality of life and death represented by a day of the dead girl with black flowers and butterflies on her headdress surrounded by skeletons. Gothic fantasy woman art. Daz Studio Iray image.What Does Our Art Say About Us?
  • Side by side face comparisons of out-of-the-box Millawa 8 face and skin and multiple tweaked Millawa 8 face and skin.Making Skin Pop with the Daz Studio Iray Uber Shader - Part 2
  • Side by side Victoria 8.1 face comparison of Daz Studio's PBR Iray Skin Shader and the Iray Uber Shader..Making Skin Pop with the Daz Studio Iray Uber Shader - Part 1
  • Item used: VR X01 BYOS Modular by Studio360.3D-Art Contest Winners ~ April 2020
  • Qualifying item used Inside Linday's Daz Studio Iray Scenes by Linday3D-Art Contest Winners ~ March 2020

Recent Comments

  • Side by side face comparisons of out-of-the-box Millawa 8 face and skin and multiple tweaked Millawa 8 face and skin.Making Skin Pop with the Daz Studio Iray Uber Shader – Part 2
    • Adil
      - Hi,I hope everything is good at your end. Please if you can help me with light scene duf file for ...
    • jane
      - I can not write 0.24 or 0.24 after 0. doesnt work. would you share your settings?
  • Duality of life and death represented by a day of the dead girl with black flowers and butterflies on her headdress surrounded by skeletons. Gothic fantasy woman art. Daz Studio Iray image.What Does Our Art Say About Us?
    • Plaiades
      - Dear Shiba,i am a long time admirer of your art and have missed you in the DAZiverse. Over a year ...
    • K Smith
      - Thank you for sharing this, a lot of it resonated with me and I know some of the pain you have been through. ...
  • Side by side Victoria 8.1 face comparison of Daz Studio's PBR Iray Skin Shader and the Iray Uber Shader..Making Skin Pop with the Daz Studio Iray Uber Shader – Part 1
    • Foxy
      - Hi, can you save your settins and share with us?

Copyright © 2023 · Genesis Skins by ShibaShake · Terms of Service · Privacy Policy ·