Think, Draw, Art!

for art lovers

  • Home
  • Gallery
  • Contact
  • Recent Articles
  • Article Categories
    • Daz Studio
    • 3D Art
    • 2D Art
    • Contest
You are here: Home / 3D Art / How to Insert Inline Images in the Daz3D Forum

How to Insert Inline Images in the Daz3D Forum

We are a Daz3d affiliate and we use affiliate links in our pages.

by shibashake 1 Comment

Daz3D just updated their forum interface. As with most new things, it took me a while to get used to it, but now, I am getting to like the new interface.

One of the first things that I had trouble with, was how to include properly sized images in my forum posts. I finally figured out how to do this, so this short tutorial gives step-by-step instructions on how to do this with the least amount of fuss. I am using the Chrome browser.

  1. Click on the Attach a file link.
  2. Click on the Choose File button, and select the image file(s) we want to post. This will upload our image files onto the Daz3D forum server.
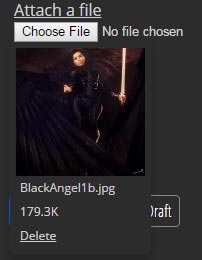
  3. Screenshot of the Delete menu that opens up when we hover our mouse over an attached image in our Daz3D forum post.
    After attaching an image to our Daz3D forum post.
  4. If we hover our mouse over any of the attached image thumbnails, a small menu will open up below it showing us the file size, and giving us the option to delete the image if we so choose.
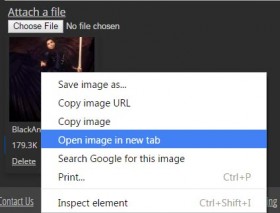
  5. Screenshot of how to get the URL of our newly attached forum post image.
    How to get our attached image URL.
  6. Instead, right click on our attached thumbnail and select Open image in new tab. This will open up our thumbnail image in a new tab on our browser.
  7. Go up into the browser address bar and remove thumbnail/ from the URL. This will give us the URL of our newly (large) attached image, on the Daz3D forum server.
  8. Screenshot of removing the thumbnail/ text from our thumbnail image URL.
    How to get our attached image URL.
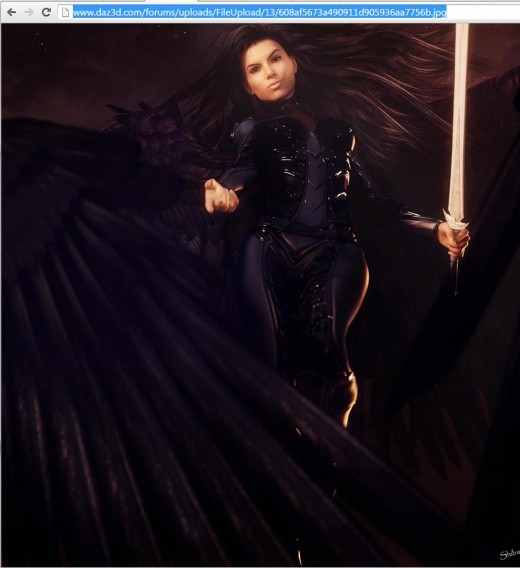
  9. After we delete thumbnail/ from our address bar, and hit , we should get the large sized image we just uploaded onto Daz. Go up to the address bar and copy this URL.
  10. Screenshot of our newly attached image and its  URL in our browser address bar.
    Copy the address (url) of our newly attached image.
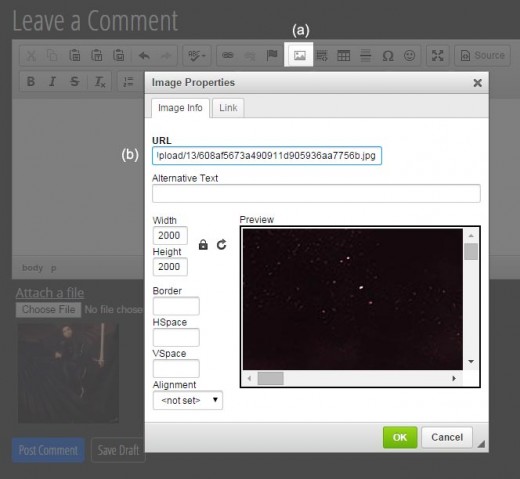
  11. Now we are ready to insert the image into our forum post. First, (a) click on the insert image icon in the Leave a Comment interface, at the bottom of each forum page. This will open up an Image Properties popup-window. Then, (b) paste our image URL into the URL box..
  12. Screenshot of the Daz Forum Image Properties pop-up box.
    How to insert an inline-image into our Daz Forum post.
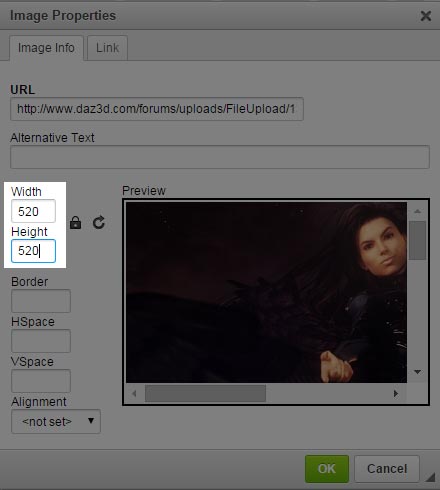
  13. At this point, we can also change the width or height of our image so that it is not too large. I usually set the larger of my image width or height to 520 pixels. Changing one, will cause the other to shift accordingly, to preserve the aspect ratio of our image.
  14. Screenshot of how to change the width or height of the image in our Daz forum post.
    Resize our forum image so that it comfortably fits a browser window.
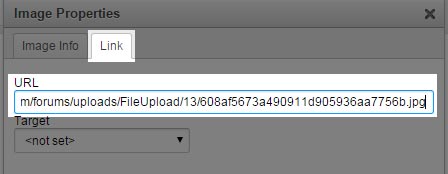
  15. Next, click on the Link tab and paste our attached image URL in there as well. Then click on OK.
  16. Screenshot of how to attach a link to our Daz forum post image.
    Use the Link tab to attach a link to our forum post image.
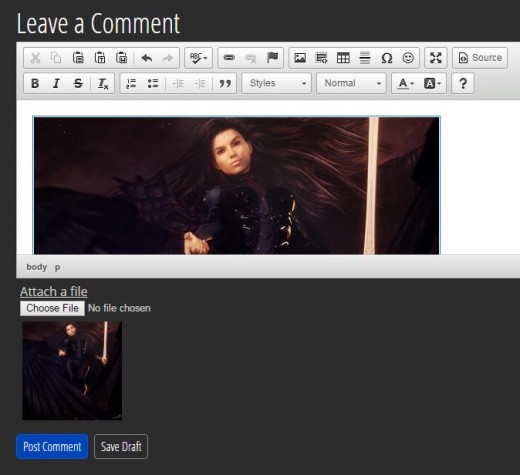
  17. This inserts our attached image into our forum post. We may then add text around it as we so choose.
  18. Screenshot of an inline-image inserted into our Daz forum post.
    Success!! We have now inserted our attached image into our Daz forum post.

Hope you found this mini tutorial to be useful and thanks for visiting!
Check Out the Latest Sales at Daz3D

Check Out the Latest Sales at Daz3D

daz sale banner
DAZ Studio FREE 3D MODELS AND SOFTWARE

Leave a Reply Cancel reply

Your email address will not be published. Required fields are marked *

Comments

  1. Dean says

    March 25, 2020 at 6:31 am

    Thank you so much!!!

    Reply

Recent Posts

  • Duality of life and death represented by a day of the dead girl with black flowers and butterflies on her headdress surrounded by skeletons. Gothic fantasy woman art. Daz Studio Iray image.What Does Our Art Say About Us?
  • Side by side face comparisons of out-of-the-box Millawa 8 face and skin and multiple tweaked Millawa 8 face and skin.Making Skin Pop with the Daz Studio Iray Uber Shader - Part 2
  • Side by side Victoria 8.1 face comparison of Daz Studio's PBR Iray Skin Shader and the Iray Uber Shader..Making Skin Pop with the Daz Studio Iray Uber Shader - Part 1
  • Item used: VR X01 BYOS Modular by Studio360.3D-Art Contest Winners ~ April 2020
  • Qualifying item used Inside Linday's Daz Studio Iray Scenes by Linday3D-Art Contest Winners ~ March 2020

Recent Comments

  • Side by side face comparisons of out-of-the-box Millawa 8 face and skin and multiple tweaked Millawa 8 face and skin.Making Skin Pop with the Daz Studio Iray Uber Shader – Part 2
    • jane
      - I can not write 0.24 or 0.24 after 0. doesnt work. would you share your settings?
  • Side by side Victoria 8.1 face comparison of Daz Studio's PBR Iray Skin Shader and the Iray Uber Shader..Making Skin Pop with the Daz Studio Iray Uber Shader – Part 1
    • Foxy
      - Hi, can you save your settins and share with us?
  • Duality of life and death represented by a day of the dead girl with black flowers and butterflies on her headdress surrounded by skeletons. Gothic fantasy woman art. Daz Studio Iray image.What Does Our Art Say About Us?
    • K Smith
      - Thank you for sharing this, a lot of it resonated with me and I know some of the pain you have been through. ...
  • Knight in armor shooting a steampunk gun at a dragon. Night scene.Shiba 3D-Art Contest
    • Carola O
      - Things are well here, having a bit of a art complication, none of the many ideas I have want to be made ...
    • Carola O
      - Hope you and yours are doing well in these trying times *hugs* (in case this end up double, I tried to ...

Copyright © 2022 · Genesis Skins by ShibaShake · Terms of Service · Privacy Policy ·