After seeing Dave’s wonderful wet skin image on the Daz Gallery, I was inspired to try creating a wet skin render in Daz Studio Iray.
Creating wet skin involves three key steps-
1. Making the composition fit. If our figure is to have wet skin, then we want our composition to support that.
2. Making the skin properly shiny. Wet skin is more shiny and reflective than dry skin because there is water on the skin’s surface.
3. Adding water drops on top of the skin. In addition to being more shiny, there will also be some drops of water clinging to the skin, and trailing down the skin.

1. Making the composition fit
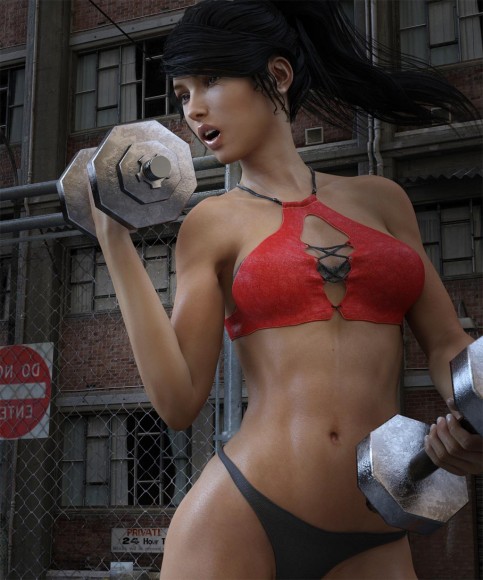
First, I create my scene in Daz Studio. Since I want to focus on the skin, I want my figure to be fairly large, and to have a good amount of skin visible. In addition, she should be doing something that will result in wet skin. In this image, I decided to create a dynamic scene, featuring Victoria 7 exercising with weights. Hair is NJA Ponytail Hair, which is one of my favorites. Outfit is Heat Up for G3F and G2F.
Below is the first pass of my composition with regular Victoria 7 skin. Lighting is just with an IBL. At this point, the skin does not look very wet.

2. Making the skin properly shiny
Next, I want to change certain settings on my Victoria 7 skin to make it more shiny. To do this, I select my Victoria 7 figure, and go into Surfaces > Editor. I select my V7 skins and make the following parameter changes –
- Glossy Layered Weight set to 1.0.
- Glossy Reflectivity set to 0.9.
- Glossy Roughness set to 0.4. This can be set lower if we want to increase the wet effect on skin. Setting it too low though, will make the skin look unrealistically shiny. Therefore, tweak it according to personal taste.
- Top Coat Layering Mode set to Fresnel. Top Coat IOR set to 1.49 and Top Coat Thin Film IOR set to 1.4. Again, Top Coat Roughness can be adjusted according to taste. A lower Roughness value will increase shininess and a higher Roughness value will decrease shininess.
3. Adding water drops on top of the skin
There are multiple ways to achieve this final step. I use a simple technique here, which utilizes the Daz Studio geometry shell.
- First, I select my Victoria 7 figure.
- Next, I go into Create > New Geometry Shell. This creates a shell over our Victoria 7 figure.
- I then select the Geometry Shell and apply the Iray Water shader to it.
- I go to Parameters > Mesh Offset and set the Offset Distance to 0.001.

In the image above, she looks like she has cellophane wrapped all around her. This looks strange because water on our body does not form an even continuous shell. Instead, we only want certain small parts of the shell to be visible, simulating water droplets.
To do this, I do a search on “water condensation bump”. I download an appropriate black and white water condensation image, and apply that to the Cutout Opacity parameter of my geometry shell. I can then adjust the Horizontal and Vertical Tiles parameter to control how much water there is. I decided to go for the more subtle effect here with water drops that are not overly prominent.
Finally, I also add some mesh lights to further accentuate the shininess of my wet skin and shell.

Another way to achieve water droplets on skin is to use crafted specular maps. This is what is done in Genesis 8 Wet Body Iray by SimonWM. He also has a variety of shells for the other Genesis figures. More recently, Hellboy released Real Drops Male Edition, which looks superb. Finally, V3Digitimes also has some great wet skin products, including Wet And Tanned Skins For Genesis 8 Female(s).
In the image below, I used Wet Body Geometry Shells by SimonWM. This is what I did –
- I apply the Wet Body geometry shell to a G2F figure (Victoria 6).
- I select all surfaces on the geometry shell and apply the Iray Uber shader.
- I set Glossy Weight to 1.0, Glossy Reflectivity to 1.0, and Glossy Roughness to 0.
- Finally, I can further control the strength of the drops by changing Translucency Weight. A value of 0 has the strongest wet map.

This first image has a stronger wet body look, and uses the specular Sweat Rolling map. For contrast, we also use a more subtle wet body look, and the Water Beads specular map.


Thanks so much for this wonderful tutorial!
You are very welcome and thank you so much for checking it out! 🙂
I added the same bump as displacement map for geometry realism. Must say, it looks good
Great idea! Thanks for sharing.
Hi ShibaShake,
This tutorial is really great. The only part I’m struggling with is the part of the cutout opacity. I tried a dozen of variants but no matter what I do, I can’t get a single drop effect…
Can you share your knowledge here ?
– What’s your map size in pixels (maybe mine is to small) ?
– How many tiles did you set (maybe in combination with about, I have not enough drops) ?
– Is your map mainly… black? White? Grey ? (maybe I’m using a wrong map) ?
– What’s your cutout opacity value (tried various settings, no effect but could be related with above) ?
Thanks & best regrads,
Uezi
Thank you Uezi. As I understand it, with the Cutout Opacity map, white = visible and black = not visible. Shades in-between will be partly visible according to how white it is. The value controls the strength of the entire map. So, for example, when hair appears too wispy, we may increase the cutout opacity value to make it appear more solid.
The map I used was 800×800 and I set Vertical and Horizontal tiles to 5.
Hello, I cant support another Patreon at the moment but, I simply must say, You have likely saved me since i moved to Gen 3’s for all my rendering. This guide alone has helped me and allowed me to again start using water in my scenes.
Thank you! That is so good to hear. 😀
hi can you please tell me where you got that water bump image
ty so much
i am trying to do the wet skin,oily skin also and its not coming out right
Hello frank, I don’t remember exactly where I got it from. It was just one with condensation drops in grayscale, so anything like that would work. The image is just to give the added look of some water drops. To get the more wet look on the skin I changed the skin shader parameters.
In case anyone else is having the same trouble finding a map, this one seemed to work well when applied to cutout opacity and bump: https://image.ibb.co/f19Kiv/Water_Condensation.png
I tried the wet skin tutorial, but after I applied the Geometry Shell, applied the iRay water shader, set to offset .001, when I render, V7 is all white. What did I do wrong? Thanks.
Sounds like a shader issue, i.e. the shader was not applied to the shell surfaces. Try going into the surface tab, go to Edit, and select all the surfaces on the geometry shell. Then go back to Presets and apply the Iray water shader.
Can you tell us specifically what light set-up you are using?
Thanks!
In the final piece, I used an IBL, three mesh lights (set up according to the 3 point light system), and a volumetric spotlight.
Thanks for the quick response, can you tell me approximately what settings you used.
Actually, a more advanced tutorial on IRay lighting would be much appreciated, I’m struggling with it a bit.
BTW, great website!
Actually, I was interested in the lightning for the “Wet-Skin-Iray-8.jpg” image.
Thanks christian.
That image uses pretty much the same lighting, except without the volumetric spotlight and with less postwork. And yes, definitely have that tutorial on my to-do list, just too many things to do. 🙂
Wow. Just wow. Thanks a lot for this – it’s really quite useful and has taken my renders up a notch!
You are very welcome. 😀
Thank you for your amazing tutorials, I’ve been sitting on the fence for awhile but your clear and concise tutorials make it easy to take the plunge into the new Daz from Poser.
Haha, at the very least, it will be a very interesting experience. Feel free to ask questions here, or the people on the Daz Forum are helpful as well. 😀
Interesting, fun and often frustrating;)
lol! Yeah, sounds about right!
Very very useful. Thanks for this tut!
Thank you Maria! 🙂