Think, Draw, Art!

for art lovers

  • Home
  • Gallery
  • Contact
  • Recent Articles
  • Article Categories
    • Daz Studio
    • 3D Art
    • 2D Art
    • Contest
You are here: Home / Daz Studio / How to Get Wet Skin in Iray

How to Get Wet Skin in Iray

We are a Daz3d affiliate and we use affiliate links in our pages.

by shibashake 37 Comments

After seeing Dave’s wonderful wet skin image on the Daz Gallery, I was inspired to try creating a wet skin render in Daz Studio Iray.

Creating wet skin involves three key steps-
1. Making the composition fit. If our figure is to have wet skin, then we want our composition to support that.
2. Making the skin properly shiny. Wet skin is more shiny and reflective than dry skin because there is water on the skin’s surface.
3. Adding water drops on top of the skin. In addition to being more shiny, there will also be some drops of water clinging to the skin, and trailing down the skin.

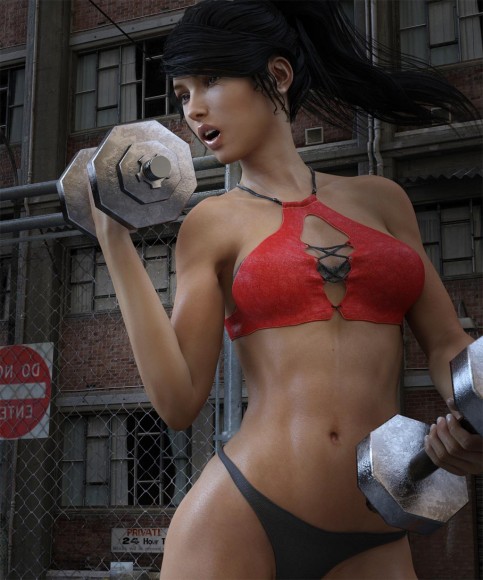
Woman exercising with two weights and covered in sweat. Daz Studio Iray render.
How to Get Wet Skin in Daz Studio Iray

1. Making the composition fit

First, I create my scene in Daz Studio. Since I want to focus on the skin, I want my figure to be fairly large, and to have a good amount of skin visible. In addition, she should be doing something that will result in wet skin. In this image, I decided to create a dynamic scene, featuring Victoria 7 exercising with weights. Hair is NJA Ponytail Hair, which is one of my favorites. Outfit is Heat Up for G3F and G2F.

Below is the first pass of my composition with regular Victoria 7 skin. Lighting is just with an IBL. At this point, the skin does not look very wet.

Victoria7 in dynamic pose exercising with two barbells.  Iray render.
Woman exercising with weights with regular Victoria 7 skin.

2. Making the skin properly shiny

Next, I want to change certain settings on my Victoria 7 skin to make it more shiny. To do this, I select my Victoria 7 figure, and go into Surfaces > Editor. I select my V7 skins and make the following parameter changes –

  • Glossy Layered Weight set to 1.0.
  • Glossy Reflectivity set to 0.9.
  • Glossy Roughness set to 0.4. This can be set lower if we want to increase the wet effect on skin. Setting it too low though, will make the skin look unrealistically shiny. Therefore, tweak it according to personal taste.
  • Top Coat Layering Mode set to Fresnel. Top Coat IOR set to 1.49 and Top Coat Thin Film IOR set to 1.4. Again, Top Coat Roughness can be adjusted according to taste. A lower Roughness value will increase shininess and a higher Roughness value will decrease shininess.
Woman exercising with two barbells, with shiny wet looking skin. Iray render.
Victoria 7 skin after changing Glossy and Top Coat parameters.

3. Adding water drops on top of the skin

There are multiple ways to achieve this final step. I use a simple technique here, which utilizes the Daz Studio geometry shell.

  • First, I select my Victoria 7 figure.
  • Next, I go into Create > New Geometry Shell. This creates a shell over our Victoria 7 figure.
  • I then select the Geometry Shell and apply the Iray Water shader to it.
  • I go to Parameters > Mesh Offset and set the Offset Distance to 0.001.
Added a geometric shell onto Victoria7 with shaders set to Iray water.
Victoria7 after adding a geometric shell with surfaces set to the Iray water shader.

In the image above, she looks like she has cellophane wrapped all around her. This looks strange because water on our body does not form an even continuous shell. Instead, we only want certain small parts of the shell to be visible, simulating water droplets.

To do this, I do a search on “water condensation bump”. I download an appropriate black and white water condensation image, and apply that to the Cutout Opacity parameter of my geometry shell. I can then adjust the Horizontal and Vertical Tiles parameter to control how much water there is. I decided to go for the more subtle effect here with water drops that are not overly prominent.

Finally, I also add some mesh lights to further accentuate the shininess of my wet skin and shell.

Woman exercising with barbells with wet skin look, achieved by adding an appropriate geometric shell and mesh lights.
Added water condensation map to our water geometric shell, so that only small parts of shell are visible. Also added mesh lights to accentuate our wet skin.

Another way to achieve water droplets on skin is to use crafted specular maps. This is what is done in Genesis 8 Wet Body Iray by SimonWM. He also has a variety of shells for the other Genesis figures. More recently, Hellboy released Real Drops Male Edition, which looks superb. Finally, V3Digitimes also has some great wet skin products, including Wet And Tanned Skins For Genesis 8 Female(s).

In the image below, I used Wet Body Geometry Shells by SimonWM. This is what I did –

  • I apply the Wet Body geometry shell to a G2F figure (Victoria 6).
  • I select all surfaces on the geometry shell and apply the Iray Uber shader.
  • I set Glossy Weight to 1.0, Glossy Reflectivity to 1.0, and Glossy Roughness to 0.
  • Finally, I can further control the strength of the drops by changing Translucency Weight. A value of 0 has the strongest wet map.
Goddess of water with wet skin. She is standing with two water dragons, in front of a choppy ocean.
Water Goddess image with stronger Sweat Rolling specular wet body map.

This first image has a stronger wet body look, and uses the specular Sweat Rolling map. For contrast, we also use a more subtle wet body look, and the Water Beads specular map.

Water Goddess image with high contrast fantasy lighting, wet body specular maps, water dragons, and ocean.
Water Goddess image with more subtle Water Beads specular wet body map. Also using more fantasy lighting here.

Related Articles

Daz Studio Iray Tips and Tricks

I am really loving the results that I am getting from Daz Studio Iray. Here, I talk about some of the useful Iray techniques that I have learned from the Daz3D forums, from talking to other Dazaholics, and from my own Iray experiments.

Water Shader Tutorial for Daz Studio Iray

In this tutorial we focus on the three water shaders in Daz Studio Iray - water, water thin, and water dispersive. We also experiment with an underwater mermaid scene and water caustics.

Daz Studio Iray Tutorial for Beginners

This tutorial describes how I create a simple scene, from start to finish, for the Daz Studio Iray renderer. In particular, I discuss how to assign Iray materials, and how to create simple but realistic lighting in Iray with an image based light (IBL).

Check Out the Latest Sales at Daz3D

DAZ Studio FREE 3D MODELS AND SOFTWARE

Comments

  1. Hobby says

    April 16, 2020 at 5:36 am

    Thank you for this tutorial! Much appriciated.

    But after working fine for a while, suddenly for no reason it’s not working.
    Character body only turns red.

    The solution I found is to increase Mesh Offset distance to 0.003 (or higher)
    Hope that helps others. I found no solution that worked for me on google.

    Reply
  2. Howard says

    May 22, 2017 at 11:54 am

    Hey – this is a completely fantastic, clearly written tutorial – in a domain where there is a lot of completely confusing info on Daz. I realize this about a year and a half after you posted this, and I apologize if my question seems incredibly amateur, but I’m not an advanced user) but my question is:

    In ‘2. Making the skin properly shiny’ you write:
    “Glossy Layered Weight set to 1.0.
    Glossy Reflectivity set to 0.9.
    Glossy Roughness set to 0.4. This can be set lower if we want to increase the wet effect on skin. Setting it too low though, will make the skin look unrealistically shiny. Therefore, tweak it according to personal taste.
    Top Coat Layering Mode set to Fresnel. Top Coat IOR set to 1.49 and Top Coat Thin Film IOR set to 1.4. Again, Top Coat Roughness can be adjusted according to taste. A lower Roughness value will increase shininess and a higher Roughness value will decrease shininess.”

    But nowhere can I find any of these parameters within Surfaces>Editor. I’m using Victoria 6 on Daz3D 4.9, with Iray. Clearly I’m looking in the wrong place? Do you have any guidance?

    thanks so much,
    Howard

    Reply
    • shibashake says

      May 22, 2017 at 5:02 pm

      Hmmm, do you have Victoria 6 selected? If so, there should be a Victoria 6 button in surfaces > editor? Open that up and click on skin.

      Oh I just thought of another thing, V6 comes with 3Delight shaders, so we also need to convert the shaders to Iray. I have more on that here –
      http://thinkdrawart.com/daz-studio-iray-tutorial-for-beginners#shader

      There are also more complex vendor solutions for converting old skin to Iray skin, but the tut above is a starting point.

    • Howard says

      May 23, 2017 at 3:34 pm

      Yup, I’ve done that, though I’m using V6 HD. Could that be an issue?

      I did a screen shot of all of the parameters available under V6>Surfaces>Skin but no way to include one here. There are approx 60 parameters. I did a search, and have scrolled carefully through the entire list, but Glossy Layered Weight, Glossy Reflectivity, Glossy Roughness and Top Coat Layering appear nowhere.

      Should I be looking at a different advanced palette?
      It starts with:
      Tags
      Ambient Color
      Ambient SSS Contribution
      Ambient Strength
      Bump Noise Strength
      …. and ends with …
      UV Set
      Angle
      SmoothOnline ID Color
      Online Depth.

      Thanks very much for your help.

    • Howard says

      May 23, 2017 at 3:45 pm

      Last point, in case this is helpful: on another tutorial, the Surfaces tab is titled “Surfaces (Color)” – mine is just Surfaces.

    • Howard says

      May 23, 2017 at 3:46 pm

      THANKS> Just figured it out. I had Skin selected but did not have “All”at the very top of the Editor menu. Thanks for being so considerate and responding, and providing the link.

    • shibashake says

      June 3, 2017 at 12:43 am

      You are very welcome. Feel free to post more questions here.

    • sreenivassan T says

      July 11, 2020 at 8:26 pm

      select skin under “character name” in the surface box.

  3. DrDrk says

    January 24, 2017 at 6:43 pm

    I cannot get this to work on scenes outside where there is a sky dome, the water shell reacts very strangely. any suggestions?

    Reply
    • shibashake says

      January 27, 2017 at 1:37 pm

      Probably a result of the reflection. First thing I would check is the skydome and skydome settings. Try setting it to Infinity and see what changes.

  4. Merceneiress says

    October 30, 2016 at 8:16 am

    Thanks so much for this wonderful tutorial!

    Reply
    • shibashake says

      October 31, 2016 at 10:43 pm

      You are very welcome and thank you so much for checking it out! πŸ™‚

  5. Hindemith says

    July 24, 2016 at 5:32 pm

    I added the same bump as displacement map for geometry realism. Must say, it looks good

    Reply
    • shibashake says

      July 26, 2016 at 2:10 pm

      Great idea! Thanks for sharing.

  6. Uezi says

    July 21, 2016 at 8:58 pm

    Hi ShibaShake,

    This tutorial is really great. The only part I’m struggling with is the part of the cutout opacity. I tried a dozen of variants but no matter what I do, I can’t get a single drop effect…
    Can you share your knowledge here ?
    – What’s your map size in pixels (maybe mine is to small) ?
    – How many tiles did you set (maybe in combination with about, I have not enough drops) ?
    – Is your map mainly… black? White? Grey ? (maybe I’m using a wrong map) ?
    – What’s your cutout opacity value (tried various settings, no effect but could be related with above) ?

    Thanks & best regrads,
    Uezi

    Reply
    • shibashake says

      July 24, 2016 at 2:37 pm

      Thank you Uezi. As I understand it, with the Cutout Opacity map, white = visible and black = not visible. Shades in-between will be partly visible according to how white it is. The value controls the strength of the entire map. So, for example, when hair appears too wispy, we may increase the cutout opacity value to make it appear more solid.

      The map I used was 800×800 and I set Vertical and Horizontal tiles to 5.

  7. Zoophilian says

    July 16, 2016 at 9:36 pm

    Hello, I cant support another Patreon at the moment but, I simply must say, You have likely saved me since i moved to Gen 3’s for all my rendering. This guide alone has helped me and allowed me to again start using water in my scenes.

    Reply
    • shibashake says

      July 17, 2016 at 11:55 pm

      Thank you! That is so good to hear. πŸ˜€

  8. frank says

    May 22, 2016 at 6:27 pm

    hi can you please tell me where you got that water bump image
    ty so much
    i am trying to do the wet skin,oily skin also and its not coming out right

    Reply
    • shibashake says

      May 22, 2016 at 9:12 pm

      Hello frank, I don’t remember exactly where I got it from. It was just one with condensation drops in grayscale, so anything like that would work. The image is just to give the added look of some water drops. To get the more wet look on the skin I changed the skin shader parameters.

    • Dave says

      April 3, 2017 at 10:25 pm

      In case anyone else is having the same trouble finding a map, this one seemed to work well when applied to cutout opacity and bump: https://image.ibb.co/f19Kiv/Water_Condensation.png

  9. Morphious says

    April 15, 2016 at 8:07 am

    I tried the wet skin tutorial, but after I applied the Geometry Shell, applied the iRay water shader, set to offset .001, when I render, V7 is all white. What did I do wrong? Thanks.

    Reply
    • shibashake says

      April 16, 2016 at 4:29 pm

      Sounds like a shader issue, i.e. the shader was not applied to the shell surfaces. Try going into the surface tab, go to Edit, and select all the surfaces on the geometry shell. Then go back to Presets and apply the Iray water shader.

  10. Christian says

    November 3, 2015 at 6:12 pm

    Can you tell us specifically what light set-up you are using?

    Thanks!

    Reply
    • shibashake says

      November 4, 2015 at 3:52 pm

      In the final piece, I used an IBL, three mesh lights (set up according to the 3 point light system), and a volumetric spotlight.

    • christian says

      November 5, 2015 at 6:27 am

      Thanks for the quick response, can you tell me approximately what settings you used.
      Actually, a more advanced tutorial on IRay lighting would be much appreciated, I’m struggling with it a bit.
      BTW, great website!

    • christian says

      November 5, 2015 at 11:57 am

      Actually, I was interested in the lightning for the “Wet-Skin-Iray-8.jpg” image.

    • shibashake says

      November 9, 2015 at 12:44 pm

      Thanks christian.

      That image uses pretty much the same lighting, except without the volumetric spotlight and with less postwork. And yes, definitely have that tutorial on my to-do list, just too many things to do. πŸ™‚

  11. Warren says

    October 16, 2015 at 6:32 pm

    Wow. Just wow. Thanks a lot for this – it’s really quite useful and has taken my renders up a notch!

    Reply
    • shibashake says

      October 16, 2015 at 10:58 pm

      You are very welcome. πŸ˜€

  12. Allegra says

    September 11, 2015 at 2:40 am

    Thank you for your amazing tutorials, I’ve been sitting on the fence for awhile but your clear and concise tutorials make it easy to take the plunge into the new Daz from Poser.

    Reply
    • shibashake says

      September 12, 2015 at 9:42 pm

      Haha, at the very least, it will be a very interesting experience. Feel free to ask questions here, or the people on the Daz Forum are helpful as well. πŸ˜€

    • Allegra says

      September 13, 2015 at 3:19 am

      Interesting, fun and often frustrating;)

    • shibashake says

      September 13, 2015 at 11:09 pm

      lol! Yeah, sounds about right!

  13. Maria says

    September 9, 2015 at 6:51 pm

    Very very useful. Thanks for this tut!

    Reply
    • shibashake says

      September 10, 2015 at 11:03 pm

      Thank you Maria! πŸ™‚

Leave a Reply Cancel reply

Your email address will not be published.

Recent Posts

  • Item used: VR X01 BYOS Modular by Studio360.3D-Art Contest Winners ~ April 2020
  • Qualifying item used Inside Linday's Daz Studio Iray Scenes by Linday3D-Art Contest Winners ~ March 2020
  • Qualifying item used –Z Beauty Poses for Kalea 73D-Art Contest Winners ~ February 2020
  • Qualifying item: - Li'l Scrap Boy HD for Genesis 8 Male by Pixeluna3D-Art Contest Winners ~ January 2020
  • Qualifying items used –Ancient Tomes by Merlin Studios3D-Art Contest Winners ~ December 2019
  • Shiba contest qualifying Item used: Mech Dancer Outfit3D-Art Contest Winners ~ November 2019
  • Shiba contest qualifying items used – Greeble City Blocks, Greeble City Blocks 2, Greeble City Blocks 3; and Greeble City Blocks 04 by Stonemason.3D-Art Contest Winners ~ October 2019
  • Shiba Contest Featured Vendor Petipet. Used: Car Edi, Unicycle Bob, Bus Maxis, Bus Pegasus & Motorbike ZAZ3D-Art Contest Winners ~ September 2019
  • Qualifying item for shiba contest - Z Almost Human Poses by Zedicuss3D-Art Contest Winners ~ August 2019
  • Qualifying items used – Rei HD for Genesis 8 Female by Mousso.3D-Art Contest Winners ~ July 2019

Recent Comments

  • Cute cat girl fantasy pin-up art with folded arms and standing in a forest or woods. Fantasy art rendered in Daz Studio Iray.Best Fantasy Women Skins, 3D-Art
    • - Can I ask how you got the Tigerlily skin on a G8F figure?
  • Girl reaching upward for a flying bird (signifying knowledge, dreams, or more) while another holds her down to earth.Daz Studio Iray Tips and Tricks
    • G.Carlo
      - Very Helpful, thanks!!!!
  • Blonde haired sci-fi elf girl with sword, standing next to an owl robot. Fantasy sci-fi woman art. Daz Studio Iray image.What Is Daz Studio?
    • Shanique
      - Hey please check your inbox on deviantart ASAP, I’ve been trying to reach out to you. Thanks
  • Screenshot of the Environment Map interface in Daz Studio Octane.How to Set-Up Camera, Lights, & Displacement in Daz Studio Octane
    • dmc
      - In my case I turned up the intensity of the spherical light. In Octane:(1) Select the Sphere-Default ...
  • Girl with pink hair, pink dress, and pink petals blowing in the wind. Daz Studio dForce Iray picture. Fantasy Art.How to Save a Daz Studio dForce Frame as a Morph
    • emu
      - I have been trying to apply this to dForce hair, but the result does not really match the original simulated ...
    • Esse
      - Just great! Thank you so much.
  • Warrior woman riding on a tiger while shooting a bow and arrow.How to Combine Multiple Poses in Daz Studio
    • Jan Freeman
      - Totally awesome tutorial!! I was able to lock Mavka in DS in her violin playing pose, then pose her ...
  • Catwoman sitting on a papasan chair with several cats around her. Moon in the background.How to Save a Single Frame in Daz Studio
    • Perficimus
      - Well thanks for this!Problem + good solution poster = happy user!!! ;-)
  • Queen Elsa with ice wings and forming the heart or love sign with her hands. Magic or spell lights in the background and around her hands.How to Create Frozen’s Queen Elsa in Daz Studio
    • lord lethris
      - I been looking at doing this myself, and trying to find the right dress was impossible - until I stumbled ...
  • Woman exercising with two weights and covered in sweat. Daz Studio Iray render.How to Get Wet Skin in Iray
    • sreenivassan T
      - select skin under "character name" in the surface box.

Copyright © 2021 · Genesis Skins by ShibaShake · Terms of Service · Privacy Policy ·