Think, Draw, Art!

for art lovers

  • Home
  • Gallery
  • Contact
  • Recent Articles
  • Article Categories
    • Daz Studio
    • 3D Art
    • 2D Art
    • Contest
You are here: Home / Daz Studio / How I Light My Daz Studio Iray Scenes

How I Light My Daz Studio Iray Scenes

We are a Daz3d affiliate and we use affiliate links in our pages.
Tweet

by shibashake 17 Comments

There is no single “right way” to do lighting in Daz Studio Iray. In this tutorial, I will describe my lighting process, which is geared towards figure based compositions. In particular, my images focus on one or a small number of actors, and everything else is built around those figures.

I use three main classes of lights in all my Iray scenes-

  1. An image based light (IBL). This is a HDR image that I use in Render Settings > Environment > Environment Map.
  2. Three mesh lights arranged according to the three-point light system.
  3. One or more volumetric lights for softening effects and atmosphere.

Then, I may add point-lights or emissive surfaces based on composition.

Woman wearing a veil and sari, with interesting ruins in the distance.
How I Light My Daz Studio Iray Scenes

We will use the image above to illustrate the different classes of lights and why we use them, in this tutorial. The outfit and hair used in the image are from the NeoIndia Outfit and Hair Bundle by Arki and Shox-Design. The ruins in the backdrop is Mandgadfor by powerage.

1. Image Based Light (IBL)

I usually use a HDR image for this to provide my scene with –

  • Realistic ambient lighting.
  • Realistic reflections.
  • Realistic background that is consistent with both lighting and reflections.

This beginner Iray tutorial has more on how I use a HDR image in Daz Studio Iray.

How well our IBL illuminates the scene will depend in large part on the HDR image we are using. In particular, what range of values it supports. The higher the range, the better the results.

I think about it this way … sunlight is a very strong light source, and its value should be many many times greater than anything else in the scene. Using a regular JPG image that only supports 255 values per pixel, is not going to work well for scene lighting. This is because the difference in range between our very bright sunlight and everything else will be overly compressed. I.e. a lot of light information in our IBL would be lost due to range limits.

A decent JPG can serve as a good enough background, but it will not be sufficient for providing good realistic scene lighting.

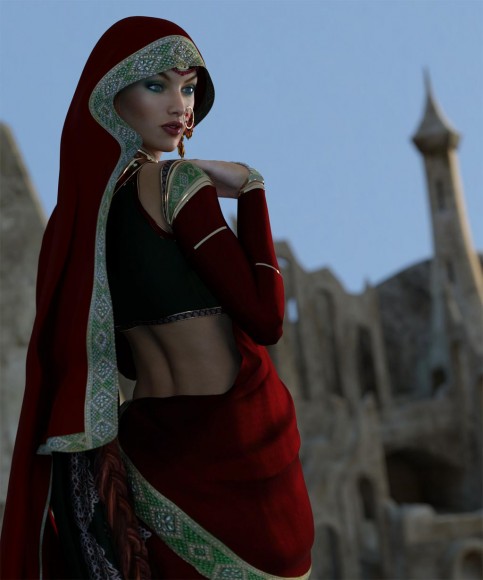
Below is our Princess of the East image, with just the IBL turned on. Here, we are using the Barcelona Rooftops HDRI from sIBL Archives.

Princess of the East scene with just the IBL turned on.
Scene lighted with just an IBL (Iray Environment Map).

2. Mesh Lights

If we are already using a good HDR image, why do we need to add mesh lights?

I add mesh lights to highlight my main figure(s) and make them stand-out from the rest of the scene. This is especially important in figure based compositions, because the focus of the image is on the main actor(s) in the scene.

I think about it this way … when we go out walking in the streets, the scene around us is very busy. Although we may imagine ourselves to be the center of attention, no single individual stands out from the rest. This is what we get with a HDR image.

In contrast, during a model photo-shoot, lights are added to bring out the figure so that it grabs the viewer’s attention.

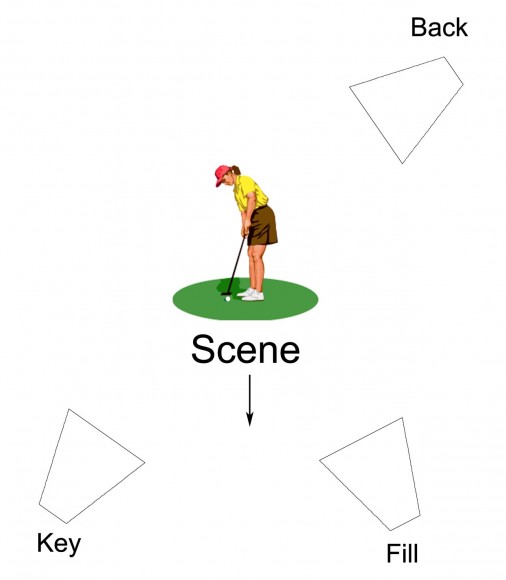
  1. To highlight my main figure(s), I add three Daz Studio spotlights (Create > New Spotlight).
  2. I place my three lights according to the three-point light system (key, fill, back).
  3. Then, I convert each of my spotlights into mesh lights by setting the Light Geometry parameter to Rectangle. This will give me softer shadows. For more details on how to convert a spotlight into a mesh light refer to this article.
  4. I want my back light to have the sharpest shadows, so I set its size to be the smallest of the three. I want my fill light to have the softest shadows, so it gets the largest rectangle. The key light is somewhere in-between the two.
  5. Finally, I select my three lights and add them to a group (Create > New Group), so that I can move them and rotate them together. In this way, I can easily center my three lights around the main figures within my Daz Studio scene.
Diagram of the three-point light system with positions for the key, fill, and back lights.
To bring out my main figure(s), I add three lights according to the three-point light system.

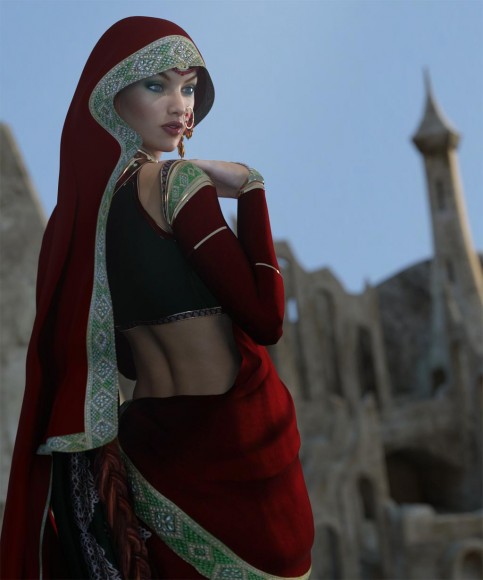
After adding the three mesh lights to my IBL, my figure stands out a lot more from the background, and there is a much stronger silhouette on my figure. If we compare this image and the previous one, with just the IBL, we can clearly see that the lighting is more compelling here and the figure pops from the background.

Princess of the East image with IBL and three mesh lights positioned according to the three-point light system.
After adding my three mesh lights to my IBL, my figure stands out a lot more from the background.

3. Volumetric Light

I also like to add at least one volumetric light to my images to provide additional shadows and atmosphere. In this case, I add a spotlight shining onto my figure’s face. I then render it as a volumetric light by using Marshian’s AtmoCam for Iray.

You can also create your own volumetric light by following the procedure here.

Princess of the East image with IBL, three mesh lights, and a volumetric light shining on her face.
Add a volumetric spotlight shining on our figure’s face. This adds more shadows and atmosphere.

Finally, I re-tone the image some, add a little bit of glow, add some contrast, and I am done!

You will notice that I do not talk much about light intensities in this tutorial. This is because I usually render each light in a separate layer, and later combine them in Photoshop. I control intensity, tint, and more from within Photoshop.

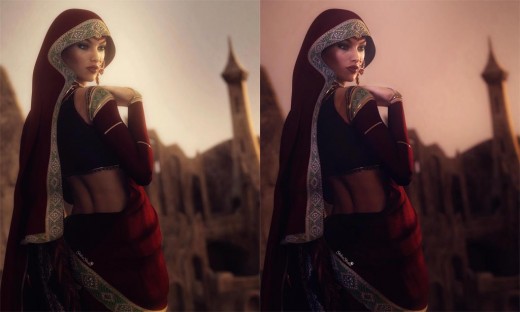
Depending on how I combine these lights, I can create a day-time scene or a sunset scene. I can create a realistic image or a colorful fantasy setting.
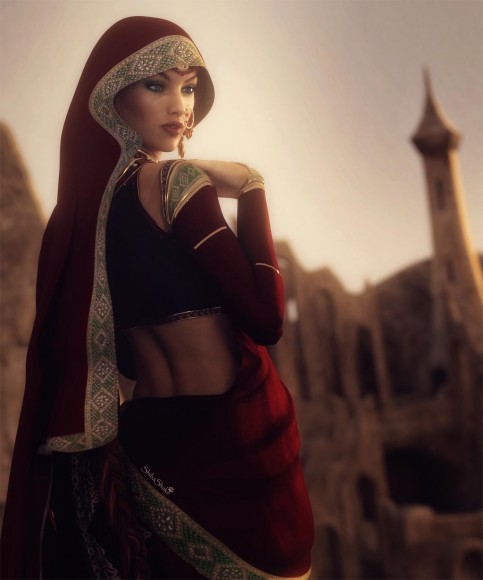
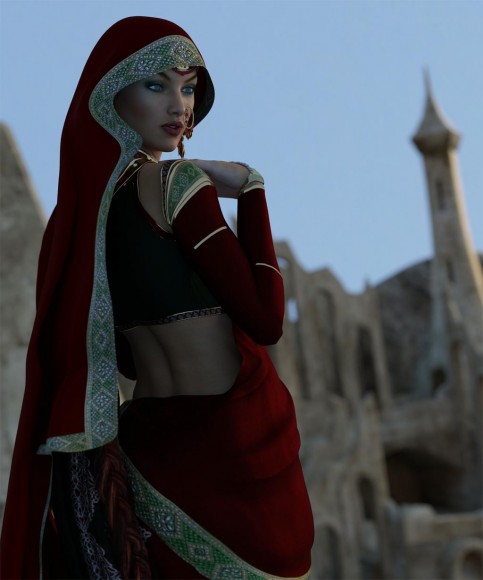
Day-time and Sunset lighting of my Princess of the East image.
By combining lights differently in Photoshop, I can get a day-time or sunset scene; a realistic or a fantasy scene.

Related Articles

Daz Studio Iray Tutorial for Beginners

This tutorial describes how I create a simple scene, from start to finish, for the Daz Studio Iray renderer. In particular, I discuss how to assign Iray materials, and how to create simple but realistic lighting in Iray with an image based light (IBL).

Daz Studio Iray Tips and Tricks

I am really loving the results that I am getting from Daz Studio Iray. Here, I talk about some of the useful Iray techniques that I have learned from the Daz3D forums, from talking to other Dazaholics, and from my own Iray experiments.

Water Shader Tutorial for Daz Studio Iray

In this tutorial we focus on the three water shaders in Daz Studio Iray - water, water thin, and water dispersive. We also experiment with an underwater mermaid scene and water caustics.

DAZ Studio FREE 3D MODELS AND SOFTWARE

Comments

  1. Kurt says

    May 9, 2018 at 6:28 am

    I took some of this advice with this image. It took a few tries to get the lighting right. Had to tone down the rock diffuse color a lot to get the balance I wanted. https://polyrender.deviantart.com/art/Fallen-Angel-744147082 I used atmocam for a volume layer and then made the rays by creating a mask using Filter Forge. Actually just using FF would probably be a lot faster than messing with volume. 3 renders at 2000 X 1600. Each one only took about half hour a piece.

    Reply
    • shibashake says

      May 12, 2018 at 9:14 pm

      Very nicely done! Yeah, I usually turn down the diffuse of background items. There are also ray props, but I like using atmocam because then the rays and shadows cast are based on the objects in the scene.

  2. Kurt says

    May 5, 2018 at 1:36 pm

    Excellent. I didn’t know you could convert spots to meshes. Will have to try that trick. Have you written a how to on your Iray Atmocam usage? I have it and sometimes use it but it looks like you are confining it to a small area. Or perhaps it is just one of your light passes. I used to render in light layers with 3DL but haven’t done that much with Iray since the more light, the faster it goes (though, with 3 GTX-1080s, I don’t worry about speed much).

    Reply
    • Kurt says

      May 5, 2018 at 1:58 pm

      Oh wait, I guess I already do that with spot lights, only I usually use sphere or disc.

    • shibashake says

      May 5, 2018 at 3:33 pm

      Yeah, I use Atmocam is a separate light pass, so that I can limit it to specific lights. It may be possible to do this in a single pass in Iray with canvasses, but I haven’t really looked deeply into that.

  3. lanny says

    August 16, 2017 at 8:25 pm

    hi boss, how Mesh Lights to HDR Image? Thanks!!!

    Reply
    • shibashake says

      August 17, 2017 at 12:42 pm

      I have not done that before, so have no idea. Google probably knows, and Dimension Theory has a bunch of HDR light sets that may help.

  4. Carl says

    November 5, 2016 at 8:17 pm

    I’ve read the comments and I have a question 🙂 how do you render the lights manually? Like you click the eye to turn the ibl light while he other lights are off then render, then turn on the key light while the other lights are turned off then render, etc? Also I’m not in my computer right now but I’d also ask this just to be sure, is IBL the environment light? If it is how can you have an ibl inside a building like what you’ve suggested in one of the comments. Thanks!

    Reply
    • shibashake says

      November 6, 2016 at 9:37 pm

      Like you click the eye to turn the ibl light while he other lights are off then render, then turn on the key light while the other lights are turned off then render, etc?

      Yes, that is what I currently do.

      I’d also ask this just to be sure, is IBL the environment light?

      Yes, that is exactly what I am referring to. 🙂

      Several ways in which I light interior scenes –
      http://thinkdrawart.com/daz-studio-iray-tutorial-for-beginners#comment-188061

  5. Jayne Wilson says

    May 2, 2016 at 6:34 pm

    Thanks for this great tutorial — I’m a complete dunce when it come to lighting an IRAY scene. I do have a question though (don’t we always?) I’m trying to do a scene which includes actual scenery, the Helena Tomb. I’ve created a three point light rig for my character, but when I render it’s coming out really dark because I’m not using an IBL light. Can I use an IBL light even though I have a building in the scene? I guess I could give it a try and see – but wondered what your thoughts are on this.

    Reply
    • shibashake says

      May 2, 2016 at 10:26 pm

      Yes, you can use an IBL light in whatever scene. However, you want to make sure that that buildings/scene objects are not blocking your light from the main character(s).

  6. Dan Burke says

    February 29, 2016 at 11:43 am

    Very nice renders!
    I especially like the mesh lights after HDR. Pops like a light wrap.
    Any advice on where to learn about multipass rendering in iray Daz? I get that the LPE passes is where you get the renders, but the process is not easy. Any resources you know of?
    Thanks.

    Reply
    • shibashake says

      February 29, 2016 at 1:55 pm

      Great tutorial by Esemwy on rendering light groups to different layers.

      However, I render things manually a lot of the time since I have to do my volumetric layer(s) separately anyway, and I am now playing with multiple environment maps.

  7. sioc says

    February 26, 2016 at 12:25 pm

    What character is it ?

    Reply
    • shibashake says

      February 26, 2016 at 4:30 pm

      Mix of Eva7 and Victoria7.

  8. chrisvika says

    December 21, 2015 at 2:17 pm

    Thanks, this is a really helpful tutorial

    Reply
    • shibashake says

      December 23, 2015 at 2:45 pm

      You are very welcome. Happy Holidays! 😀

Leave a Reply to sioc Cancel reply

Your email address will not be published.

Recent Posts

  • Qualifying item used: Lexy HD for Genesis 8 Female by Mousso3D-Art Contest Winners ~ January 2019
  • Looking for her Prince. Item used: Y'vas Outfit for Genesis 8 Female by Aeon Soul.3D-Art Contest Winners ~ December 2018
  • Qualifying items used –Emiyo HD for Mei Lin 83D-Art Contest Winners ~ November 2018
  • Blonde haired sci-fi elf girl with sword, standing next to an owl robot. Fantasy sci-fi woman art. Daz Studio Iray image.What Is Daz Studio?
  • Qualifying Daz Originals: Sensibility, Sensibility Expansion and Reparation by Daz Originals3D-Art Contest Winners ~ October 2018
  • Featured vendor: deviney. Item used: 'Ron' Explosions' from deviney.3D-Art Contest Winners ~ September 2018
  • Qualifying items used –Barbarian Warrior Outfit for Genesis 8 Females by Linday3D-Art Contest Winners ~ August 2018
  • Qualifying item used: FWSA Helena for Alexandra 8 by FWArt3D-Art Contest Winners ~ July 2018
  • Two cute cat girls, one sitting on the floor with red hair and another sitting on a bench with pink hair. Fantasy women pin-up art. Daz Studio Iray image.Pre and Post-Work Images – Cute Cat Girls, Fantasy Women Pin-Up Art
  • Qualifying items used –Hongyu's Bikini For Genesis 8 Females(s)3D-Art Contest Winners ~ June 2018

Recent Comments

  • Qualifying item used: Lexy HD for Genesis 8 Female by Mousso3D-Art Contest Winners ~ January 2019
    • Vueiy
      - Thanks for the honorable mention, and congrats to the other winners; awesome work!
    • NapalmArsenal
      - WOW thanks so much guys! There are some amazing pieces displayed here. I'm honored to be included with ...
    • Deanna Cathcart
      - Congrats everyone, really beautiful work!
    • VortigensBane
      - Like Kibosh said, selecting "memory" under Optimization (why you can't set that as the default and make ...
    • Kibosh
      - Apologies for butting into the conversation, I also couldn't run the meadow grass without crashing when ...
    • Kibosh
      - Congratulations to all the winners and a big thank you for selecting my work also. It's always fun and ...
    • Stalest
      - Congratulations to all the winners and a big thank you for the HM.
    • Thoreandan
      - Wow, stunning work by the winners, the choices are all very well deserved!
    • Secret77
      - Congratulations to all, awesome work by all!Thank you so much for the thoughtful comments. It is ...
    • BavarianR
      - Congrats to all and thank you!

Copyright © 2019 · Genesis Skins by ShibaShake · Terms of Service · Privacy Policy ·