Think, Draw, Art!

for art lovers

  • Home
  • Gallery
  • Contact
  • Recent Articles
  • Article Categories
    • Daz Studio
    • 3D Art
    • 2D Art
    • Contest
You are here: Home / Daz Studio / Daz Studio Iray Tips and Tricks

Daz Studio Iray Tips and Tricks

We are a Daz3d affiliate and we use affiliate links in our pages.

by shibashake 13 Comments

I am really enjoying the Iray renderer in Daz Studio. It is fast (with an nVidia card), and I like the results that I get. With the release of Victoria 7, there are now some really great Iray skins available. In addition, there have been a lot of vendor support for Daz Studio Iray, including some awesome light sets and material sets. For me, this is the key thing that separates the Iray renderer from Reality/LuxRender.

However, one of the key weaknesses of Daz Studio Iray is the difficulty of finding information on how to use it effectively, and how its’ new features can help to enhance my art. There is a lot of good stuff in the Daz3D forums, however one usually has to wade through pages and pages of images and posts, before getting to anything that helps.

Here, I want to list some of the useful Iray tips and tricks that I learned from the Daz forums, from talking to other Dazaholics, and from my own experiments with Daz Studio Iray. If you know of any additional Iray techniques, please let us know in the comments section below.

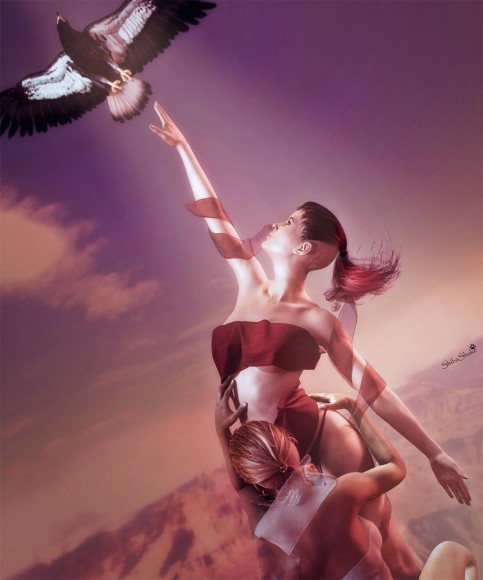
Girl reaching upward for a flying bird (signifying knowledge, dreams, or more) while another holds her down to earth.
Daz Studio Iray Tips ad Tricks

1. Mesh Lights

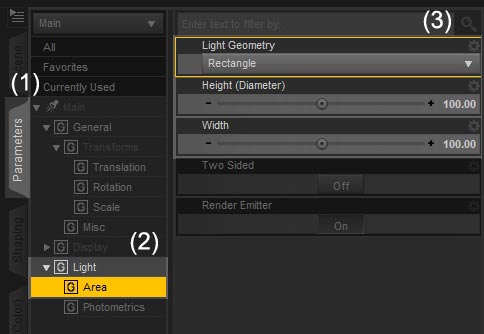
Mesh lights are extremely useful for lighting an Iray scene because it provides soft and more realistic shadows. One of the best ways to get a mesh light in Iray, is to convert a spotlight into a mesh light. We can easily do this by –

  1. Select our spotlight and click on the parameters tab.
  2. Click on Light > Area.
  3. Set the Light Geometry drop-down menu to Rectangle, and set the height and width parameters according to the mesh light size that you want. A larger mesh light will product softer shadows, and a smaller mesh light will produce harder shadows.
Screenshot of a spotlight's Light > Area parameters.
How to change a spotlight into a mesh-light.

And that is it! Our spotlight has now become a mesh light, and the really cool advantage is that we can still change our camera to the spotlight view, and see exactly what it lights. Similarly, we can change a point light into a sphere, so that it produces softer shadows.

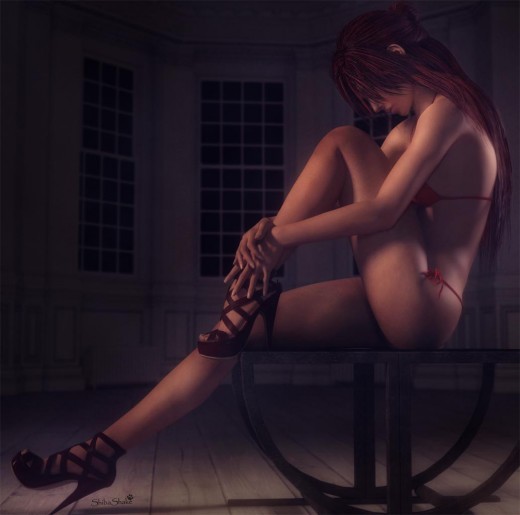
I usually use an IBL to provide ambient light in my scene, and multiple mesh-lights to further accent my figure(s). In the scene below, I only used two mesh-lights.

Victoria7 in heels, in a pin-up pose, on a chair at night. She is looking down and seems alone and lonely.
Soft shadow pin-up scene of woman in heels. Only used two mesh-lights in this scene.

2. Fuller Hair

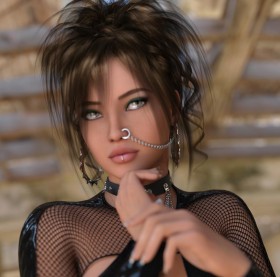
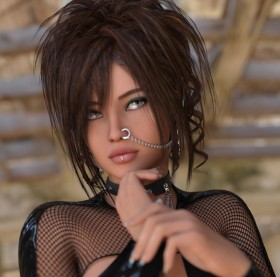
Woman with face jewelry with one hand under her chin. She has thin, wispy, hair.
Example of thin, wispy hair in Daz Studio Iray.

A common problem that I faced in Iray is that certain hair props or figures may appear very wispy or thin. As I understand it, this is a problem with the hair transparency map not being strong enough, i.e. not white enough.

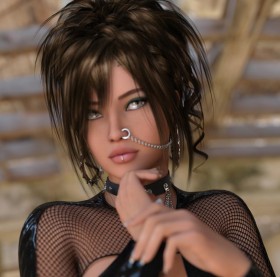
Woman with face jewelry with one hand under her chin. She has thicker and fuller hair.
Hair is thicker and fuller now with the Cutout Opacity parameter set to 2.

One very easy way to fix this problem is to –

  1. Select our hair object and click on the Surfaces tab.
  2. Select all the relevant hair surfaces, and look for the Cutout Opacity parameter.
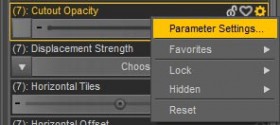
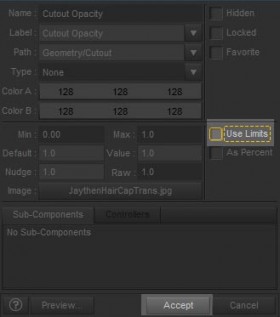
  3. Remove the limits on the Cutout Opacity parameter. To do this, click on the gear icon to the right and select Parameter Settings (see below). Then, un-check the Use Limits box and click Accept in the pop-up box.
  4. Set the Cutout Opacity parameter to a value greater than 1 depending on how much we want to strengthen the visibility of our hair strands. Setting a value that is too high may make things too strong, and lose the wispy look of our outer hair strands.
Screenshot of how to get the Parameter Settings pop-up for our hair Cutout Opacity parameter.
How to remove the max limit on our hair Cutout Opacity parameter.
Screenshot on how to remove limits from our hair Cutout Opacity parameter (part 2).
Un-check the Use Limits box and click Accept

One very important thing to note is that removing the limits on the Cutout Opacity parameter, also changes the transparency map of all selected surfaces to the same image. Therefore, if we are changing several surface layers at once, we need to make sure that all their transparency maps match. Otherwise, the wrong transparency map will be used.

Instead of using Cutout Opacity, we may also lighten our transparency map in a separate image editing software. This method gives us more control over which parts of the hair we want to strengthen, and which parts we want to leave wispy.

What I do in Photoshop –

  1. Load my hair transparency map.
  2. Duplicate the transparency map into an additional layer.
  3. Set the layer blending option of my duplicate layer to Screen.
  4. I can change the opacity of this layer to control how much additional volume I want to add to my hair. I can also use masks to control which area I want to strengthen.
  5. Once I am happy with the results, I merge both layers and save the transparency image to a new file.
  6. I replace the transparency map, in the Cutout Opacity parameter, with this new Photoshop-ed image.

I got this tip from Fred Winkler Art. Many thanks Fred! 😀

Woman with face jewelry with one hand under her chin. She has thicker, fuller, and more realistic looking hair.
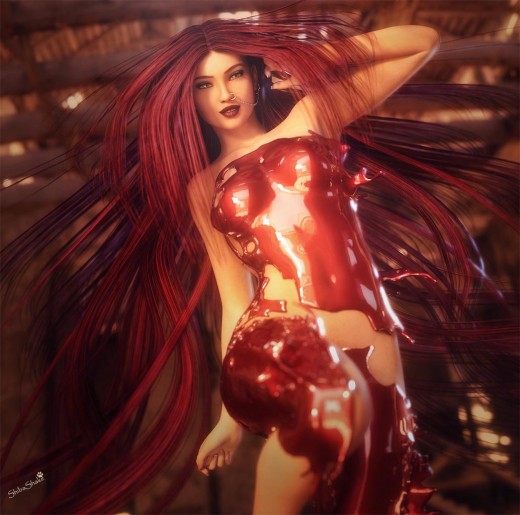
Using UHT Hair Shaders for Iray by Slosh.

Instead of mucking with transparency maps and fiddling with hair surface parameters, we can also use UHT Hair Shaders for Iray by Slosh. So far, I am very happy with this product.

  • It is easy to use,
  • I like the extra displacement and shine options it provides, and
  • It produces good results in most of my renders.
Girl with long red hair,  shiny eyes, and red paint on her body, doing a dance.
Lady with red hair, using UHT Hair Shaders for Iray by Slosh.

3. Shiny Eyes

Eyes appear shiny when the surface of our eye reflect the strong light sources in the environment. Therefore, to get lively, shiny eyes, there has to be one or more properly placed light sources to reflect off of.

For example, in the hair examples above, her eyes are shiny because they are reflecting some of the strong light areas in my IBL (image based light). Rotating my image map differently, will result in different eye reflections.

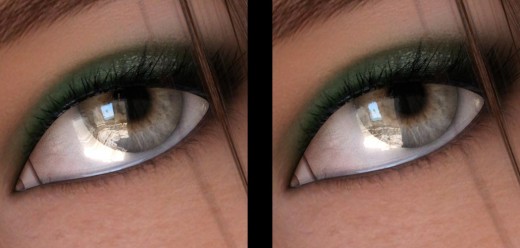
Sometimes, our light source may be properly placed, but the area of the eye that it affects (i.e. the area of reflection) may be too small to be discernible in my rendered image. In this case, we may increase the area of reflection by increasing the amount of cornea bulge in our figure.

Comparison of two eye renders. The one to the left has more reflection and is more shiny than the one to the right.
Left – Cornea Bulge set to maximum, larger reflection. Right – Cornea Bulge set to minimum, smaller reflection.

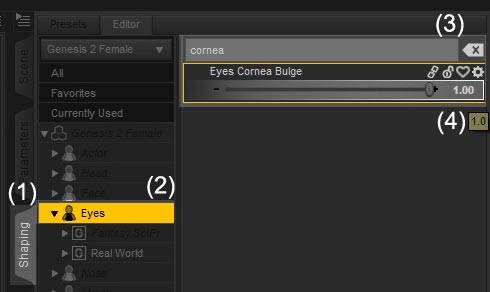
To achieve this –

  1. Select our figure and click on the Shaping tab.
  2. Open up our figure and click on the Eyes section.
  3. Enter cornea into the search box at the top to filter the shaping parameters that are shown.
  4. Set the Eyes Cornea Bulge parameter to maximum.
Screenshot of how to access and change the Cornea Bulge parameter for our human figure.
How to change the area of eye-reflection on our figures.
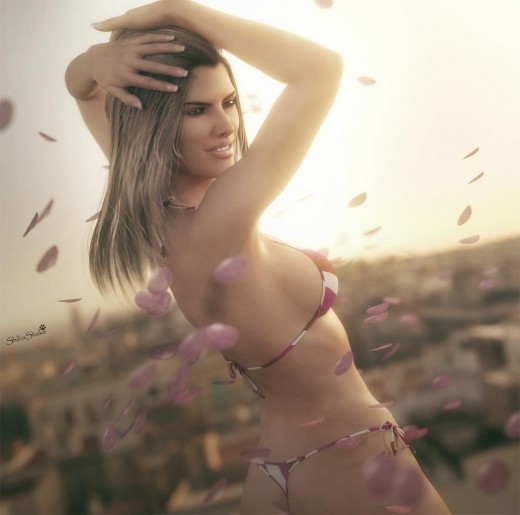
Victoria7 smiling and in a pin-up pose, with pink petals in the wind.
Victoria 7 swimsuit pin-up with shiny eyes and cornea bulge set to maximum.

4. Metal Shader Textures

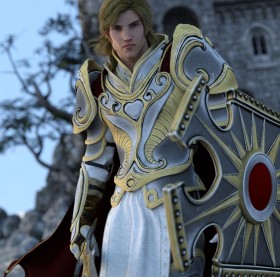
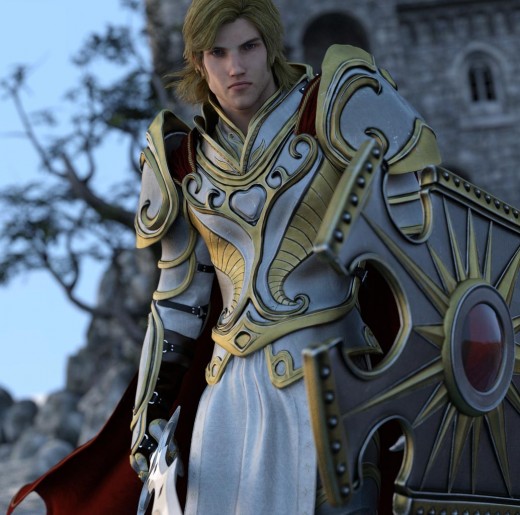
Blonde knight in Luthbel's Paladin for G2M armor, with sword and shield. Castle in the background.
(A) Knight in armor after applying Iray Uber shaders.

One of the early problems I encountered with Iray is how to have my original armor textures show, after I apply an Iray metal shader. For example, I am creating a knight in armor image (A) using Luthbel’s Paladin armor for G2M.

First of all, I just apply the Iray Uber shader to all the objects in my scene.

Next, I want to further refine my armor surfaces. In particular, I want to apply metal surfaces to appropriate parts of my knight’s armor. I also change the cloth surfaces to Iray velvet, and the leather surfaces to Iray leather.

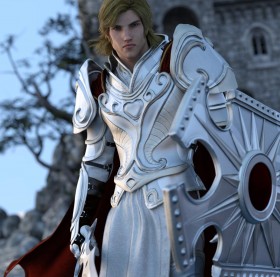
Blonde knight in Luthbel's Paladin for G2M armor, with sword and shield. Castle in the background.
(B) Knight in armor after applying Iray Steel-Galvanized shader.

In the next image (B), I Ctrl-clicked on the Iray Steel-Galvanized metal shader, so that my original textures are preserved, but still, the armor appears a flat shade of silver. All my original texture colors are not showing. Why?!

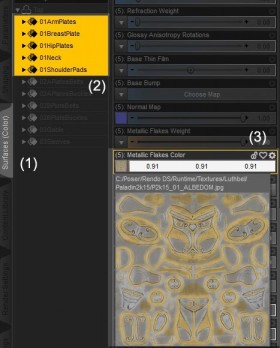
This is because my armor texture only appears in the Base Color parameter. However, for some metal shaders, there is a much stronger, additional, Metallic Flakes layer.

Screenshot of how to assign an image map to the  Metallic Flakes Color parameter.
How to have my original armor textures show after applying an Iray metal shader.

If I want my original armor textures to show, I will need to load those textures into the Metallic Flakes Color parameter.

  1. I go into the surfaces tab.
  2. I select all the metal surfaces on my armor object.
  3. I note which image map is used in the Base Color parameter, and apply the same image to the Metallic Flakes Color parameter.

After I apply the Base Color image maps to the Metallic Flakes Color parameter, I get a more metallic looking armor with my original textures (C) – Success!!

Blonde knight in Luthbel's Paladin for G2M armor, with sword and shield. Castle in the background.
(C) Knight in armor after setting the Metallic Flakes Color image map, to my original armor textures.

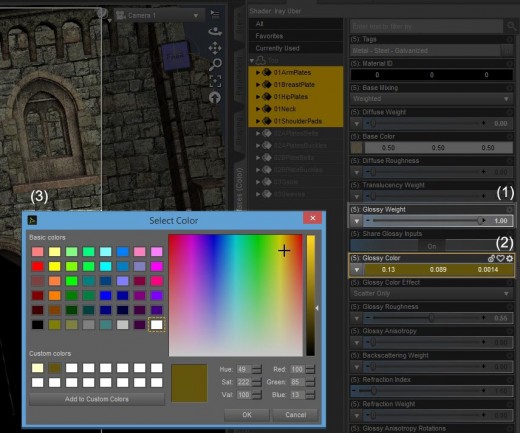
Next, I can enhance the glossiness of my metal surfaces by –

  1. Setting Glossy Weight to 1,
  2. Removing the image map from Glossy Color,
  3. Setting the Glossy Color to an appropriate color. In this way I can tint my armor to whatever I want. For example, in this composition I want my armor to appear somewhat golden, so I play around with the Glossy Color until I find something that I am happy with. Once I find it, I drag and drop that color into my Custom colors panel so that I can easily apply it to other metal surfaces.
Screenshot of how to change the Glossy Weight and Glossy Color.
How to increase the glossiness of our armor and tint it appropriately.

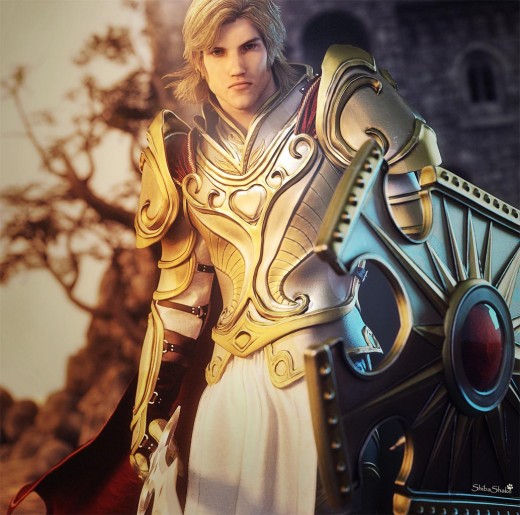
Now that I have all the materials set up properly, I add in some lights to highlight my figure, and then finish with some post-work in Photoshop.

I am still learning the ins and outs of Iray, so if you have more Iray tips, please post them in the comments section below. Many thanks!
Blonde knight in Luthbel's Paladin for G2M armor, with sword and shield. Castle in the background.
Final Golden Knight image with post-work in Photoshop.

Check Out the Latest Sales at Daz3D

daz sale banner
DAZ Studio FREE 3D MODELS AND SOFTWARE

Leave a Reply Cancel reply

Your email address will not be published. Required fields are marked *

Comments

  1. G.Carlo says

    December 6, 2020 at 12:10 am

    Very Helpful, thanks!!!!

    Reply
  2. Stevie3d says

    October 15, 2018 at 12:04 am

    Thank you for taking the time to share your tips and workflow. I’ve learned a lot from you.

    I read once that setting the cornea bulge to 150% was the best way to get good eye reflections. I use that for head on shots.

    Reply
  3. Xavii says

    July 28, 2018 at 12:49 pm

    Wonderful site, great tutorials AND great art! So happy I found it.
    I recently moved from Poser to Daz, mostly for iray renderer which I love but – this is fourth day I try to get the lights. It seemed so straight forward in Poser but in Daz there are so many settings plus iray, as far as I see, is really tricky re. lighting and I simply am lost and close to get mad.
    In Poser I was able to achieve dark, moody light, lighening, say, half of figure’s face, with no problem. In Daz – I spent last 6 hours trying to figure out how to do it with absolutely no effect. How do you achieve results like in these two images?
    https://thinkdrawart.com/wp-content/uploads/2015/07/Red1.jpg
    and particularly this one https://thinkdrawart.com/wp-content/uploads/2016/02/EvaPortrait2.jpg
    I went through your tutorials and actually got more understanding on how lights work in Daz/iray but I am completely dumb when it comes to one simple thing – my scenes are very dark in viewport, render lighter (still not the light I want…) OR they are greatly looking in viewport and then rendering aither too light or too dark. No idea what to do. Hope you will, well, lighten this up 🙂

    Reply
    • shibashake says

      August 1, 2018 at 10:20 pm

      There are some environment lights that do mood lighting. I think Dimension Theory has some of those. In terms of how I light my scenes, I have a couple of tutorials where I describe what I do in detail. https://thinkdrawart.com/how-i-light-my-daz-studio-iray-scenes

      In terms of viewport vs. rendered image, the GL viewport doesn’t show environment lighting, nor does it show shadows or occlusion. There is an Aux Viewport that I think will give a more accurate view, but I don’t use it so can’t say much about it. https://www.daz3d.com/forums/discussion/220966/aux-viewport-iray-pause

  4. Suze says

    June 2, 2018 at 10:15 am

    I would love a tutorial on emmisives and how to set/control them in a scene so they don’t blow it out and look harsh. I’d like them to look more realistic like real lights glow. I had a difficult time recently with florescent light tubes in a warehouse. Needed enough like so workers could see, but not so harsh.

    Another area where I struggle is indoor lighting and making it soft. All my renders come out too bright and I can’t figure out where to put my mesh lights to get the right look, whether it be soft and romantic or brighter and more clear.

    Thanks for providing this tutorial here. It was very good and a technique I can use right away.

    Reply
    • shibashake says

      June 2, 2018 at 10:31 pm

      Tutorial on how I use emissives –
      https://thinkdrawart.com/light-emitting-shaders-and-surfaces-in-daz-studio-iray

      More on how I get soft lighting effects –
      https://thinkdrawart.com/5-ways-to-create-soft-lighting-effects-in-daz-studio-photoshop

      Hope this helps. 🙂

  5. Lucinda Atman says

    June 1, 2016 at 7:08 pm

    Thank you for sharing these. I will make good use of the info. I like that you write things clearly with lots of illustrations and bold print. Very easy to understand!

    Reply
  6. darren bixman says

    November 14, 2015 at 12:42 am

    I love your work, thank you for shareing
    sincerel
    Darren Bixman

    Reply
    • shibashake says

      November 14, 2015 at 9:36 pm

      Thank you very much Darren! We hope you will consider becoming a site patron. 🙂

  7. Daren Wilson says

    August 17, 2015 at 8:51 am

    Fantastic tutorial collection. Particularly the tips on fuller hair.
    The new iray renderer has really made all the difference in the world to daz studio. Can’t wait to see other software providers adopting the iray tech.

    For anyone who has never used the free 3d software DAZ Studio, get it here http://www.daz3d.com/daz_studio

    Reply
  8. Ippotamus says

    August 1, 2015 at 5:46 am

    Really enjoyed this article.
    Thank you!

    I did not know about the fuller hair settings. 🙂

    That soft shadow pin-up is gorgeous lighting.
    So amazing only from two mesh lights.
    Lighting is just so much easier in Iray.
    But the materials become more difficult. 🙂

    Reply
    • shibashake says

      August 1, 2015 at 10:18 pm

      Thank you Ippotamus.

      Yeah, Iray is a lot of fun and I am really loving how it renders things. Materials are also fun to play with although as you say, it can be time consuming to tweak and tweak. 🙂

      If you know of any additional techniques or problem areas, please share them here. I think the two areas that I am planning to explore next are light emission profiles and water.

    • Ippotamus says

      August 3, 2015 at 4:46 am

      Sounds great.
      I hope you mean like lakes, ponds and ocean types.
      That would be very useful for me indeed. 🙂

Recent Posts

  • Duality of life and death represented by a day of the dead girl with black flowers and butterflies on her headdress surrounded by skeletons. Gothic fantasy woman art. Daz Studio Iray image.What Does Our Art Say About Us?
  • Side by side face comparisons of out-of-the-box Millawa 8 face and skin and multiple tweaked Millawa 8 face and skin.Making Skin Pop with the Daz Studio Iray Uber Shader - Part 2
  • Side by side Victoria 8.1 face comparison of Daz Studio's PBR Iray Skin Shader and the Iray Uber Shader..Making Skin Pop with the Daz Studio Iray Uber Shader - Part 1
  • Item used: VR X01 BYOS Modular by Studio360.3D-Art Contest Winners ~ April 2020
  • Qualifying item used Inside Linday's Daz Studio Iray Scenes by Linday3D-Art Contest Winners ~ March 2020

Recent Comments

  • Side by side face comparisons of out-of-the-box Millawa 8 face and skin and multiple tweaked Millawa 8 face and skin.Making Skin Pop with the Daz Studio Iray Uber Shader – Part 2
    • Adil
      - Hi,I hope everything is good at your end. Please if you can help me with light scene duf file for ...
    • jane
      - I can not write 0.24 or 0.24 after 0. doesnt work. would you share your settings?
  • Duality of life and death represented by a day of the dead girl with black flowers and butterflies on her headdress surrounded by skeletons. Gothic fantasy woman art. Daz Studio Iray image.What Does Our Art Say About Us?
    • Plaiades
      - Dear Shiba,i am a long time admirer of your art and have missed you in the DAZiverse. Over a year ...
    • K Smith
      - Thank you for sharing this, a lot of it resonated with me and I know some of the pain you have been through. ...
  • Side by side Victoria 8.1 face comparison of Daz Studio's PBR Iray Skin Shader and the Iray Uber Shader..Making Skin Pop with the Daz Studio Iray Uber Shader – Part 1
    • Foxy
      - Hi, can you save your settins and share with us?

Copyright © 2023 · Genesis Skins by ShibaShake · Terms of Service · Privacy Policy ·