Think, Draw, Art!

for art lovers

  • Home
  • Gallery
  • Contact
  • Recent Articles
  • Article Categories
    • Daz Studio
    • 3D Art
    • 2D Art
    • Contest
You are here: Home / Daz Studio / How to Create Fantasy Art in Daz Studio (for Beginners)

How to Create Fantasy Art in Daz Studio (for Beginners)

We are a Daz3d affiliate and we use affiliate links in our pages.

by shibashake 15 Comments


I just started with Daz Studio about 3-4 months ago, and I must say that I am really loving it. Why?


DAZ Studio 4 - Create 3D Art for Free
  • Daz Studio is free!
  • I like the Daz Studio interface. It is fast, smooth, and intuitive. It did not take me very long at all to get comfortable with it.
  • I like the Daz Studio lights. I am very much a newbie when it comes to lighting, but with some simple distant lights and the Uber Environment2 light, I was able to get nice looking scenes with very little effort. I just need to point my distant lights at the right place, and I am done. No positioning needed! I will talk more about this later.
  • I like the Daz Studio renderer. It is quite fast and allows for rapid prototyping. I usually push down render quality and image size for my initial test shots, and then push them back up for the final shot.
  • I like where Daz Studio is headed. There have been a lot of cool features added into Daz Studio in recent times that allow for some great renders (sub-surface scattering, object instancing, subdivision surfaces, collision detection, and more). I mostly do figure based images, and that is where the Daz Studio system really shines. From what I have read, it is weaker when it comes to environment based scenes. However, I think the future looks very bright.
Lady with long hair sitting on a Siberian Tiger.
Fantasy art rendered in Daz Studio 4.6 Pro. Post-work in Photoshop.

In this tutorial I will talk about my early process in using Daz Studio to quickly start creating cool looking fantasy art. I also discuss my favorite figures, environments, and the simple lighting system that I used.

1. Figure, Clothes, and Environment

Screen-shot of the Daz Studio smart content pane.
How to easily navigate through our Daz Studio content by using the smart content pane.

The first step is to determine what we want to put in our image. For a start, putting in one figure is the simplest, so that is what we will do. One simple way to do this is to –

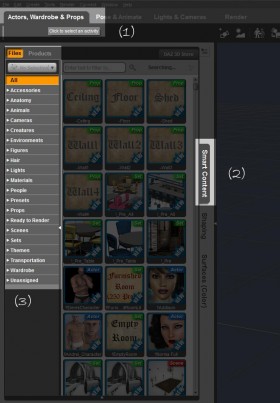
1. Click on the Actors, Wardrobe & Props tab on the top left corner of the interface.

2. Make sure we have the Smart Content tab selected on the right of our content pane.

3. This gives us a list of content objects that we currently have available. Note, to get a full list of content objects, we want to make sure that we do not have any objects selected in our scene.

We can see all the objects in our scene by looking at the right-most panel in our Daz Studio interface, and clicking on the Scene tab. For example, in the screen shot below, we have one object in our scene – the Genesis figure.

Selected objects are highlighted in yellow. If we select the Genesis figure, note that the categories on the Smart Content pane to the left will shrink to only show those elements that are related to our selected object.

Clicking on empty space on the Scene pane to the right will deselect all objects.

Full screen-shot of the Daz Studio Interface, showing all three default panes.
Screen-shot of full default Daz Studio interface.

Content will automatically appear on the Smart Content pane if we install them using the Daz Install Manager (DIM), which we can get and install for free. Then, when we buy products at Daz, they will automatically appear on our DIM interface for download and installation.

The Daz Install Manager is easy to use and very convenient. I highly recommend it.

If there are problems with our Smart Content pane, here is an article from Daz on Why isn’t the Smart Content Pane Working?

a) Adding a Figure

Selecting Figures >> People >> Female >> Real World from the Smart Content pane to add a figure into our scene.
Adding a figure using the Smart Content pane.

At this point, we can simply go with our pre-loaded Genesis figure, or alternatively, we can delete it and add our own figure. To delete an object, simply select it in our Scene pane, and hit the Delete key.

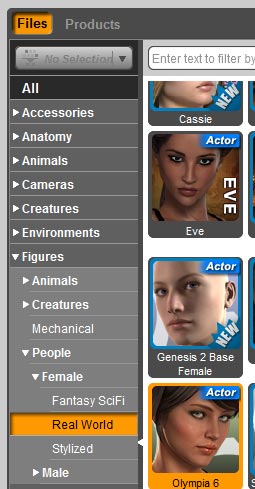
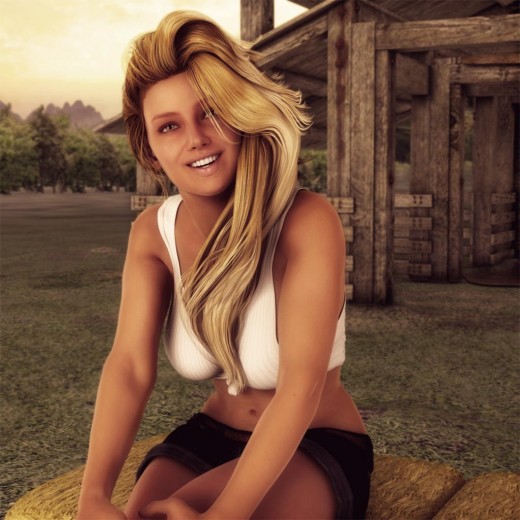
Daz Studio comes with the basic Genesis figures, and we can get additional figure morphs from the Daz Store. We can get to our available figures by clicking on the Figures category in our Smart Content pane. There are further sub-categories after that. For example, in the screen-shot to the right, I have selected Figures >> People >> Female >> Real World and then I double click on the Olympia 6 actor to add it to my scene.

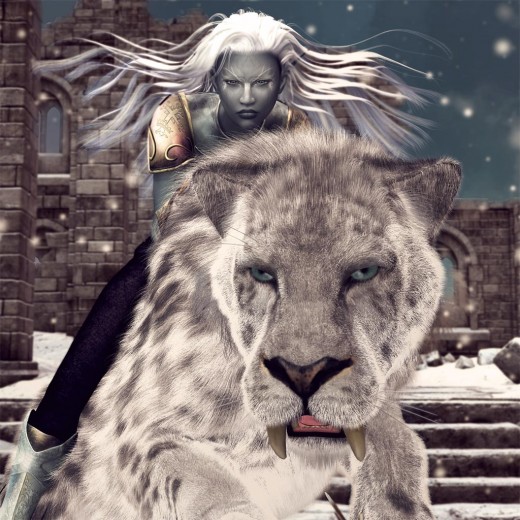
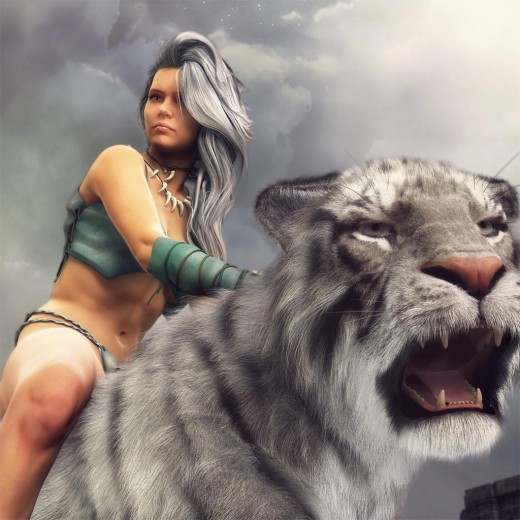
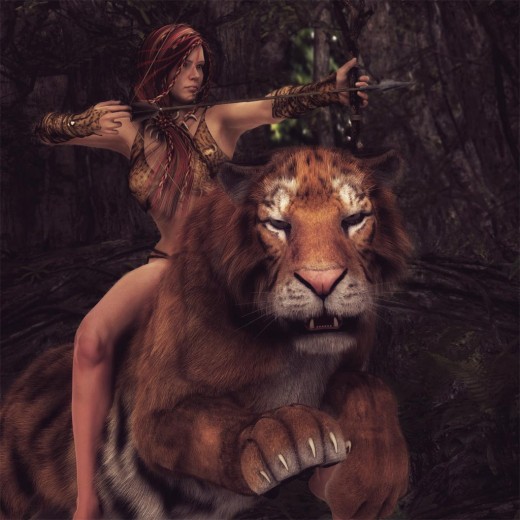
For figures, I really like the Olympia 6 figure, and also characters by Fred Winkler Art. The first image on this article as well as the image below are examples of the Olympia 6 figure.

The good aspect and bad aspect of the same woman figure. The good aspect has white hair and more conservative white clothing. The bad aspect has horns for headwear, and more revealing black clothing.
The Olympia 6 figure wearing two different styles of fantasy clothing.

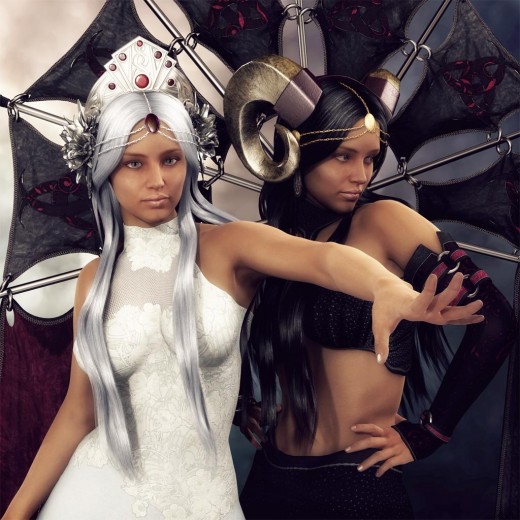
In the beginning, I only use one figure or at most two. We can still create very nice looking images with single figures if we pose it right, and set it off with the right clothing and environment.

Close-up of a cute farm girl with blonde hair, sitting on some bales of hay, in front of a stable.
Interesting scene with a close-up of just one figure. I used Olympia 6 here as well.

b) Adding Clothes

Selecting clothing for our Olympia 6 figure from our Smart Content pane.

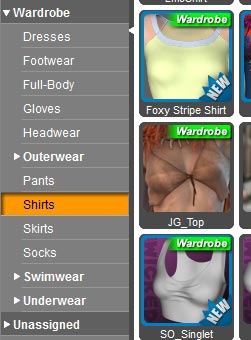
To add clothing, I simply select my Olympia figure in the Scene pane to the right, and then select Wardrobe on my Smart Content pane.

This will show me all the clothing items that are available for this character.

Note that a big part of the power of the Genesis figure comes from its Auto-Fit tool. This tool is included in the Daz Studio installation and it allows us to fit clothing from older generation figures (e.g. Victoria 4) onto our new Olympia or Genesis 2 figure. This gives us access to a wide range of clothing items.

We do not need to do anything with this now, but just keep it in mind for later when we start looking for a greater range of content.

Asian woman with long black hair, wearing a low-back-scoop red dress, looking contemplative at sunrise.
One of my very early renders with Daz Studio. Single figure with a one click background environment by Stonemason (Streets of Asia 2).

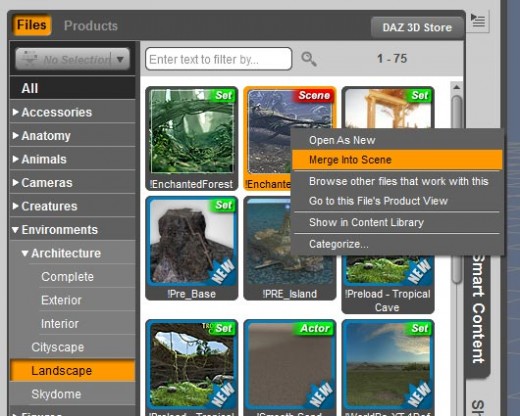
c) Adding an Environment

For environments, you definitely want to check out Stonemason. His environments are not only great looking, but they are also very well created, so that navigation is smooth and rendering is fast in Daz Studio.

Environments also usually categorized under the Environments option as well as under Props (look at Props >> Architecture or Props >> Landscape).

Sometimes, clicking on an environment will cause it to want to over-write our existing scene. One interesting trick I discovered is to right click on the environment tile instead. This will open up a drop-down menu, and we can pick the Merge Into Scene option to merge our selected environment into our existing scene.

Some people prefer to render the figure separately, and then combine it with various backgrounds later on, by using image manipulation software such as Photoshop or GIMP.

Indeed, this was the process I used in the past because it allows for very rapid prototyping. However, it restricts the use of interesting camera angels, shadows, and lighting.

Screen-shot of the environment objects in our Smart Object pane.
Merging an environment into our existing scene.

2. Posing

To pose a figure, simply
1. Select the figure in the Scene panel on the right of our interface.
2. Click on the Pose and Animate tab at the top
3. Select the Poses >> By Function category in our Smart Content pane.
4. Double click on a pose tile to apply it to our selected figure.

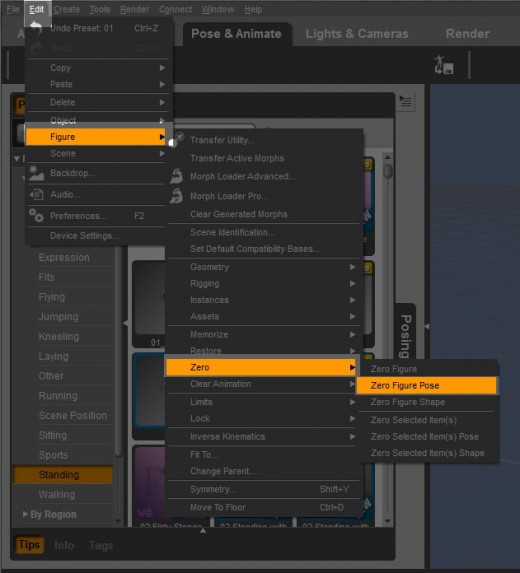
To zero out the pose of a figure,
1. Select the figure in the Scene panel.
2. Select Edit menu from the top of the Daz Studio interface.
3. Then select Figure >> Zero >> Zero Figure Pose.

There are also options for zeroing out the figure shape, or zeroing out only particular parts/items of the figure. Zeroing-out a figure pose removes all pose applications on *all* the elements/children within the figure.

Screen-shot of the drop-down menus we go through to zero-out a figure pose.
How to zero-out a figure pose.

For more unique renders, we can also compose multiple poses together.

Warrior woman riding on a tiger while shooting a bow and arrow.
Composed pose for Olympia figure – riding pose and archery pose. Fantasy art rendered in Daz Studio 4.6 Pro with simple distant and UE2 lights. Post-work in Photoshop.

3. Very Simple Lights

One of the things I absolutely love about Daz Studio is that I was able to light my scene really easily, even as a newbie.

The two lights that I used in the beginning are-
a) Distant Light

Drop-down menus on how to create a new distant light.
Creating a new distant light.

Distant lights have direction but no position, so they are very easy to use. The easiest way to understand a distant light is to consider sunlight. It has direction, but the sun is so far away, that for all intents and purposes, its light rays are parallel to each other from a given direction. That is what a distant light approximates – sunlight.

To create a distant light, we go to the Create menu up top, and select New Distant Light. Then, we simply change the direction of the distant light to illuminate different parts of our scene.

White knight in shining armor sitting on a white Siberian Tiger, battling with a large dragon.
Fantasy art rendered in Daz Studio 4.6 Pro with Distant Lights and the UE2 light. Post-work in Photoshop.

b) Uber Environment2 Light

The main purpose of the Uber Environment light is to provide indirect lighting to our scene. There are many ways to provide indirect lighting or global illumination. The UE2 light uses image based lighting.

To add a UE2 light,
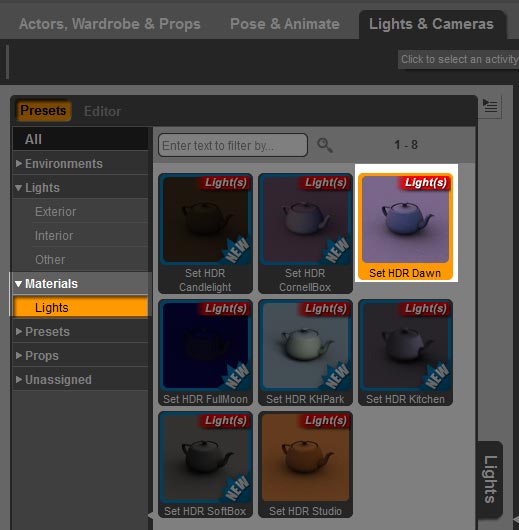
1. I click on the Lights & Cameras tab up top.
2. I select Lights >> Other in my Smart Content panel.
3. I right-click on the UberEnvironment2 Base tile, and select Merge Into Scene.

Screen-shot of what to do to add a UE2 light from the Smart Content panel.
How to add an Uber Environment2 light.

4. I select the UE2 light in my Scene panel.
5. I go to Materials >> Lights on my Smart Content pane, and then double click on one of the tiles to apply it to my UE2 light. This applies an image to our UE2 sphere.

Screen-shot of how to apply and environment map to our UE2 light sphere.
Apply environment map to our UE2 light sphere.

For more on UE2 lights, refer to-

  • Beginning Help with Uber Environment 2.
  • UberEnvironment2 User Guide.

Like distant lights, UE2 does not need a position. We can rotate the UE2 sphere to change the lighting from its environment map. However, for my early simple scenes, that is not really necessary.

Many of my early Daz Studio renders uses just one or two distant lights, and a UE2 light. I then do some post-work in Photoshop to adjust contrast, brightness, saturation, and more.

Dark elf woman riding on a white saber-tooth tiger. Snowy ruins background.
This image won the Daz PC monthly contest in December 2013. I started learning Daz Studio the month before, in November.

Related Articles

Carrara - Head Modeling for Beginners

One of the reasons I got Carrara was so that I could create my own character faces. However, I had a difficult time finding good tutorials on how to do this using Carrara. This is a simple beginners tutorial on how to model heads and faces using Carrara.

Poser, Daz Studio, Carrara - Which One Should I Use?

For rendering 3D-pictures and figures we can use Poser, Daz Studio, or Carrara. Poser is the oldest and most mature. However, Daz Studio has many features and new add-ons that are not available on Poser. In addition, it is free. Carrara has some great environment effects and some cool tools such as vertex editing. We consider which one to use for our computer generated pictures.

How to Make a Fantasy Background - Fantasy Sky

This tutorial outlines how to make a simple fantasy background using Photoshop. Making our fantasy background involves 5 simple steps which we will describe in detail. This tutorial is for beginners and also includes some free fantasy background downloads for your own personal use. Have fun and enjoy!

Check Out the Latest Sales at Daz3D

DAZ Studio FREE 3D MODELS AND SOFTWARE

Comments

  1. Santosh says

    July 7, 2018 at 4:29 am

    I really loved the examples you used. Would love to see some more and maybe some tutorials too, on how to create them.

    Reply
    • shibashake says

      July 10, 2018 at 11:33 pm

      Thank you very much! I pretty much use the same process in all of my images. https://thinkdrawart.com/pre-and-post-work-images-redhead-warrior-woman-fantasy-art

  2. Dawn says

    July 25, 2017 at 1:45 am

    Firstly, these tutorials are amazing. I am really new to Daz3D and having worked through the built in samples and user documentation I was looking for something to take me a bit further. Your tutorials fill that gap perfectly, please, please, please do more!
    Secondly, are there any tips you would have to help put characters onto other objects, like the cats here, or beds, or chairs etc. Mine just seem to look “perched” on them, rather than blending in. Either that or they are overlapping somewhere!

    Reply
    • shibashake says

      July 31, 2017 at 11:45 am

      Thank you so very much Dawn. Sorry for the late reply, but had a difficult week with one of my pups.

      In terms of posing characters with objects, the key thing for me is to not be too afraid of collisions. When I sit on a chair, for example, my flesh gets pushed around some to conform to the chair. So when I pose my 3D figure, I make sure to set her down low enough that it looks like she is actually resting on the object surface, with a flatter (possibly with collision) rear and the right shadows. In contrast, a round rear will look more like she is floating on top of the object, because there is not enough contact and dispersion.

      You can possibly also use the smoothing+collision parameter to control for collisions or perhaps Zev’s rear morphs. I haven’t tried those tho, so not sure how well they work.

  3. Michael says

    April 21, 2017 at 6:14 am

    Hey, I just wanted to take a moment to thank you for sharing all of this. I am a newcomer to Daz3D myself, and in addition, new to graphic art as a hobby (I have no prior experience other than art classes up through high school). Thanks in part to your tutorials here, I have already been able to create some renders that I am very proud of, given my lack of experience and skill. Keep doing what you do; you are amazing.

    Reply
    • shibashake says

      April 21, 2017 at 5:48 pm

      Thank you Michael. This means a lot and is greatly appreciated.

  4. Dan Strelek says

    April 4, 2017 at 10:40 am

    Shibashake, thanks for these extensive tutorials. I stumbled on to your page by doing a general google search looking for Daz tutorials, seeing as how I’ve JUST started myself. Needless to say I’ve bookmarked your site. These tutorials are well written and well organized. I especially appreciate the links to other topics you have written on. You’ve put quite a lot of work into this, and it shows. Trust me, it is greatly appreciated by this neophyte!

    Reply
    • shibashake says

      April 5, 2017 at 12:10 am

      Thank you Dan! Writing is definitely a challenge for me, so I am very happy to hear this. Always difficult to stop rendering and start writing. πŸ˜€

  5. Jayne Wilson says

    April 13, 2016 at 5:21 pm

    Awesome artwork πŸ™‚ Olympia 6 is my favorite character too.

    Reply
  6. James says

    February 25, 2016 at 12:41 pm

    Daz is additive. The work I see some people doing with it is beyond amazing. It would be interesting to see an update of this article after a year, to see what you think of all the new additions to the program since this came out.

    Reply
  7. sandeep says

    November 7, 2015 at 9:25 pm

    please tell me how to use figures

    Reply
  8. Dave says

    July 22, 2014 at 2:10 am

    Wonderful art! I have been using daz for a while and am on a mission to improve the final look of my art, I’m especially interested in post work. Alot of your pictures say “post work in photoshop” i would love it if you would consider talking a bit about what steps you like to take in photoshop, what you change, focus on etc and any techniques / tips / tricks. Any chance of that?? <3

    Reply
    • shibashake says

      July 22, 2014 at 3:15 pm

      Haha, yeah, I was planning to write a post-work article, but I haven’t gotten to it yet. I am a big procrastinator when it comes to writing. πŸ˜€

      Also, there are already so many Photoshop tutorials out there, that I hesitate to write another one.

      I love the tutorials on psdbox, so if you have the time, definitely check their stuff out. His tutorials are on photographs, but most of the techniques can be applied to 3D renders as well.

  9. Debbie Ruth says

    May 7, 2014 at 11:07 am

    Love the AWESOME ART WORK!!!:-):-) SO BEAUTIFUL!! AWESOME JOB, THANKS FOR SHARING!!!β™₯β™₯β™₯

    Reply
    • shibashake says

      May 9, 2014 at 8:07 am

      Thank you very much Debbie. πŸ˜€

Leave a Reply Cancel reply

Your email address will not be published.

Recent Posts

  • Item used: VR X01 BYOS Modular by Studio360.3D-Art Contest Winners ~ April 2020
  • Qualifying item used Inside Linday's Daz Studio Iray Scenes by Linday3D-Art Contest Winners ~ March 2020
  • Qualifying item used –Z Beauty Poses for Kalea 73D-Art Contest Winners ~ February 2020
  • Qualifying item: - Li'l Scrap Boy HD for Genesis 8 Male by Pixeluna3D-Art Contest Winners ~ January 2020
  • Qualifying items used –Ancient Tomes by Merlin Studios3D-Art Contest Winners ~ December 2019
  • Shiba contest qualifying Item used: Mech Dancer Outfit3D-Art Contest Winners ~ November 2019
  • Shiba contest qualifying items used – Greeble City Blocks, Greeble City Blocks 2, Greeble City Blocks 3; and Greeble City Blocks 04 by Stonemason.3D-Art Contest Winners ~ October 2019
  • Shiba Contest Featured Vendor Petipet. Used: Car Edi, Unicycle Bob, Bus Maxis, Bus Pegasus & Motorbike ZAZ3D-Art Contest Winners ~ September 2019
  • Qualifying item for shiba contest - Z Almost Human Poses by Zedicuss3D-Art Contest Winners ~ August 2019
  • Qualifying items used – Rei HD for Genesis 8 Female by Mousso.3D-Art Contest Winners ~ July 2019

Recent Comments

  • Sexy Fantasy woman with horns, standing in water, surrounded by skulls. Fantasy art. Daz Studio Iray image render.Why Is There Noise in My Daz Studio Iray Render and How to Remove It
    • Dorf
      - Can you tell me what asset you used for the abs on the girl with horns? Or is it a custom morph?
  • Sexy darked haired fantasy woman sitting on the floor with lace dynamic cloth draped around her. Night time fantasy art scene with fireflies.Daz Studio Dynamic Cloth (dForce) Tutorial for Beginners
    • Carlos Moreno
      - Magnifico tutorial, he aprendido muchisimo...para un ignorante como yo es una gran avance. Gracias, ...
  • Girl with pink hair, pink dress, and pink petals blowing in the wind. Daz Studio dForce Iray picture. Fantasy Art.How to Save a Daz Studio dForce Frame as a Morph
    • Frank Rizzo
      - First, thank you for this and your other articles. I hope I'm not too late in contributing this:In ...
    • emu
      - I have been trying to apply this to dForce hair, but the result does not really match the original simulated ...
  • White haired fantasy girl being embraced from behind by a smiling horned Devil. Red portal with glowing letters in the background.Top 6 Fantasy Art Environments for Daz Studio
    • Sam
      - thank you so much for these! Your page has been a great help for a beginner like me ^^ is it possible ...
  • Catwoman sitting on a papasan chair with several cats around her. Moon in the background.How to Save a Single Frame in Daz Studio
    • Mike
      - This works great except for one problem. I realize this article was posted a few years ago and this problem ...
  • Cute cat girl fantasy pin-up art with folded arms and standing in a forest or woods. Fantasy art rendered in Daz Studio Iray.Best Fantasy Women Skins, 3D-Art
    • - Can I ask how you got the Tigerlily skin on a G8F figure?
  • Girl reaching upward for a flying bird (signifying knowledge, dreams, or more) while another holds her down to earth.Daz Studio Iray Tips and Tricks
    • G.Carlo
      - Very Helpful, thanks!!!!
  • Blonde haired sci-fi elf girl with sword, standing next to an owl robot. Fantasy sci-fi woman art. Daz Studio Iray image.What Is Daz Studio?
    • Shanique
      - Hey please check your inbox on deviantart ASAP, I’ve been trying to reach out to you. Thanks
  • Screenshot of the Environment Map interface in Daz Studio Octane.How to Set-Up Camera, Lights, & Displacement in Daz Studio Octane
    • dmc
      - In my case I turned up the intensity of the spherical light. In Octane:(1) Select the Sphere-Default ...

Copyright © 2021 · Genesis Skins by ShibaShake · Terms of Service · Privacy Policy ·