When Daz Studio’s new dynamic cloth system (dForce) was released, I was happy with some of the simulation results I got. However, I had trouble with older V4 cloth items that were created to work with Poser. After a bit more experimentation though, I was able to get even older items to work with very satisfying results, so I am fast becoming a big fan.
With dForce, I can not only use Poser dynamic dresses on Genesis figures, but also older V4 dresses that did not autofit well on Genesis.
In this tutorial, I will outline how I simulate two V4/Poser dynamic cloth items (the over-sleeves and over-skirt from Angeloi – the Outfit) on a Genesis 8 Female figure. The final result is shown in the image below. You may also view a larger version in my Daz Gallery.

1. Add Cloth Items and Pose Figure
- We start by adding a Genesis 8 Female figure.
- Add in a floor or background environment so that there is a ground collision item for our cloth simulation. In my example scene, I add in the Oremus set.
- Go to our Poser directory and add in the over-sleeves and over-skirt props from Angeloi – the Outfit.
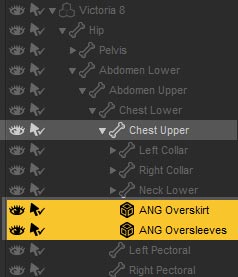
- Next, parent both cloth items to Chest Upper in our Genesis 8 figure (see right). At this point, I only add in items that are necessary for the cloth simulation. More objects (or geometry) in the scene, especially on the figure, will slow down the simulation.
- Go to the Pose tab and frame 0 in our timeline.
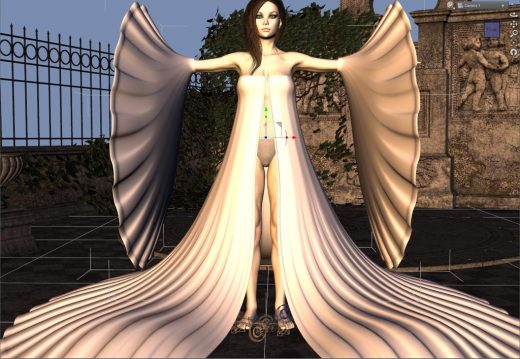
- In the first frame, set our G8F figure to the old T-pose (see below). We can do that by using a pose converter product such as the one by Zev0 or RiverSoft Art. Some pose packs may also contain the T-pose.
- To give our cloth items time to properly drape, we also want to increase the number of frames in our timeline. I set my total number of frames to 51, but you can adjust this to suit your scene and taste.
- Go to frame 15 and set the end pose of our figure. In this way, we have 15 frames to simulate the cloth into our figure end-position, and 35 frames for the cloth to drape.
This finishes our figure set-up. Next, we work on the cloth simulation parameters.
2. Daz Studio Dynamic Cloth Setup
- First, we want to set up our global simulation parameters. To do that, open up the Simulation Settings pane.
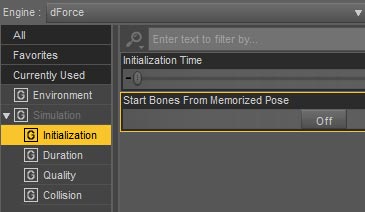
- Go to Simulation > Initialization and set Start Bones From Memorized Pose to Off (see right).
[List and descriptions of all global cloth simulation settings.]
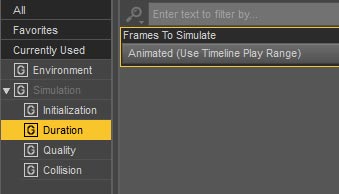
- Go to Simulation > Duration and set Frames to Simulate to Animated (Use Timeline Play Range) (see right).
- Now we are ready to add dynamic cloth settings to our cloth objects. Go to the Scene tab and select both the Angeloi oversleeves and overskirt objects.
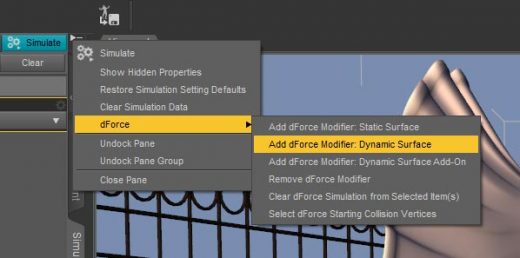
- On the Simulation Settings pane, click on the Options Menu button (the little button with a triangle and lines) next to the blue Simulate button. Select dForce > Add dForce Modifier: Dynamic Surface (see below). This will make both selected objects dynamic and add new cloth simulation parameters in the Surfaces tab.
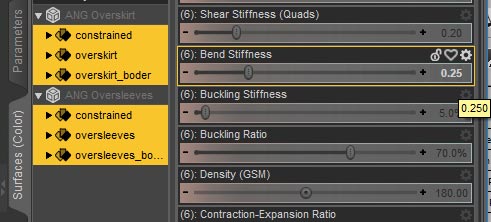
- Go to the Sufaces tab and click on Editor. Select all surfaces and change the Bend Stiffness parameter from 0.5 to 0.25 (see below). This will help prevent exploding meshes. Mephoria has more useful tips on exploding meshes in the Daz Forum.
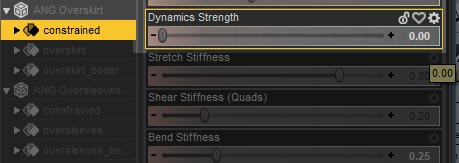
- Select ANG Overskirt > constrained and set the Dynamics Strength parameter to 0 (see below). This will hold the top of the over-skirt together.
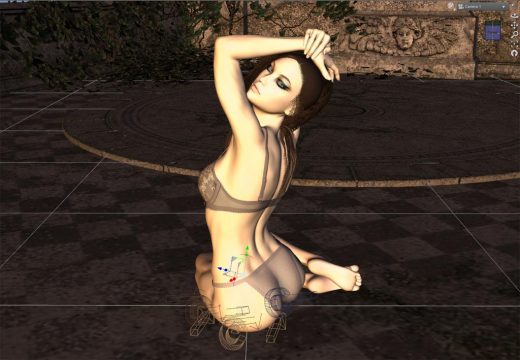
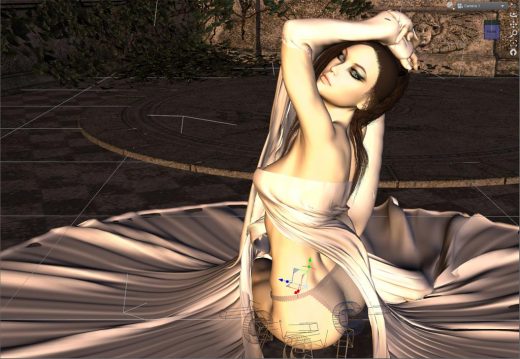
This finishes our cloth simulation settings. Now go to the Pose tab, click on the blue Simulate button, and enjoy the cloth simulation! At frame 15, we get the simulation image below.

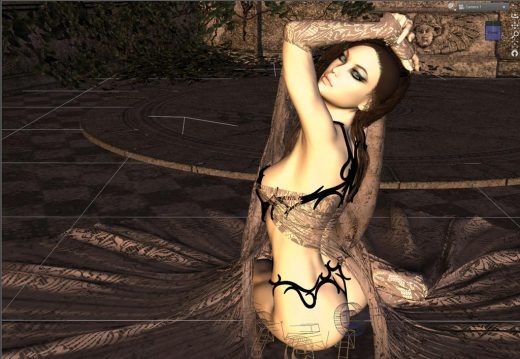
At frame 51 we get the final simulation image.
3. Adjust and Finish
We may adjust draping by changing the initial rotation of our figure. Alternatively, we can tweak any of the interim poses or add in new key-frames. Once we are happy with the simulation, we finish up our scene by –
- Smoothing out the geometry of our cloth items,
- Applying appropriate Iray shaders, and
- Adding in new objects and details to our fantasy scene.
- Go to the Scene pane and select both the Angeloi over-sleeves and over-skirt objects. Do Option Menu (triangle + lines button) > Edit > Geometry > Convert SubD and Option Menu > Edit > Geometry > Add Smoothing Modifier. Both of these operations will help to smooth out our cloth items.
- Go to Parameters > General > Mesh Smoothing and set Collision Item to our Genesis 8 figure. This helps to remove pesky poke through between our cloth objects and fantasy female figure.
- There may also be some collisions with the floor. Therefore, I slightly move the floor down until the collisions are no longer visible. For this reason, I like to start with the floor a bit raised during the cloth simulation.
- Next, we add in details, accessories, and more, to enrich and finish up our scene. In my Sultry Night scene, I added in the Bean Sidhe outfit on my figure, as well as some fireflies as a light accent.
- Finally, apply appropriate Iray shaders on surfaces that need them, and we are done!
After render and postwork, I get the finished fantasy woman image below.
Daz Studio dForce Q&A
- When should I fit the dynamic clothing and when not?
I fit clothing when there are pieces/surfaces within it that are not dynamic but should fit to the body. In this case, I fit the clothing, select the surfaces that should not be dynamic, go to the Surfaces pane, and set Visible in Simulation to Off.
- Will all clothing work with dForce?
The dForce simulator should work on any object, however, it may not work well on clothing objects that were not designed for it. For example there may be unattached pieces that fly off, exploding meshes, etc. Here is a good list of reasons from Richard Haseltine.


I tried to do this and the pose pulled the sleeves inward and covered and draped over her hands.
Actually figured it out. I messed with the timeline and simulation settings and the sleeves dropped quicker than her going into pose first.
Ahhh, great that you figured it out and thanks for letting us know.
An oldy but goody guide. Thanks so much for reminding me how powerful dForce is after coming back to DAZ. I am trying some new clothing items, but I am getting some melting of cloth off models at 100% Dynamic setting. Will just lowering that so that it doesn’t move that much keep it closer to the model or do I need to adjust global gravity?
I would try adjusting the dynamic setting slightly down first, but you can also do both. 🙂 I usually just try different things to see which works best.
This has been very helpfull, your tuts care nice and clear and to the point.
You wouldn’t happen to be thinking of doing one on how to make ony parts of an outfit dforce would you?
You can do that by setting Dynamics Strength to 0 for those surfaces that you do not want dForce on.
Boys. I have daz Studio, nvidia but I do not have Opengl for clothes simulation. can not be used… ? thats weird!.???. 🙂
You may need to update your graphics card driver. What error message are you getting? When does the message appear?
https://helpdaz.zendesk.com/hc/en-us/articles/207530473-OpenGL-and-DAZ-3D-Software
I’m sorry to be a slow learner – I’m still having trouble – tried this with the V4.2 (which Angeloi is made for) and the weird rigid tulip sleeves on the overgarment simply can’t be applied to posed figures at all and don’t drape. Followed all these steps with no results and no idea where things are going wrong.
When you go to frame 15 to pose, do you just *leave* the oversleeves where they were (which doesn’t work), or attempt to position them correctly? If the latter – how? Because they are paired and in a straight line and can’t be easily manipulated onto a posed figure with arms in a different configuration. I’m just confused.
I leave it. The simulation should take care of the transition. You need to run the dforce dynamic simulation on the sleeves. I think it only works with dynamic simulation (like dForce or dynamic cloth in Poser).
thank you!
Glad you like it and you are very welcome! 🙂
Great tutorial and explanation. It makes things understandable.
Thank you very much! Sooo valuable.
I am so glad. Thank you!
This is a fantastic tutorial! I’ve been struggling with understanding dForce and this allowed me to get perfect results. Thank you! –Mary/Canary3d
Thank you! I am so happy to hear this. Btw. love Robo-Knit. Great idea and texture looks great!
how to simulate pants and make it move with the foot.
I simulate it in the way described above and the cloth moves with the figure.
I haven’t gotten around to play with Dforce yet
This might be the push I need to start, since it’s a step to step tutorial without any in between comments to get me sidetracked lol
Thank you!
I really love it. Once you start, it is difficult to stop. 😀