Think, Draw, Art!

for art lovers

  • Home
  • Gallery
  • Contact
  • Recent Articles
  • Article Categories
    • Daz Studio
    • 3D Art
    • 2D Art
    • Contest
You are here: Home / Daz Studio / Cyborg Girl Fantasy Art and Blending Effects in Photoshop

Cyborg Girl Fantasy Art and Blending Effects in Photoshop

We are a Daz3d affiliate and we use affiliate links in our pages.

by shibashake Leave a Comment

I was playing around with goldtassel’s Two Phased Bob hair the other day, and thought it would look good on a cyborg character. This was perfect because I have also been wanting to try out the Pix – Synx skin for the longest time.

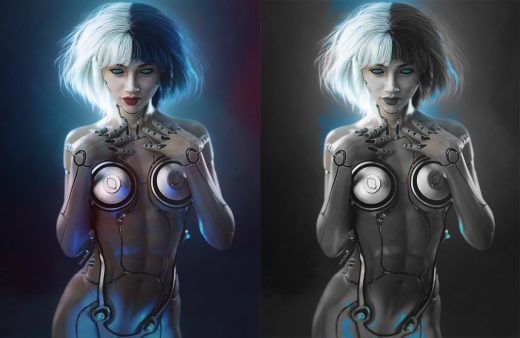
I decided to go for a simple Daz Studio scene that just focused on the character and hair. After rendering all my light layers in Iray and putting everything together in Photoshop, I got the more colorful image on the left (below).

Comparison of a colorful cyborg girl sci-fi fantasy image with an unsaturated version of the same picture.
Left – More colorful cyborg girl fantasy art from my usual Photoshop post-work process. Right – Unsaturated version of the cyborg girl image achieved with an adjustment layer and blending effects in Photoshop.

Creating an Un-Saturated Image

Photoshop screenshot of adding in a Hue/Saturation adjustment layer and converting my cyborg girl image into a gray-scale picture.
I add a Hue/Saturation adjustment layer and set the Saturation value to -100.

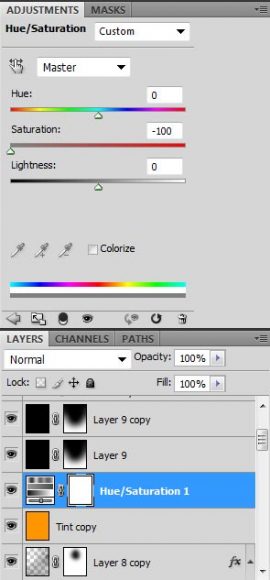
The initial image seemed a bit too colorful, so I wanted to see how the image would look in gray-scale (unsaturated). To do this, I add a Hue/Saturation adjustment layer in Photoshop (Layer > New Adjustment Layer > Hue/Saturation), after my completed image. I set the Saturation value to -100.

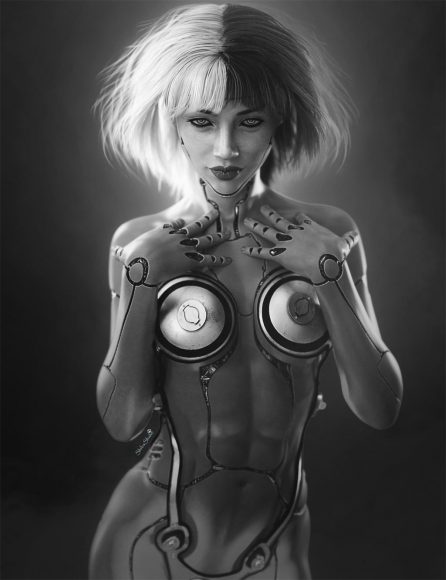
After adding my adjustment layer, I get the cyborg girl gray-scale image below. Unfortunately, it looks a bit drab without any color at all.

Cyborg girl fantasy art image after adding my adjustment layer with saturation value set to -100.
Gray-scale cyborg girl fantasy art image.

Using Photoshop Blending Mode to Get More Color

Photoshop screenshot of the layers' tab with the blending mode drop-down menu highlighted.
We can change our layer blending mode by going to the drop-down menu at the top of our layer’s tab.

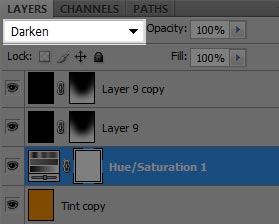
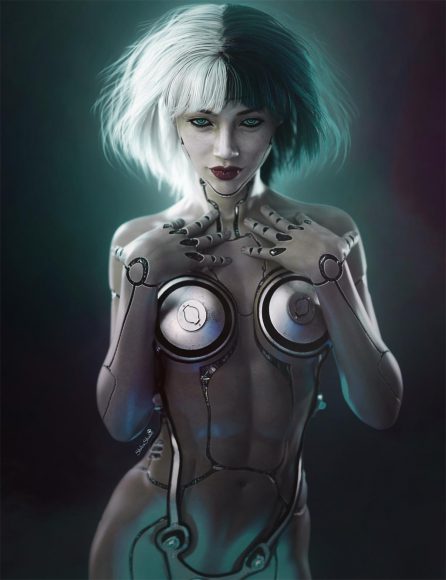
To get some interesting effects, I started playing around with different blending modes for my Hue/Saturation adjustment layer. We can change our layer blending mode by going to the drop-down menu at the top of our layer’s tab (see right). When I set the blending mode to Darken, I get the cool effect below.

Resulting cyborg girl fantasy image when blending mode is set to Darken.
Cyborg girl sci-fi fantasy image with blending mode set to “Darken” for our Hue/Saturation adjustment layer.

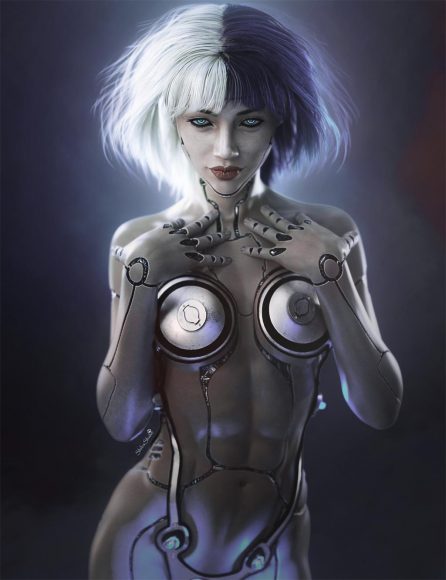
If I set blending mode to Lighten, I get a different color effect.

Resulting cyborg girl fantasy image when blending mode is set to Lighten.
Cyborg girl sci-fi fantasy image with blending mode set to “Lighten” for our Hue/Saturation adjustment layer.

Final Cyborg Girl Image

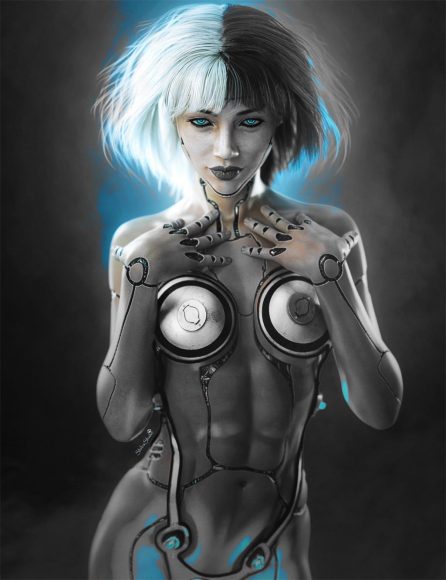
I finally settled on the Lighter Color blending mode, which is mainly unsaturated with strong blue highlights. After some further sharpening and contrast adjustment, I get my final image.

This was a fun exercise to see the different Photoshop blending mode effects. However, note that the results will be highly dependent on the colors of the original image.

Final cyborg girl fantasy image when blending mode is set to Lighter Color.
Cyborg girl sci-fi fantasy image with blending mode set to “Lighter Color” for our Hue/Saturation adjustment layer.

Related Articles

Pre and Post-Work Images - Redhead Warrior Woman Fantasy Art

Before and after image progression of my Redhead Warrior Woman Fantasy Art.

Step-by-Step Daz Studio Post-Work Tutorial

A step-by-step postwork tutorial on my Asian Girl with Pearls image. Scene was created in Daz Studio and initial light layers were rendered in Daz Studio Iray.

How I Combine Daz Studio Lights in Photoshop

Come see how I combine my various Daz Studio light layers in Photoshop, how I add color to lights, and how I modify light layers using Photoshop masks.

Check Out the Latest Sales at Daz3D

DAZ Studio FREE 3D MODELS AND SOFTWARE

Leave a Reply Cancel reply

Your email address will not be published.

Recent Posts

  • Item used: VR X01 BYOS Modular by Studio360.3D-Art Contest Winners ~ April 2020
  • Qualifying item used Inside Linday's Daz Studio Iray Scenes by Linday3D-Art Contest Winners ~ March 2020
  • Qualifying item used –Z Beauty Poses for Kalea 73D-Art Contest Winners ~ February 2020
  • Qualifying item: - Li'l Scrap Boy HD for Genesis 8 Male by Pixeluna3D-Art Contest Winners ~ January 2020
  • Qualifying items used –Ancient Tomes by Merlin Studios3D-Art Contest Winners ~ December 2019
  • Shiba contest qualifying Item used: Mech Dancer Outfit3D-Art Contest Winners ~ November 2019
  • Shiba contest qualifying items used – Greeble City Blocks, Greeble City Blocks 2, Greeble City Blocks 3; and Greeble City Blocks 04 by Stonemason.3D-Art Contest Winners ~ October 2019
  • Shiba Contest Featured Vendor Petipet. Used: Car Edi, Unicycle Bob, Bus Maxis, Bus Pegasus & Motorbike ZAZ3D-Art Contest Winners ~ September 2019
  • Qualifying item for shiba contest - Z Almost Human Poses by Zedicuss3D-Art Contest Winners ~ August 2019
  • Qualifying items used – Rei HD for Genesis 8 Female by Mousso.3D-Art Contest Winners ~ July 2019

Recent Comments

  • Cute cat girl fantasy pin-up art with folded arms and standing in a forest or woods. Fantasy art rendered in Daz Studio Iray.Best Fantasy Women Skins, 3D-Art
    • - Can I ask how you got the Tigerlily skin on a G8F figure?
  • Girl reaching upward for a flying bird (signifying knowledge, dreams, or more) while another holds her down to earth.Daz Studio Iray Tips and Tricks
    • G.Carlo
      - Very Helpful, thanks!!!!
  • Blonde haired sci-fi elf girl with sword, standing next to an owl robot. Fantasy sci-fi woman art. Daz Studio Iray image.What Is Daz Studio?
    • Shanique
      - Hey please check your inbox on deviantart ASAP, I’ve been trying to reach out to you. Thanks
  • Screenshot of the Environment Map interface in Daz Studio Octane.How to Set-Up Camera, Lights, & Displacement in Daz Studio Octane
    • dmc
      - In my case I turned up the intensity of the spherical light. In Octane:(1) Select the Sphere-Default ...
  • Girl with pink hair, pink dress, and pink petals blowing in the wind. Daz Studio dForce Iray picture. Fantasy Art.How to Save a Daz Studio dForce Frame as a Morph
    • emu
      - I have been trying to apply this to dForce hair, but the result does not really match the original simulated ...
    • Esse
      - Just great! Thank you so much.
  • Warrior woman riding on a tiger while shooting a bow and arrow.How to Combine Multiple Poses in Daz Studio
    • Jan Freeman
      - Totally awesome tutorial!! I was able to lock Mavka in DS in her violin playing pose, then pose her ...
  • Catwoman sitting on a papasan chair with several cats around her. Moon in the background.How to Save a Single Frame in Daz Studio
    • Perficimus
      - Well thanks for this!Problem + good solution poster = happy user!!! ;-)
  • Queen Elsa with ice wings and forming the heart or love sign with her hands. Magic or spell lights in the background and around her hands.How to Create Frozen’s Queen Elsa in Daz Studio
    • lord lethris
      - I been looking at doing this myself, and trying to find the right dress was impossible - until I stumbled ...
  • Woman exercising with two weights and covered in sweat. Daz Studio Iray render.How to Get Wet Skin in Iray
    • sreenivassan T
      - select skin under "character name" in the surface box.

Copyright © 2021 · Genesis Skins by ShibaShake · Terms of Service · Privacy Policy ·